5. Furnaces are equipped with permanent, washable filters. Clean
filters with tap water. Spray water through filter in opposite
direction of airflow.
6. Rinse and let dry. Oiling or coating of filter is NOT recom-
mended or required.
7. Reinstall filter(s).
8. Replace blower and control access doors.
9. Restore electrical power to furnace.
BLOWER MOTOR AND WHEEL
For long life, economy, and high efficiency, clean accumulated dirt
and grease from the blower wheel and motor annually.
The following steps should be performed by a qualified service
technician.
Some motors have prelubricated sealed bearings and require no
lubrication. These motors can be identified by the absence of oil
ports on each end of the motor. For those motors with oil ports,
lubricate motor every 5 years if motor is used on intermittent
operation (thermostat FAN selection in AUTO mode), or every 2
years if motor is in continuous operation (thermostat FAN selec-
tion in ON mode).
NOTE: Remember to disconnect the electrical supply before
removing access doors.
Clean and lubricate as follows:
1. Remove blower and control access doors.
2. Remove screws holding control support to blower deck, and
hold control assembly out of way.
3. Disconnect blower motor electrical leads from control. (See
Fig. 2.) Note location of wires for reassembly.
4. Remove screws holding blower assembly to blower deck and
slide blower assembly out of furnace.
5. Loosen screw in strap holding motor capacitor to blower
housing and slide capacitor out from under strap.
6. Mark blower wheel, motor, and motor support in relation to
blower housing before disassembly to ensure proper reassem-
bly.
7. Loosen setscrew holding blower wheel on motor shaft. Dis-
connect ground wire attached to blower housing.
8. Remove bolts holding motor mount to blower housing and
slide motor and mount out of housing. Do not loosen motor
mount belly-band bolt unless motor is to be replaced.
9. Lubricate motor (when oil ports are provided).
a. Remove dust caps or plugs from oil ports located at each
end of motor.
b. Use a good grade of SAE 20 nondetergent motor oil and
put 1 teaspoon, 5 cc, 3/16 oz, or 16 to 25 drops in each oil
port. Do NOT over-oil.
c. Allow time for total quantity of oil to be absorbed by each
bearing.
d. Wipe excess oil from motor housing.
e. Replace dust caps or plugs on oil ports.
10. Remove blower wheel from housing.
a. Mark cutoff plate location to ensure proper reassembly.
b. Remove screws holding cutoff plate and remove cutoff
plate from housing.
c. Lift blower wheel from housing through opening.
11. Clean blower wheel and motor using a vacuum cleaner with
soft brush attachment. Do not remove or disturb balance
weights (clips) on blower wheel blades. The blower wheel
should not be dropped or bent as balance will be affected.
12. Reinstall blower wheel by reversing items 10 a through c. Be
sure wheel is positioned for proper rotation.
13. Reassemble motor and blower by reversing items 5 through 8.
Be sure ground wire is connected as before.
Be sure the motor is properly positioned in the blower
housing. The motor oil ports must be within 45° of top of the
motor after the blower assembly has been reinstalled in the
furnace.
14. Reinstall and secure blower assembly in furnace.
15. Reinstall control assembly. Connect blower electrical leads to
control. Please note that the common wire connection is
3/16-in. terminal and all other wire connections are 1/4-in.
terminals for assembly. DO NOT FORCE.
16. Replace blower and control access doors.
17. Turn on electrical power and check for speed changes between
heating and cooling.
CLEANING HEAT EXCHANGER
The following steps should be performed by a qualified service
technician.
NOTE: Deposits of soot and carbon indicate the existence of a
problem which needs to be corrected. Take action to correct the
problem.
If it becomes necessary to clean the heat exchanger because of
carbon deposits, soot, etc., proceed as follows:
1. Turn off gas and electrical power to furnace.
2. Remove control and blower access doors.
3. Remove vent pipe from relief box.
4. Remove 2 screws that secure relief box. (See Fig. 2.)
5. After labeling wires, disconnect from the following compo-
nents:
a. Draft safeguard switch
b. Inducer motor
c. Pressure switch
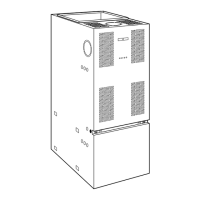
Fig. 2—Model 58YAV Upflow Furnace
A92063
C
OM
24V
HUM
GRYW
DRAFT
SAFEGUARD
SWITCH
FLUE
COLLECTOR
BOX
MOUNTING
SCREWS
RELIEF
BOX
CONTROL
FILTER
RETAINER
WASHABLE
FILTER
3
 Loading...