22
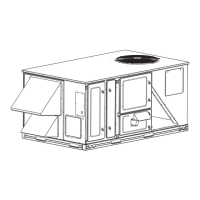
Fig. 35 provides an example of the unit.
1. Remove the 11 screws from the Safety Drain Tray and remove the tray along the direction of the arrows in Fig. 36.
2. Clean the tray and evaporator.
3. Use step 1 (in reverse order) to re-assemble the unit.
Fig. 37 —Fan Disassembly (024-036)
1. Horizontally push the fan assembly until it cannot move any further. See Fig. 37.
2. Lift up slightly and take it down to remove it.
3. After motor maintenance, reinstall the fan assemblies (apply steps in reverse order (step 2 then step 1)).
4. Connect the motor with electric control box.
4 Screw
For fixing the reinforced panel
FIiler
Motor Asseembly
Safety Drain Tray
11-Screw
For fixing the satety drain tray
Fortified panel
4 Bolts
For fixing the fan assembly