30
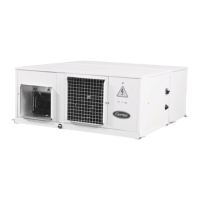
Air discharge
In these units the air discharge and supply (indoor and outdoor)
is factory-set as shown in Fig. 31. Alternative positions are
possible, as follows (Fig. 32):
Fig. 31 - Standard air supply and discharge
Fig. 32 - Alternative air supply and discharge (except
outdoor unit model 084)
A = Alternative
NOTE: In the 50TZ/YZ 060 and 40BZ 060 units the standard
indoor air discharge is through this panel.
Outdoor unit change
a) Detach discharge panel and access panel .
b) Remove the fan/motor assembly , loosening it from the
unit base and remove the duct .
c) Unscrew the angle irons in the fan/motor assembly .
d) Turn the fan/motor assembly by 180° and attach the
angle irons previously removed.
e) Fasten the fan/motor assembly in its new position.
f) Install the discharge panel and the access panel in
their new positions.
g) Remove supply air panel and access panel !.
h) Exchange the position of panels and !.
See Figs. 31 and 32.
S = Standard
NOTE: In the 50TZ/YZ 060 and 40BZ 060 units the standard
indoor air discharge is through this panel.
Legend Figs. 31 and 32
1 Indoor air discharge panel
2 Access panel
3 Indoor fan/motor assembly
4 Air filter panel
5 Access panel
6 Outdoor air discharge panel
7 Access panel
8 Air discharge duct
9 Outdoor fan/motor assembly
0 Outdoor air supply panel
! Access panel
Indoor unit change
a) Detach discharge panel and access panel .
b) Remove the fan/motor assembly , loosening it from the
unit base. In sizes 50TZ/YZ 060 and 40BZ 060 remove
the duct.
c) Unscrew the angle irons in the fan/motor assembly .
d) Turn the fan/motor assembly by 180° and attach the
angle irons previously removed.
e) Fasten the fan/motor assembly in its new position.
f) Install the discharge panel and the access panel in
their new positions.
g) Remove filter panel and access panel .
h) Exchange the position of panels and .
See Figs. 31 and 32.
 Loading...