EXAMPLE: (High-heat operation at 0—2000 ft altitude)
Furnace input from rating plate is 85,000 Btuh
Btu heating input = Btu/cu ft X cu ft/hr
Heating value of gas = 1050 Btu/cu ft
Time for 1 revolution of 2-cu ft dial = 90 sec
Gas rate = 80 cu ft/hr (from Table 12)
Btu heating input = 1050 X 80 = 84,000 Btuh In this
example, the orifice size and manifold pressure adjustment
is within ±2 percent of the furnace input rate.
NOTE: Measured gas inputs (high heat and low heat) must be
within ±2 percent of that stated on furnace rating plate when
installed at sea level or derated per that stated above when installed
at higher altitudes.
m. Remove jumper across R, W/W1, and W2 thermostat
connections to terminate call for heat.
5. Set air temperature rises.
Place SW-2 in ON position. Jumper R to W/W1 and W2 to
check high-gas heat temperature rise. To check low-gas heat
temperature rise, remove jumper to W2. Determine air tem-
perature rises for both high and low heat. Do not exceed
temperature rise ranges specified on unit rating plate for high
and low heat.
a. Place duct thermometers in return and supply ducts as near
furnace as possible. Be sure thermometers do not see heat
exchangers so that radiant heat will not affect thermometer
readings. This is particularly important with straight run
ducts.
b. When thermometer readings stabilize, subtract return-air
temperature from supply-air temperature to determine tem-
perature rise.
NOTE: If the temperature rise is outside this range, first check:
(1.) Gas input for low- and high-heat operation.
(2.) Derate for altitude if applicable.
(3.) Return and supply ducts for excessive restrictions
causing static pressures greater than 0.70-in. wc.
c. Adjust air temperature rise by adjusting airflow. Move the
RED jumper wire on the airflow selector control to MID,
HI, or M-HI for mid-point of the air temperature rise range,
high end of the rise range, or in-between, respectively. The
single RED jumper selection is used for both high- and
low-heat rises. Power need not be reset after making this
selection.
Recheck the temperature rise. It must be within the limits
specified on the unit rating plate. Recommended operation is
at midpoint of rise range or above.
6. Set thermostat heat anticipator.
a. When using a nonelectronic thermostat, the thermostat heat
anticipation must be set to match the amp draw of the
electrical components in the R-W/W1 circuit. Accurate
amp draw readings can be obtained at the wires normally
connected to thermostat subbase terminals R and W/W1.
Fig. 20 illustrates an easy method of obtaining actual amp
draw. The amp reading should be taken after blower motor
has started and furnace is operating in low heat. To operate
furnace in low heat, first move SW-2 to ON position,
THEN connect ammeter wires as shown in Fig. 20. The
thermostat anticipator should NOT be in this circuit while
measuring current. If thermostat has no subbase, the
thermostat MUST be disconnected from the R and W/W1
wires during the current measurement. Return SW-2 to
final desired location after completing the reading. See the
thermostat manufacturer’s instructions for adjusting heat
anticipator and for varying heating cycle length.
b. When using an electronic thermostat, set cycle rate for 3
cycles per hr, if possible.
CHECK SAFETY CONTROLS
The flame sensor, gas valve, and pressure switches were all
checked in the Start-up section as part of normal operation.
1. Check primary limit control.
This control shuts off the combustion control system and
energizes the circulating-air blower motor if the furnace
overheats.
The preferred method of checking the limit control is to
gradually block off the return air after the furnace has been
operating for a period of at least 5 minutes. As soon as limit
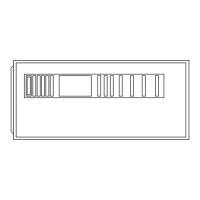
Fig. 18—Redundant Automatic Gas Control Valve
A97358
ON/OFF
SWITCH
INLET
PRESSURE
TAP
ON
O
F
F
MANIFOLD
PRESSURE
TAP
LOW-FIRE
ADJUSTMENT
ALLEN SCREW
(UNDER CAP)
HIGH-FIRE
ADJUSTMENT
ALLEN SCREW
(UNDER CAP)
Fig. 19—Burner Flame
A89020
BURNER FLAME
BURNER
MANIFOLD
24
 Loading...