7
24 25
3. Remove air filter from furnace.
• AIR FILTER LOCATED IN BLOWER COMPART-
MENT:
a. Slide filter retainer sideways until it is free of latch.
(See Fig. 24)
b. Gently remove air filter and carefully turn the dirty
side up (if dirty) to avoid spilling dirt from the filter
(see Fig. 25)
• AIR FILTER LOCATED IN FILTER CABINET:
a. Re-install door.
b. Slide air filter out of furnace. Keep dirty side up (if
dirty) to avoid spilling dirt. (See Fig. 32 and 33)
4. Inspect the filter. If torn, replace it.
26
NOTE:
If washable filter that was shipped with the furnace
has been replaced with:
a) Factory specified disposable media filter – Do not clean.
If dirty, replace only with media filter having the same
part number and size. Install with airflow direction arrow
pointing towards blower.
b) Electronic air cleaner (EAC) – Refer to EAC owner’s
Manual for maintenance information.
5. Wash filter (if dirty) in sink, bathtub, or outside with a gar-
den hose. Always use cold tap water. A mild liquid deter-
gent may be used if necessary. Spray water through filter
in the opposite direction of airflow. Allow filter to dry.
6. Reinstall clean air filter
7. Reinstall filter retainer (for blower compartment locations
only)
8. Replace control and blower doors (See Fig. 16 and 17) or
filter cabinet door (Fig. 34 and 35)
9. Turn on electrical supply to furnace (see Fig 18).
NOTE:
For upflow models only—if side return ducts are used,
2 filters may be required in some models.The procedure listed
above may be used to remove side filters.
•
Downflow/Horizontal Furnaces Only:
Two filters are located in the return-air plenum above the
blower (above line-of-sight) resting in the V-shaped channel
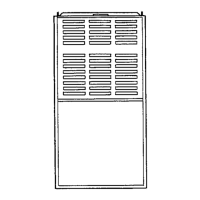
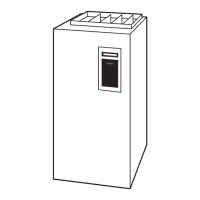
on top of the furnace. (See Fig. 27.)
1. Turn off electrical supply to the furnace. (See Fig. 21.)
2. Remove 2 screws from blower access door and remove
the door.
3. Remove the left-side filter by tipping the filter toward
the center and raising it from the V-shaped channel in
which it rests. (See Fig. 27 and 28.)
4. Lower filter down along side of the blower and remove
from the furnace.
5. To remove the right-side filter, lift from V-shaped channel
and remove through left side the same way as left-side filter.
6. Inspect the filter. If torn, replace the filter.
7. Wash the filter (if dirty) in a sink, bathtub, or outside
with a garden hose. Always use cold tap water. A mild
liquid detergent may be used if necessary. Spray water
through the filter in opposite direction of airflow. Allow
filter to dry.
8. Reinstall the clean filters.
27 28
9. Replace blower door and secure with 2 screws. Turn
ON electrical supply to your furnace. (See Fig. 18.)
UPFLOW FURNACE AIR FILTER TABLE
AIR FILTER LOCATED IN BLOWER COMPARTMENT
FURNACE
CASING
WIDTH (IN.)
FILTER SIZE (IN)
FILTER
TYPESide Return Bottom Return
14-3/16 (1) 16 x 25 x 1* (1) 14 x 25 x 1 Cleanable
17-1/2 (1) 16 x 25 x 1* (1) 16 x 25 x 1* Cleanable
21 (1) 16 x 25 x 1 (1) 20 x 25 x 1* Cleanable
24-1/2 (1 or 2) 16 x 25 x 1 (1) 24 x 25 x 1* Cleanable
AIR FILTER LOCATED IN FILTER CABINET
FILTER
CABINET
HEIGHT (IN)
FILTER
SIZE (IN)
FILTER
TYPE
16 (1) 16 x 25 x 1*
or (1) 16 x 25 x 4-5/16
Cleanable
Disposable
20 (1) 20 x 25 x 1*
or (1) 20 x 25 x 4-5/16
Cleanable
Disposable
24 (1) 24 x 25 x 1*
or (1) 24 x 25 x 4-5/16
Cleanable
Disposable
 Loading...