EasyManua.ls Logo

Cateye MITY 3 - User Manual

Cateye MITY 3
2 pages
Print Icon
To Next Page IconTo Next Page
Loading...
Precautions
Do not concentrate too much on the computer operations
while riding.
Be sure to securely mount the magnet, sensor and bracket
on your bicycle, and periodically check to insure they are
mounted securely.
Used batteries must be disposed of properly and in accor-
dance with all local regulations.
Do not leave the main unit exposed to direct sunlight. Never
disassemble the computer.
To clean the computer, use mild soap and a soft cloth. Wipe
dry with a soft cloth. Paint thinner, benzine, alcohol or other
chemicals may damage the surface.
Bracket
Secure the wire along the fork with the nylon ties
(S) 9, and wind it round the front brake cable up
to the handlebar.
Apply the rubber pad 8 to the bracket 1, and fix it
with the screw.
*The band is adjustable. To release the band, pull
it while pushing the area marked with
.
Note: Allow enough wire clear-
ance in the area marked
with
to insure you can
turn the handlebars all the
way from side to side
without pulling the wire.
Main Unit
Slide the main unit until it clicks into position. The
contact is automatically connected. To remove,
slide it forward while pushing the lever.
Test
Install the main unit onto the bracket 1. Spin the
front wheel and see if the speed appears in the
display. If not, re-adjust the position of the sen-
sor 3 and the magnet 7 so that it meets the con-
ditions
A
and
B
in the “Important” column.
SETTING UP
1 Bracket 7 Magnet
2 Wire 8 Rubber Pad
3 Sensor 9 Nylon Tie S (3 pcs.)
4 Sensor Band A (L&S) 0 Nylon Tie L (1 pcs.)
5 Sensor Band B q Screw
6 Attachment for Aerofork
Installation
Important
Attach the sensor and the magnet
properly so that their positions meet
the following conditions
A
and
B
.
Align the magnets 7 center
and the sensors 3 marking
line while rotating the wheel.
The clearance between the sen-
sor 3 and the magnet 7 should
be less than 5mm.
Sensor
Attach the sensor 3 temporarily to
the inside of the right front fork.
Applicable diameter of the sensor
band A 4:
(S) ------- 11-26ø front fork
(L) ------- 21-36ø front fork
If the clearance between the sen-
sor 3 and magnet 7 is wide,
mount the sensor band 45 in the
opposite way as shown.
In case of aerofork, apply the at-
tachment 6.
Magnet
Attach the magnet 7 to the right side spoke of the
front wheel. Adjust the position of the sensor 3 and
the magnet 7 so that it meets the conditions
A
and
B
in the “Important” column.
L(cm)Tire size
12 x1.75 94
14 x 1.50 102
14 x 1.75 106
16 x 1.50 119
16 x 1.75 120
18 x 1.50 134
18 x 1.75 135
20 x 1.75 152
20 x 1-3/8 162
22 x 1-3/8 177
22 x 1-1/2 179
24 x 1 175
24 x 3/4
Tubular
178
24 x 1-1/8 179
24 x 1-1/4 191
24 x 1.75 189
24 x 2.00 192
24 x 2.125 196
26 x 7/8 192
26 x 1(59) 191
26 x 1(65) 195
26 x 1.25 195
26 x 1-1/8 190
26 x 1-3/8 207
26 x 1-1/2 210
26 x 1.40 200
26 x 1.50 201
26 x 1.75 202
26 x 1.95 205
26 x 2.00 206
26 x 2.10 207
26 x 2.125 207
26 x 2.35 208
26 x 3.00 217
27 x 1 215
27 x 1-1/8 216
27 x 1-1/4 216
27 x 1-3/8 217
650 x 35A 209
650 x 38A 212
650 x 38B 211
700 x 18C 207
700 x 19C 208
700 x 20C 209
700 x 23C 210
700 x 25C 211
700 x 28C 214
700 x 30C 217
700 x 32C 216
700C Tubular 213
700 x 35C 217
700 x 38C 218
700 x 40C 220
Cross Reference
Table
CAT EYE MITY 3
CYCLOCOMPUTER
CC-MT300N
Instruction Manual
MITY 3
U.S. Pat. Nos. 4633216/4642606/5236759/5226340/5904442 and Pat. Pending
Design Patented
Copyright© 2001 CATEYE Co., Ltd.
CCMMT3N-011119 Printed in Japan 066600095 a
2
The speed sensor, handlebar bracket and wheel magnet
should be installed first.
NOTE: To utilize previously accumulated Odometer data, refer to
the section Manually Replacing Mileage into Odometer
described in the last section of this manual.
The following set up is required before use:
1. Find the Wheel Calibration Number
(Length of Tire Roll-Out)
Determine the length of the tire (Length in centi-
meters) from the Cross Reference Table. Alter-
nately, you can find the most accurate wheel cali-
bration number by rolling the tire on the ground.
In this method, properly inflate the tires, sit on the
bike and measure the distance of one wheel
length. This distance in centimeters is the most
accurate number. (Inches X 2.45 = Centimeters)
2. Perform the ALL CLEAR OPERA-
TION to clear the computer and
set the speed scale:
Press the SET Button while pressing the MODE
and START/STOP(S) Buttons (ALL CLEAR OP-
ERATION: Fig. 2). The entire memory of the
computer will be erased, and the complete
screen will light up and then all fade away, leav-
ing a flashing K on the screen. A press on the
MODE Button will display K and M alternately
(Fig. 3). Select your desired speed scale. Then
press the START/STOP(S) Button to set the
scale. The display moves to the next screen.
3. Set the Wheel Circumference.
The number 210 (typical wheel circum-
ference for 700x23C tires) will be dis-
played (Fig. 4).
Input the number from step 1 above.
Press the MODE Button to increase the num-
ber. Press the START/STOP(S) Button to
decrease it. You can fast forward the num-
bers by holding either buttons down.
Set the number by pressing the SET Button.
Your computer is now set up for riding.
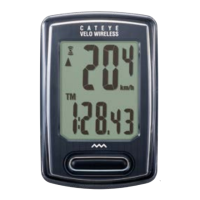
G.Lower Display
(Selected Function)
H. Mode Button
I. S Button
J. SET Button
K. Battery Cover
L. Contact
Setting Up the Computer
A. Upper Display
(Usually Current
Speed)
B. Mode Symbol
C. Average Pace Arrow
D. Speed Scale
E. Auto Mode Symbol
F. Wheel Selection
Symbol
Setting the CLOCK
For setting the CLOCK, the TIME function must be turned off and
the speed scale symbol (either M for Miles or K for Kilometers)
must not be flashing (Fig. 5). The CLOCK is set to either 24-
HOUR or 12-HOUR depending on the SPEED SCALE selected.
In K (kilometers), a 24-HOUR CLOCK is selected, while in M
(miles), a 12-HOUR CLOCK is selected.
1. In the TIME Function(Tm), hold down the MODE Button, the
mark will appear. This is an indication that you are in the
CLOCK function.
2. Press the SET Button. The HOURS will flash. Use the MODE
Button to change/advance the number, and the ST./STOP(S)
Button to switch between HOURS and MINUTES.
3. Press the SET Button to set the CLOCK.
7
1
5
4
8
3
45
3
0
6
7
3
7
3
on back
Clock
L cm
SET
on back
SET Button
Press
Fig. 1
ALL CLEAR
OPERATION
K (km) = kilometer
M (mile) = mile
Fig. 3
Fig. 4
Setting Range: 100 - 300 cm
Increases the
number
B
1
2
A
B
A
center
marking line
front fork
less than 5mm
3
4
lever
slide
Fig. 2
1
2
4
5
7
3
8
6
9
q
0
1
2
3
4
9
1
8
spoke
In case of aerofork
pull
push
®
OK
spin
L cm
Fig. 5
Switching
of Hours and Minutes
Set Up Completed
Question and Answer IconNeed help?

Do you have a question about the Cateye MITY 3 and is the answer not in the manual?

Summary

General Precautions

Setting Up

Installation

Instructions for mounting the sensor, magnet, and bracket on the bicycle.

Important Installation Notes

Critical alignment and clearance requirements for sensor and magnet.

Computer Setup Steps

Steps to set wheel circumference, speed scale, and perform all clear operation.

Setting the Clock

Procedure for setting the current time, including 12/24 hour format selection.

Operating the Computer

Mode Selection

How to switch between different display modes like TIME, AVERAGE SPEED, and TRIP DISTANCE.

Starting;Stopping the Recording

Instructions on how to start and stop the recording of ride data.

Manually Replacing Mileage into Odometer

Procedure to manually input previous odometer data.

Power Saving Function

Explanation of the power saving feature and how to activate it.

Overview

The CatEye Mity 3 (CC-MT300N) is a cyclocomputer designed to provide cyclists with essential ride data. This device measures and displays various metrics to help users track their performance and manage their cycling activities.

Function Description

The Mity 3 cyclocomputer offers a range of functions, categorized into main and sub-functions, accessible via the MODE button.

Main Functions:

  • Elapsed Time (Tm): Displays the duration of the current ride, ranging from 0:00:00 to 9:59:59. It can be reset.
  • Average Speed (Av): Shows the average speed of the ride, from 0.0 to 105 km/h (or 0.0 to 65 mph). Recording is possible for up to 27 hours or 999.99 miles/km. It can be reset. The Average Pace Arrow indicates if the current speed is faster or slower than the average speed.
  • Trip Distance 1 (Dst1): Records the distance of the current trip, from 0.00 to 999.99 km (or miles). It can be reset.

Sub-Functions:

  • Clock: Displays the current time, in 24-hour format (0:00-23:59) for kilometers or 12-hour format (1:00-12:59) for miles. It can be reset.
  • Maximum Speed (Mx): Shows the highest speed achieved during the ride, from 0.0 (4.0) to 105 km/h (or 0.0 (3.0) to 65 mph). It can be reset.
  • Trip Distance 2 (Dst2): Records a second trip distance, from 0.00 to 999.99 km (or miles). This function allows for single resetting only.
  • Total Distance (Odo): Displays the accumulated total distance, from 0.0 to 9999.9 / 10000 to 99999 km (or miles). This is the odometer reading.

Usage Features:

Setting Up the Device:

  1. Bracket Installation: The bracket is secured to the handlebar using a rubber pad and screw. The wire is routed along the fork and secured with nylon ties, ensuring enough slack for handlebar movement.
  2. Main Unit Installation: The main unit slides onto the bracket until it clicks, automatically connecting the contacts. A test involves spinning the front wheel to check for speed display; if not, the sensor and magnet positions need adjustment.
  3. Computer Setup:
    • Wheel Calibration Number (Tire Roll-Out): The wheel circumference (L) in centimeters is determined either from a cross-reference table or by rolling the tire one full rotation and measuring the distance.
    • ALL CLEAR OPERATION: Pressing the SET button while simultaneously pressing the MODE and START/STOP(S) buttons clears all memory (Odo data, speed scale, wheel setting, clock time) and sets the speed scale (K for kilometers or M for miles).
    • Wheel Circumference Setting: The calculated wheel circumference (L) is entered. The MODE button increases the number, and the START/STOP(S) button decreases it. Holding buttons down allows for fast forwarding/decreasing.
    • Clock Setting: With the TIME function active and the speed scale symbol not flashing, the clock can be set to 24-hour (K) or 12-hour (M) format. Holding the MODE button enters clock setting mode, then the SET button allows adjustment of hours and minutes using MODE and ST./STOP(S) buttons.

Sensor and Magnet Installation:

  • The sensor is temporarily attached to the inside of the right front fork. It is compatible with fork diameters of 21-36mm (S band) or 11-26mm (L band). For aeroforks, an attachment is used.
  • The magnet is attached to the right side spoke of the front wheel.
  • Important Alignment: The magnet's center must align with the sensor's marking line when rotating the wheel. The clearance between the sensor and magnet must be less than 5mm. If the clearance is wide, the sensor band can be mounted in the opposite direction.

Operating the Computer:

  • Changing Data Display: Pressing the MODE button cycles through main functions. Holding the MODE button for 2 seconds or longer switches to sub-functions.
  • Starting/Stopping Recording: The ST./STOP(S) button starts and stops the recording of TIME, AVERAGE SPEED, and DISTANCE 1 or 2. During recording, the speed scale (K or M) flickers.
  • Auto Mode (AT): The computer can be set to automatically start and stop recording based on wheel motion. This is activated by pressing the SET button in DISTANCE, TIME, or AVERAGE SPEED functions, displaying the "AT" symbol.
  • Moving Data to Upper Display: TIME, AVERAGE SPEED, or MAX SPEED can be moved to the larger upper display for easier viewing. In AUTO MODE, this is done by displaying the desired mode and pressing the ST./STOP(S) button. In non-AUTO MODE, it's done by holding the ST./STOP(S) button for 2 seconds.
  • Resetting Functions:
    • DISTANCE 1, TIME, MAX SPEED, AVERAGE SPEED: Simultaneously press MODE and ST./STOP(S) buttons for 1 second in any function other than Odo or Dst2.
    • DISTANCE 2: In Dst2 function, simultaneously hold MODE and ST./STOP(S) buttons for 1 second.
  • Wheel Setting A and B: The computer supports two wheel settings for different bike tire sizes. Wheel Setting "B" is optimized for low-speed sensitivity (e.g., mountain bikes). To select between "A" or "B", hold the SET button in any function other than ODOMETER. To check the current wheel setting number, simultaneously press ST./STOP(S) and MODE buttons in ODOMETER function. Holding the button for 3 seconds or longer in this state allows switching between "A" and "B".
  • Changing Wheel Setting Number: In ODOMETER function, press the SET button. The wheel setting number flashes. Use MODE to increase and ST./STOP(S) to decrease the number. Press SET to confirm.
  • Power Saving Function: If no signal is received for 60-70 minutes, the computer enters power saving mode, displaying only the CLOCK. Press MODE or ST./STOP(S) to wake it up.

Maintenance Features:

  • Cleaning: If the computer or bracket contacts get wet, dry them with a cloth to prevent rusting and speed detection errors. If dirt or sand jams the buttons, wash them away with water.
  • Battery Replacement: When the display becomes faint, it's time to replace the battery. Note Odo data before replacement. Insert a new CR2032 lithium battery with the (+) pole facing up. After replacement, perform the ALL CLEAR OPERATION and re-enter necessary settings (including Odo data if desired).

Troubleshooting:

  • No Display: Check if the battery has run out and replace it. Perform ALL CLEAR OPERATION.
  • Incorrect Data: Perform ALL CLEAR OPERATION.
  • Current Speed Not Appearing: Short-circuit the main unit contact several times with a metal piece. If speed appears, the issue is with the bracket or sensor. Check for damaged wires (replace bracket sensor if needed). Re-adjust sensor and magnet position (clearance approx. 5mm). Clean contacts on the main unit or bracket.

Manually Replacing Mileage (Odo) into Odometer: After an ALL CLEAR OPERATION (e.g., due to battery replacement), previously accumulated Odo data can be manually re-entered. After ALL CLEAR, select the speed scale, then hold the MODE button without pressing SET. The Odo and "0000.0" will display, with the 0.1 digit flashing. Use MODE to enter numbers and ST./STOP(S) to move digits. Press SET to confirm, then proceed to Wheel Setting function.

Important Technical Specifications

  • Power Supply: Lithium Battery (CR2032) x 1.
  • Battery Life: Approximately 3 years (for factory-loaded battery, life may be shorter).
  • Controller: 4-bit 1-chip Microcomputer (Crystal Controlled Oscillator).
  • Display: Liquid Crystal Display.
  • Sensor: No Contact Magnetic Sensor.
  • Applicable Wheel Circumference: 100cm - 300cm.
  • Applicable Fork Diameter: 110 to 360 (Sensor band S: 11-26mm, L: 21-36mm).
  • Length of Wire: 70cm.
  • Operating Temperature: 32°F - 104°F (0°C - 40°C).
  • Dimension/Weight: 1-13/16" x 1-17/32" x 9/32" [46 x 39 x 17mm] / 0.92 oz. [26 g].
  • Warranty: 2-Year Warranty for Main Unit Only (accessories/attachments and battery consumption excluded).

Precautions:

  • Do not concentrate too much on computer operations while riding.
  • Ensure secure mounting of magnet, sensor, and bracket, and periodically check their security.
  • Dispose of used batteries properly according to local regulations.
  • Avoid direct sunlight exposure to the main unit.
  • Do not disassemble the computer.
  • Clean the computer with mild soap and a soft cloth; avoid paint thinner, benzine, alcohol, or other chemicals.

Cateye MITY 3 Specifications

General IconGeneral
BrandCateye
ModelMITY 3
CategoryBicycle Accessories
LanguageEnglish

Related product manuals