Do you have a question about the Celestron PowerSeeker 114EQ and is the answer not in the manual?
Spread, extend, and level tripod legs, securing them properly.
Attach accessory tray, equatorial mount, secure bolt, and insert latitude screw.
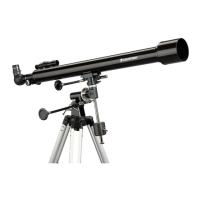
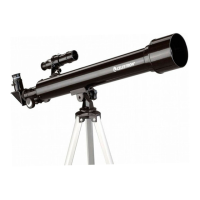
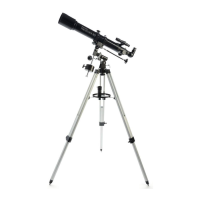
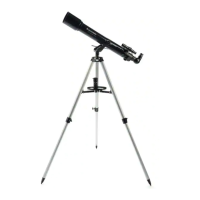
The Celestron PowerSeeker 114EQ and 127EQ are entry-level astronomical telescopes designed for amateur astronomers, offering a straightforward setup and user-friendly operation to explore celestial objects. These models are ideal for individuals new to stargazing, providing a complete package to begin their journey into observational astronomy.
The primary function of the PowerSeeker 114EQ and 127EQ telescopes is to magnify distant celestial objects, making them visible and detailed to the observer. Both models are Newtonian reflector telescopes, meaning they use a primary mirror to collect and focus light, which is then reflected to a secondary mirror and finally to the eyepiece. This design is well-suited for observing a wide range of astronomical targets, including the Moon, planets, star clusters, and brighter deep-sky objects like nebulae and galaxies. The equatorial mount, denoted by "EQ" in the model name, is a crucial component that allows the telescope to track celestial objects as they move across the night sky due to Earth's rotation. This tracking capability simplifies extended observations, keeping the object centered in the eyepiece without constant manual adjustments in both altitude and azimuth.
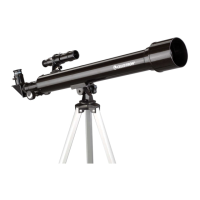
The optical tube assembly (OTA) houses the mirrors and is designed to be robust yet manageable. The 114EQ and 127EQ refer to the diameter of the primary mirror in millimeters (114mm and 127mm, respectively), which directly impacts the telescope's light-gathering capability and resolution. A larger aperture (like the 127mm) collects more light, resulting in brighter and more detailed views of fainter objects. The focuser, located at the side of the optical tube, allows for precise adjustment of the eyepiece to achieve a sharp image.
The included accessories enhance the telescope's versatility. Two eyepieces (typically a 20mm and a 4mm or similar combination) provide different magnification levels. The 20mm eyepiece offers a wider field of view and lower magnification, useful for locating objects and observing extended targets like star clusters. The 4mm eyepiece provides higher magnification for detailed views of the Moon and planets. A 3x Barlow lens further triples the magnification of any eyepiece it's used with, effectively expanding the range of available magnifications. The finderscope, a small auxiliary telescope mounted parallel to the main optical tube, has a wider field of view and lower magnification, making it easier to locate objects in the night sky before centering them in the main telescope's high-magnification eyepiece.
The equatorial mount itself consists of several key parts: the declination (Dec) axis and the right ascension (RA) axis. These axes are aligned with the celestial poles, allowing the telescope to follow the arc of celestial objects. Slow-motion control cables are attached to these axes, enabling fine adjustments to the telescope's pointing without directly touching the optical tube, which can cause vibrations. A counterweight and counterweight bar are essential for balancing the optical tube on the equatorial mount. Proper balancing ensures smooth movement and prevents strain on the mount's gears, making tracking easier and more stable.
The tripod provides a stable platform for the entire telescope assembly, minimizing vibrations that can degrade image quality. Its adjustable legs allow for leveling on uneven terrain and adjusting the observing height for comfort. An accessory tray attaches to the tripod's center leg brace, providing a convenient place to store eyepieces and other small accessories during an observing session, keeping them organized and within easy reach.
Setting up the PowerSeeker 114EQ or 127EQ is designed to be a straightforward process, even for beginners. The quick setup guide emphasizes a step-by-step approach to ensure proper assembly and functionality.
Tripod Setup: The first step involves spreading the tripod legs outward until fully extended and pushing down the center leg brace for stability. The legs are then extended further (6-12 inches) and secured with tightening screws, ensuring a level platform for the telescope. The accessory tray is then placed on top of the center leg brace and threaded into its central hole, providing immediate utility.
Mount Assembly: The equatorial mount is then placed onto the tripod's mounting platform, with its base passing through the central hole. A mounting bolt from underneath the platform secures the mount in place. The latitude adjustment screw is threaded into the equatorial mount until it touches the inside of the mount, allowing for adjustment to match the observer's geographical latitude, which is crucial for accurate equatorial alignment.
Counterweight and Slow-Motion Cables: The counterweight bar is threaded into the Dec axis of the equatorial mount. The counterweight is then slid onto the bar and secured, ensuring the telescope is balanced. The slow-motion control cables are attached to the RA and Dec gear shafts. The longer cable typically attaches to the RA axis, and the shorter one to the Dec axis, allowing for precise manual tracking and pointing adjustments.
Optical Tube Mounting: Before mounting the optical tube, the two knobs on the tube rings are removed. The optical tube is then placed onto the mount, aligning its mounting holes with the screws on the tube rings. The knobs are reattached and tightened to secure the tube firmly. It's important to ensure the focuser end of the telescope is positioned over the counterweight assembly for optimal balance.
Finderscope Installation: The finderscope is prepared by removing its plastic caps. It is then placed over the threaded posts at the focuser end of the telescope tube, ensuring the glass window faces towards the front of the tube. The knurled nuts are tightened to secure the finderscope. The finderscope will need to be aligned with the main telescope during daylight hours by centering a distant object in both the finderscope and the main telescope's eyepiece.
Eyepiece and Barlow Lens Usage: To begin observing, the plastic cap covering the end of the focuser is removed. The screw on the focuser is loosened to ensure it doesn't obstruct the eyepiece. The chrome barrel of the desired eyepiece (e.g., the 20mm) is inserted into the focuser, and the screws are tightened to secure it. For higher magnification, the 3x Barlow lens can be used. The Barlow is inserted into the focuser first (after removing its cap), and then the eyepiece is inserted into the Barlow, with both secured by set screws.
Observation: Once all components are assembled and the desired eyepiece/Barlow combination is in place, the lens cap from the front of the telescope is removed. The observer then looks through the eyepiece to view celestial objects. The slow-motion controls are used to make fine adjustments to center and track objects.
The equatorial mount, once properly aligned with the celestial pole, simplifies tracking. Instead of adjusting in two axes (up/down and left/right), the observer only needs to turn the RA slow-motion control to follow an object as it drifts across the sky. This makes extended observations, especially at high magnifications, much more enjoyable.
Maintaining the PowerSeeker 114EQ and 127EQ telescopes is crucial for ensuring their longevity and optimal performance. While the manual doesn't explicitly detail extensive maintenance, general practices for reflector telescopes apply.
Cleaning Optics: The most delicate part of the telescope is its optics (mirrors and eyepieces). Dust can accumulate on the primary mirror and eyepieces. For light dust, a can of compressed air (used carefully and held upright to prevent propellant discharge) or a soft camel-hair brush can be used. For more stubborn smudges or fingerprints, specialized optical cleaning solutions and microfiber cloths designed for optics should be used. It's critical to avoid touching the mirror surfaces directly and to clean them as infrequently as possible, as improper cleaning can scratch the delicate coatings. Eyepieces can be cleaned similarly.
Storage: When not in use, the telescope should be stored in a dry, dust-free environment. Keeping the dust caps on the front of the optical tube and on the eyepieces helps prevent dust accumulation. If possible, storing the telescope in its original packaging or a dedicated telescope case can provide additional protection from impacts and environmental elements.
Mechanical Components: The mechanical components, such as the focuser, mount axes, and tripod legs, generally require little maintenance. The slow-motion gears and focuser mechanism should operate smoothly. If they become stiff, a very small amount of silicone-based grease (specifically designed for plastics and metals) can be applied, but care should be taken not to over-lubricate or use petroleum-based products, which can damage plastic parts. The tightening screws and bolts should be checked periodically to ensure they are secure, but not overtightened, to prevent stripping threads.
Environmental Considerations: Telescopes should not be exposed to extreme temperatures or humidity for prolonged periods. Rapid temperature changes can cause condensation on the optics, which should be allowed to evaporate naturally or gently removed with a fan, rather than wiping. After observing in humid conditions, it's advisable to allow the telescope to air dry indoors before capping and storing it.
Software Maintenance: The included "The Sky® Level 1" software should be kept updated if possible, to ensure access to the latest star charts and features. Regular computer maintenance will also ensure the software runs smoothly.
By following these usage and maintenance guidelines, users can ensure their Celestron PowerSeeker 114EQ or 127EQ telescope provides many years of enjoyable stargazing experiences. The straightforward design and comprehensive quick setup guide make these telescopes an accessible entry point into the fascinating world of astronomy.
| Magnification | 45 x |
|---|---|
| Fixed focal length | 900 mm |
| Visual power (max) | 265 x |
| Primary mirror size | 114 mm |
| Maximum supported eyepiece diameter | 20 mm |
| Tripod material | Aluminum |
| Weight | 8620 g |
|---|---|
| Optical tube diameter | 863.6 mm |