Sheet of fl at media,
eg legends MG-TAPW,
etc
Sheet of cable tags
MG-TPM
Sheet
MG-CPM-...
MG-TDM-...
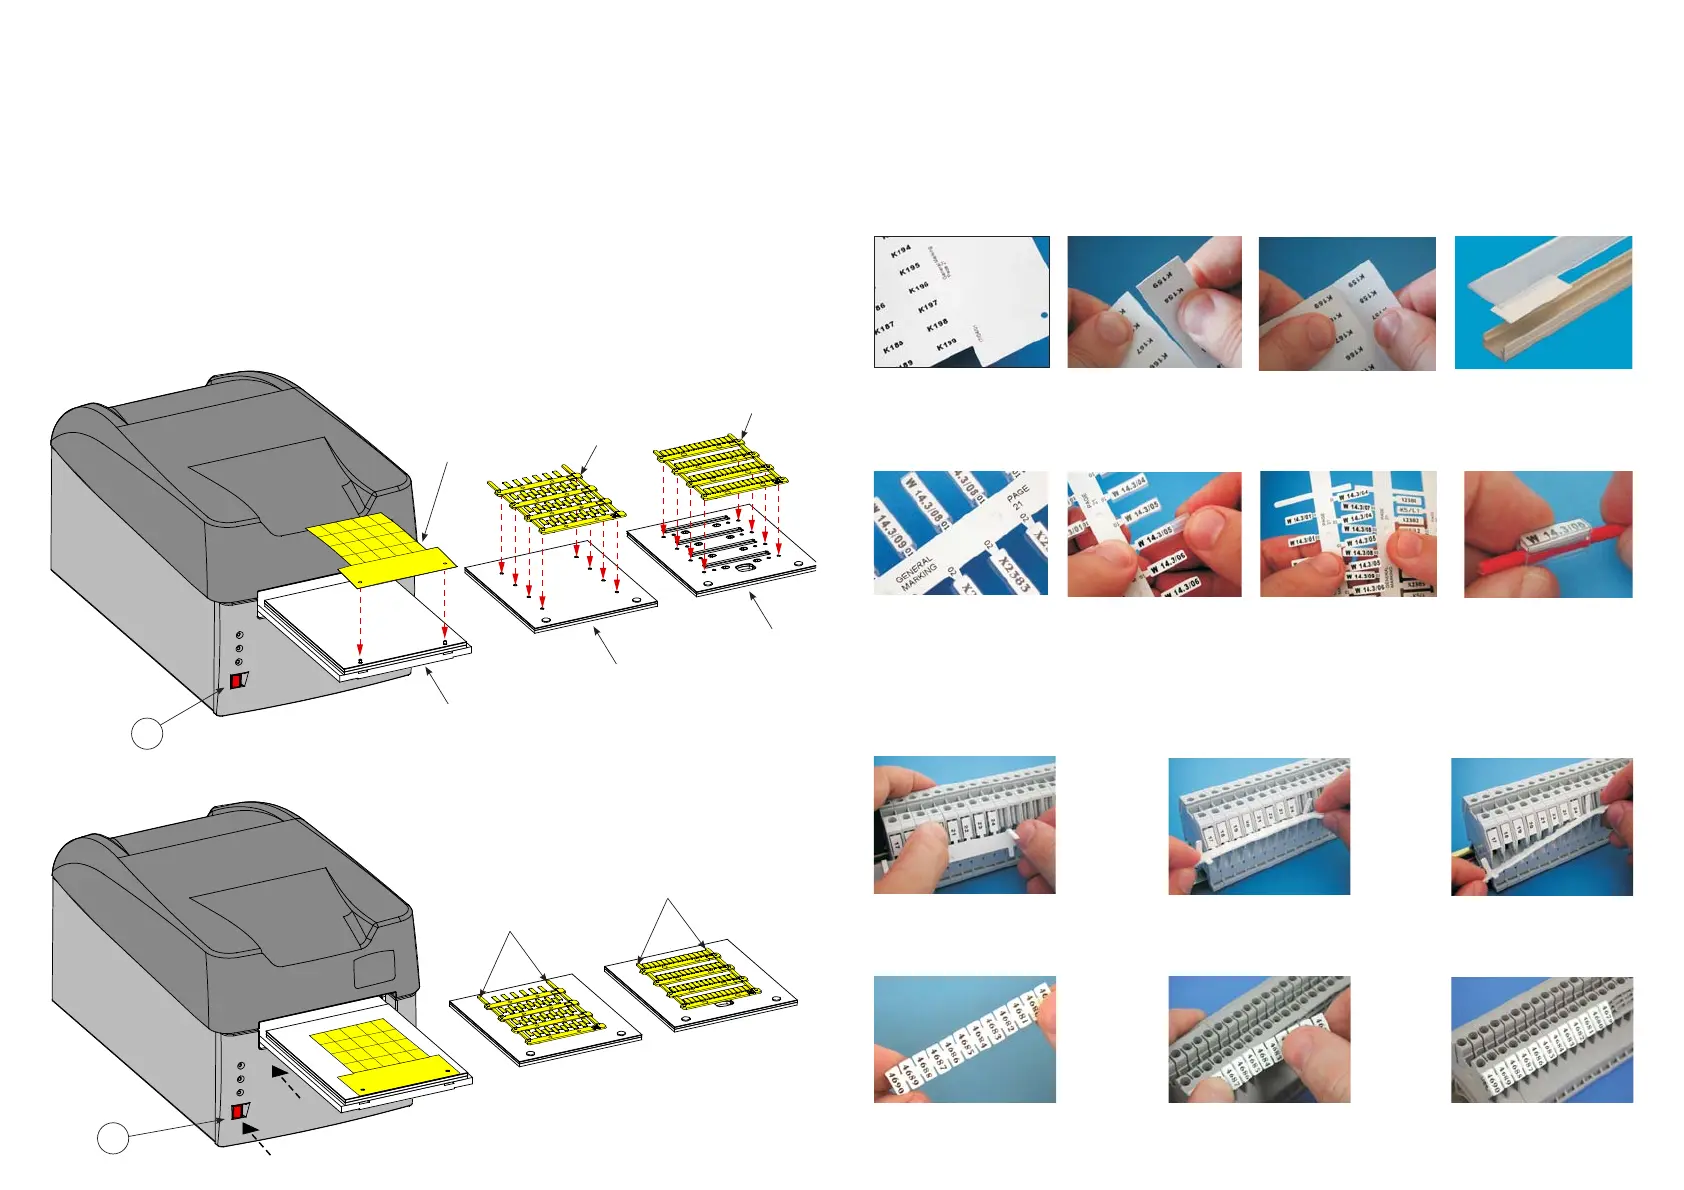
4.7.1) Position mediasheets on the MG2-PLT support template
All die-cut sheets of fl at media are printed on the MG2-PLT template and have two holes to locate on pins mounted on the template:
– Press the RED button (4) to open the carriage already fi tted with the template (See section 4.6).
– Position the sheet by hand, fi tting its holes fully over the corresponding locating pins on the template; the side to be printed
must face upwards (See FIGS. B and C).
Once loaded, the sheet must be fl at, square, clean and without protrusions, bends or kinks; this allows correct positioning
of the print head during the printing cycle.
– Press the RED button (4) to close the carriage.
4.7.2) Position media sheets on the MG2-PWC, MG2-PTD*, MG2-QTB, MG2-LTB*, MG2-WTB*, MG2-STB*, MG2-CTB*
MG2-MTB* support templates
The cable tags are printed on the MG2-PWC and MG2-PTD* templates, while MG-CPM terminal block markers on MG2-QTB,
MG2-LTB*, MG2-WTB*, MG2-STB*, MG2-CTB* or MG2-MTB* templates:
– Press the RED button (4) to open the carriage already equipped with the template (See section 4.6).
– Position the sheet by hand such that the open ‘fi rst’ row of tags/markers is nearest to MG2 with the locating lugs on the
underside of the sheet inserted fully into the corresponding holes in the template (See FIGS. B and C).
Once loaded, the sheet must be fl at, square, clean and without protrusions, lifted or bent components; this allows correct
positioning of the print head during the printing cycle.
4
Template
MG2-PLT
Template
MG2-PWC
Template
MG2-QTB
MG2-LTB *
MG2-WTB *
MG2-STB *
MG2-CTB *
MG2-MTB *
MG2-PTD *
Open ‘fi rst’ row of
tags/markers should be
nearest to MG2
Open ‘fi rst’ row of
tags/markers should be
nearest to MG2
FIG. B
FIG. C
4
(*) Templates available separately .
.7.
TARGHETTE MG-TAPW
Possono essere stampate con
diversi fonts; gli steli sono iden-
tifi cabili per una facile rintraccia-
bilità sullo schema. Inoltre accan-
to ad ogni targhetta è possibile
riportare il modello di tubetto da
inserire.
La scheda stampata viene divi-
sa in lische piegando e spezzan-
do gli estremi di giunzione.
L’inserimento del tubetto PM può
essere quindi effettuato diretta-
mente sulle lische senza stacca-
re la targhetta.
Esempio di targhette MG-TPM
in tubetto trasparente per la
siglatura di cavi.
Il risultato fi nale sul cavo si pre-
senta perfetto, protetto nel tem-
po da agenti chimici ed atmo-
sferici.
TARGHETTE MG-CPM
Dopo aver staccato dalla scheda
lo stelo stampato, innestare le
targhette direttamente sui morsetti.
Posizionare le targhette, procede-
re al distacco dello stelo ruotan-
dolo verso l'alto.
Staccato lo stelo la morsettiera
risulterà così siglata.
Procedere al distacco dalla sche-
da dell'intero modulo stampato.
Innestare direttamente le targhet-
te sui morsetti.
La morsettiera risulterà così
siglata.
Permettono di ottenere ottimi
risultati grafi ci con i diversi fonts
di sistema. L’operatore può ripor-
tare sulla parte fi ssa della scheda
i dati di schema o di lavoro.
Quando stampate, le tessere si
dividono facilmente in strisce.
Il distacco delle singole targhette
è semplice e preciso e sui bordi
non rimangono residui.
Esempio di targhette MG-TAPW
su profi lo RTR-TAPW con coper-
chio trasparente RT-CCWS.
TARGHETTE MG-TPM
4.8) Procedura di stampa
Dopo aver caricato il prodotto da stampare sulla piastra, procedere alla stampa.
– Impostare i dati nel programma (riferirsi al manuale del software) e cliccare sul tasto “STAMPA” per iniziare la fase di
stampa; il carrello verrà richiamato all'interno della stampante e gradualmente espulso fi no a fermarsi automaticamente
a fi ne ciclo con la scheda stampata.
– Togliere la scheda dalla piastra e procedere al distacco delle varie targhette spezzando gli estremi di giunzione.
4.9) Esempi di utilizzo di alcuni tipi di targhette.
.48.
Singole
Modulari