SKU 2792 For technical questions, please call 1-800-444-3353. Page 6
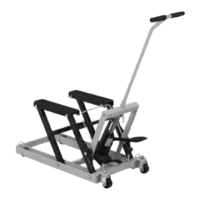
OPERATION
Warning!! Do not work on the Lift, or
leave it unattended if the Stop
Bar (9) is not in place, or the Lock
Bolts (25) are not engaged (lifting
the casters off of the ground).
Note: Keep clear of Lift Arms (4 and 5)
during operation. Keep onlookers
and children a safe distance from the
Lift during operation.
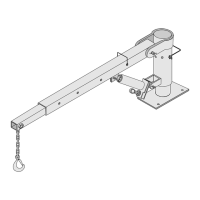
Raising the Lift
Lift the 1. Stop Bar (9) and secure it to
the chain (see FIGURE 1).
Use the 2. Handle (12) to roll the Lift
and position it next to the load. Low-
er the Lift by depressing the Release
Pedal (18).
Once positioned under the load, turn 3.
the Lock Bolts (25) until they contact
the ground and lift the Swivel Cast-
ers (22) slightly off of the ground, to
keep the Lift from rolling.
Note: Check the ATV or motorcycle man-
ual for recommended lifting points.
Use tie-down straps (not included) to 4.
secure the load. Repeatedly depress
the Foot Pedal (17) slowly, to raise
the Lift. When the Lift makes contact
with the load, make sure the load sits
evenly on the two Rubber Pads (3)
before raising the load. If the load is
not evenly distributed on the Rubber
Pads (3) or not secured in place with
tie-down straps, it may fall from the
Lift, resulting in personal injury and
property damage.
Continue to raise the Lift to the de-5.
sired height. Disengage the Stop Bar
(9) from the chain. Lock the Lift at
one of the four locking positions with
the Stop Bar (9). See FIGURE 2.
This is a lifting device only. Do not 6.
use to support loads for extended
periods of time. Do not work directly
under the ATV lift.
Lowering the Lift.
Note: Remove all tools from under the Lift
before lowering.
Depress the 1. Foot Pedal (17) slowly
to raise the Lift enough to disengage
the Stop Bar (9). Lift it up and attach
it to the chain.
The lift has a two-speed release sys-2.
tem:
When the release pedal is de-a.
pressed about halfway the lift will
lower quickly. This is to allow low-
ering of the lift while it is unloaded.
When the release pedal is de-b.
pressed completely the lift will lower
slowly. This helps to control the
descent of a loaded lift.
The jack will not lower properly un-3.
less it is installed in the lift and the lift
is completely assembled.
The lift is optimized for loaded use. If 4.
the lift, while unloaded, lowers very
slowly or not at all, place about 20-
30 lb. on the lift and hold the release
pedal down only about halfway.
Once the load is on the ground, re-5.
move the tie-down straps. When the
Lift is clear of the load, turn the Lock
Bolts (25) until they are clear of the
ground, allowing the Swivel Casters
(22) to rmly contact the ground. Roll
the Lift clear of the load.
Rev 04c, 09a
 Loading...