Technical instructions CSK-Touch
6
First turning on, main display
1
2
5
6
7
8
9
10
12 13 14 15
16
3
CSK-Touch is connected
with a boiler
CSK-Touch is not connected
with a boiler
11
Depending on the view selected (heating circuit), the current measured room temperature can be
displayed on the screen, you can set the desired room temperature (correction of the set
temperature on the boiler control) or switch off the heating circuit and see the weather forecast for
several days in advance (if the boiler is connected to the Internet via the CM-WiFi box).
1. Date
2. Hour
3. Outside temperature
(if there is an outdoor temp. sensor)
4. WiFi signal / data transfer
5. Name of heating view / circuit
6. Room temperature (depending on the selected
view and the heating circuit, measured either on
the current room corrector or other corrector.
7. Day / night heating mode
8. Desired / set room temperature
9. Weather forecast (internet connection required)
10. Menu
11. Menu bar
12. Boiler menu - data from boiler control
13. A - overview of the selected heating circuit
14. B - overview of the selected heating circuit
15. Button for other views if set
16. Turn OFF / turn ON of the selected heating circuit
In the menu 3.2. Views it is necessary to assign each view of the corrector to a specific heating
circuit and add a name to it as desired. If there is only one room corrector in the heating system,
number 1 is selected in the menu 3.2.1Number of views. If there are more room correctors (digital
or analog) to be monitored on this corrector, the number of all correctors to be monitored should be
selected in this menu. Depending on the number of views selected, the same number of buttons for
editing the views (eg 3 views, View A, View B and View C buttons) appear in the menu 3.2 Views.
In the menu 3.2.2. View A you can change the name of that view (factory A) to eg Floor 1 or Zone 1
or Circle 1 or Living Room ... (max. 30 characters) and a heating circuit must be selected to be
joined by this corrector, 3.2.2.2. Heating circuit.
After the corrector connects to the boiler / CM2K (WiFi signal strength is white), it is necessary to
download the data from the boiler control by pressing the START button in the menu 3.1.5. Get data
After adjusting these parameters, the corrector is ready for use..
MAIN DISPLAY
4
3. SETTINGS
Settings
3.1. Connection
3.1.1. Connection type
Choose how to connect the room corrector to the boiler / CM2K. Currently enabled: Only connect
via WiFi Tree.
3.1.2. WiFi ID
It is mandatory to enter the WiFi ID (unique number of the CM-WiFi box) - the number is displayed
on the boiler control in the Information menu after connecting the CM WiFi box to the boiler.
3.1.3. Corrector address
The address selected on the boiler control must be the same as the one selected here. If there is
one digital corrector the address does not have to be defined (but it can), if there is more than one
digital corrector the address of each must be defined and the address of each digital corrector must
be different.
3.1.4. Destination address
One digital corrector must always be connected directly to the WiFi box (WiFi box destination
address selected). If we have more than one digital corrector, other correctors can be connected to
each other (eg when the signal from the WiFi box is too weak or missing) by selecting the
destination address of the nearest neighboring digital corrector (destination address ADR1 / 2 ...).
3.1.5. Get data
After configuring the room corrector or afterwards changing the language, it is necessary to
download the configuration / error / setpoint data from the boiler controller in order to print the
correct information on the digital corrector.
3.1.6. Language selection
When connecting a digital corrector for the first time, the digital corrector asks you to choose a
language that will display information on the screen. After selecting the language for the first time,
the language selection menu automatically shuts off. If you wish to change the language of the
corrector later, you need to activate the language selection in the menu 3.1.6. Language selection,
turn off the corrector 3.7. Shutdown and the language selection will appear on restart (long press
on the screen). After selecting a new language, it is necessary to retrieve the data from the boiler
control unit 3.1.5. Get data.
Corrector address Not defined
Factory:
setting
Not defined / ADR 1/2/3/4/5/6/7/8
Language selection ON
Factory:
setting
OFF / ON
Connection type WIFI BOX Tree
Factory:
setting
WIFI BOX Tree / Wired / Home router
Destination address WIFI BOX
Factory:
setting
WIFI BOX / >>>ADR 1/2/3/4/5/6/7/8
Technical instructions CSK-Touch
11
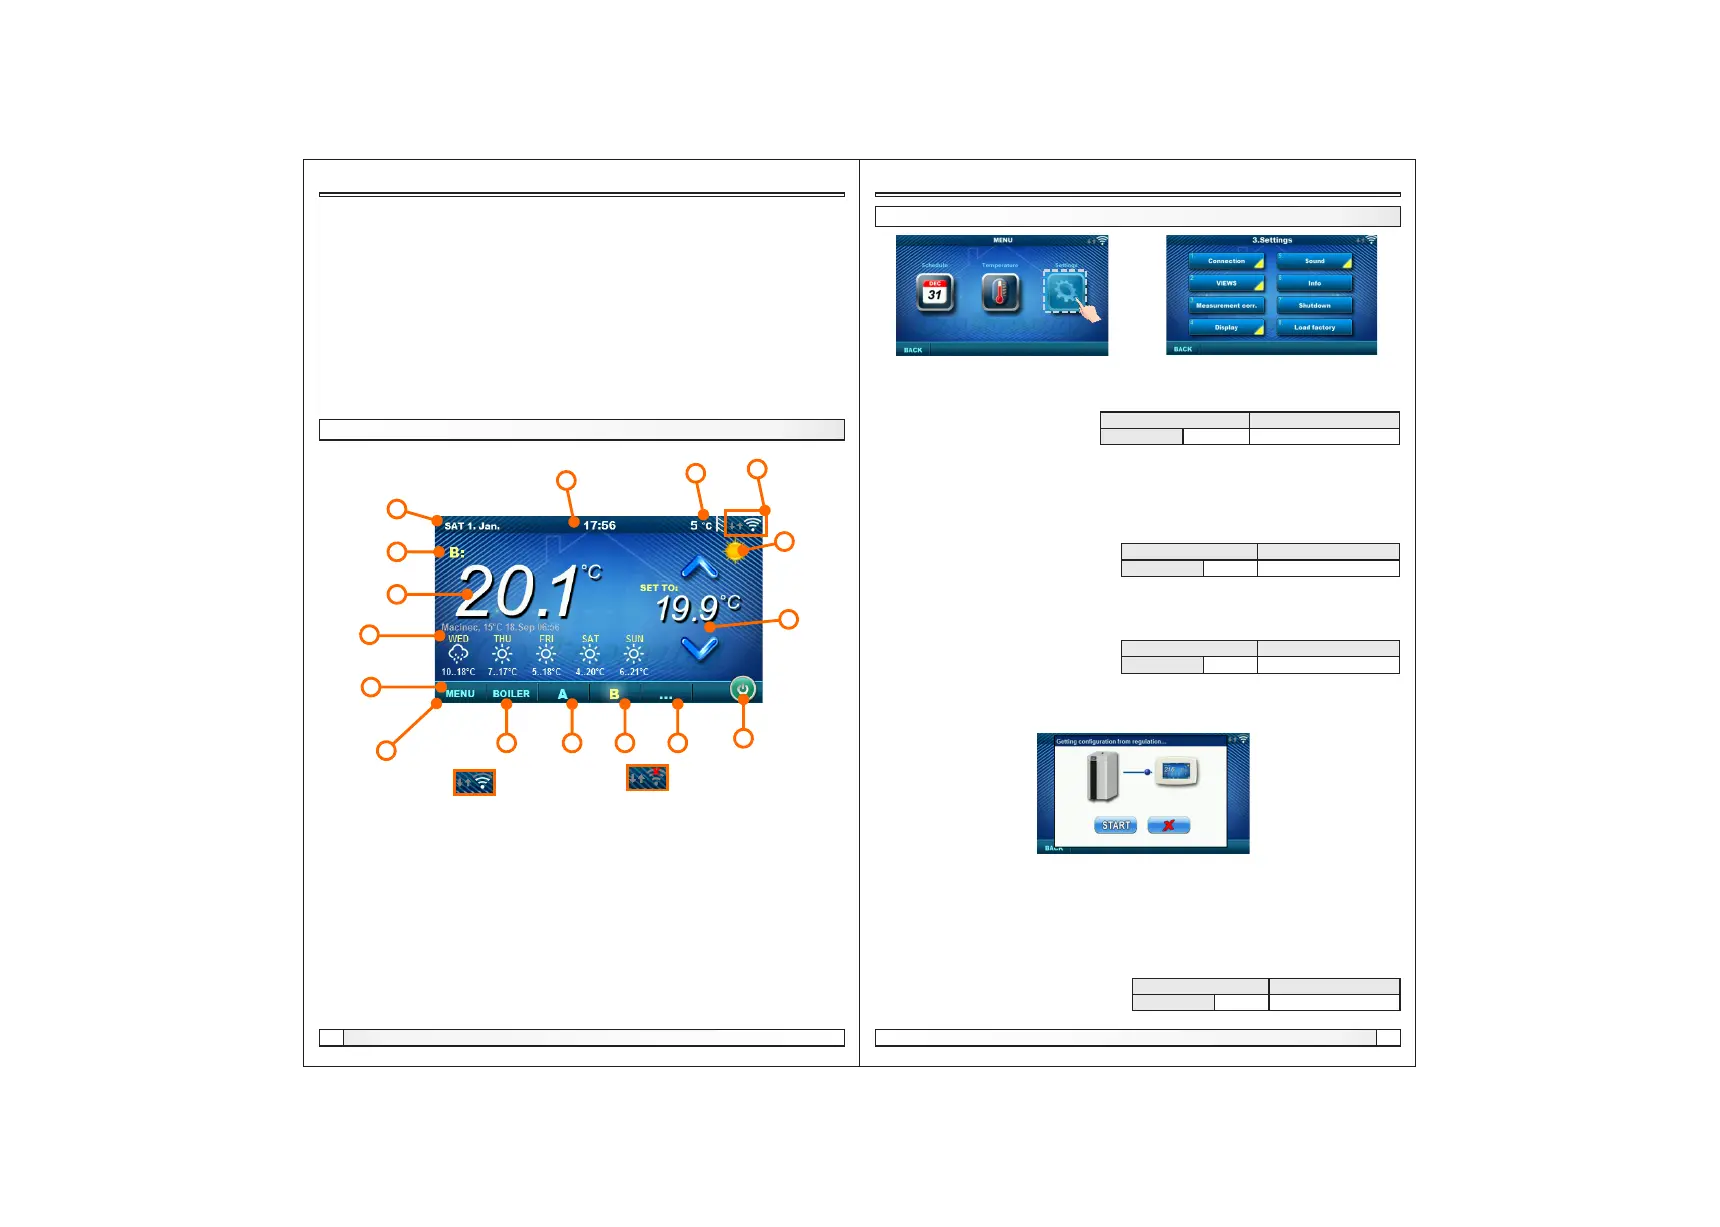 Loading...