oil
dipstick calibrations,
5-8
5
oil
filler,
5-7
oil
filter,
5-9
Quick-Drain
Valve, Oil,
7-17
oil pressure
gage,
1-6,
4-3
oil pressure
switch,
2-4
oil
quick
-drain
valve,
7
-17
6
oil
screen,
5-9
---
4
¯
¯,
oil temperature
gage,
1-6,
4-2
R
Operation
Limitations,
Engine,
4-2
Operation,
Cold
Weather,
2-12
Radios,
1-6
.2 Operations, Authorized,
4-1
Radio
Selector
Switches,
1-6,
7-4
Optimum
Cruise
Performance,
2-10
autopilot-omni
switch,
7-5
Optional Instrument
Space,
1-6
operation,
7-4
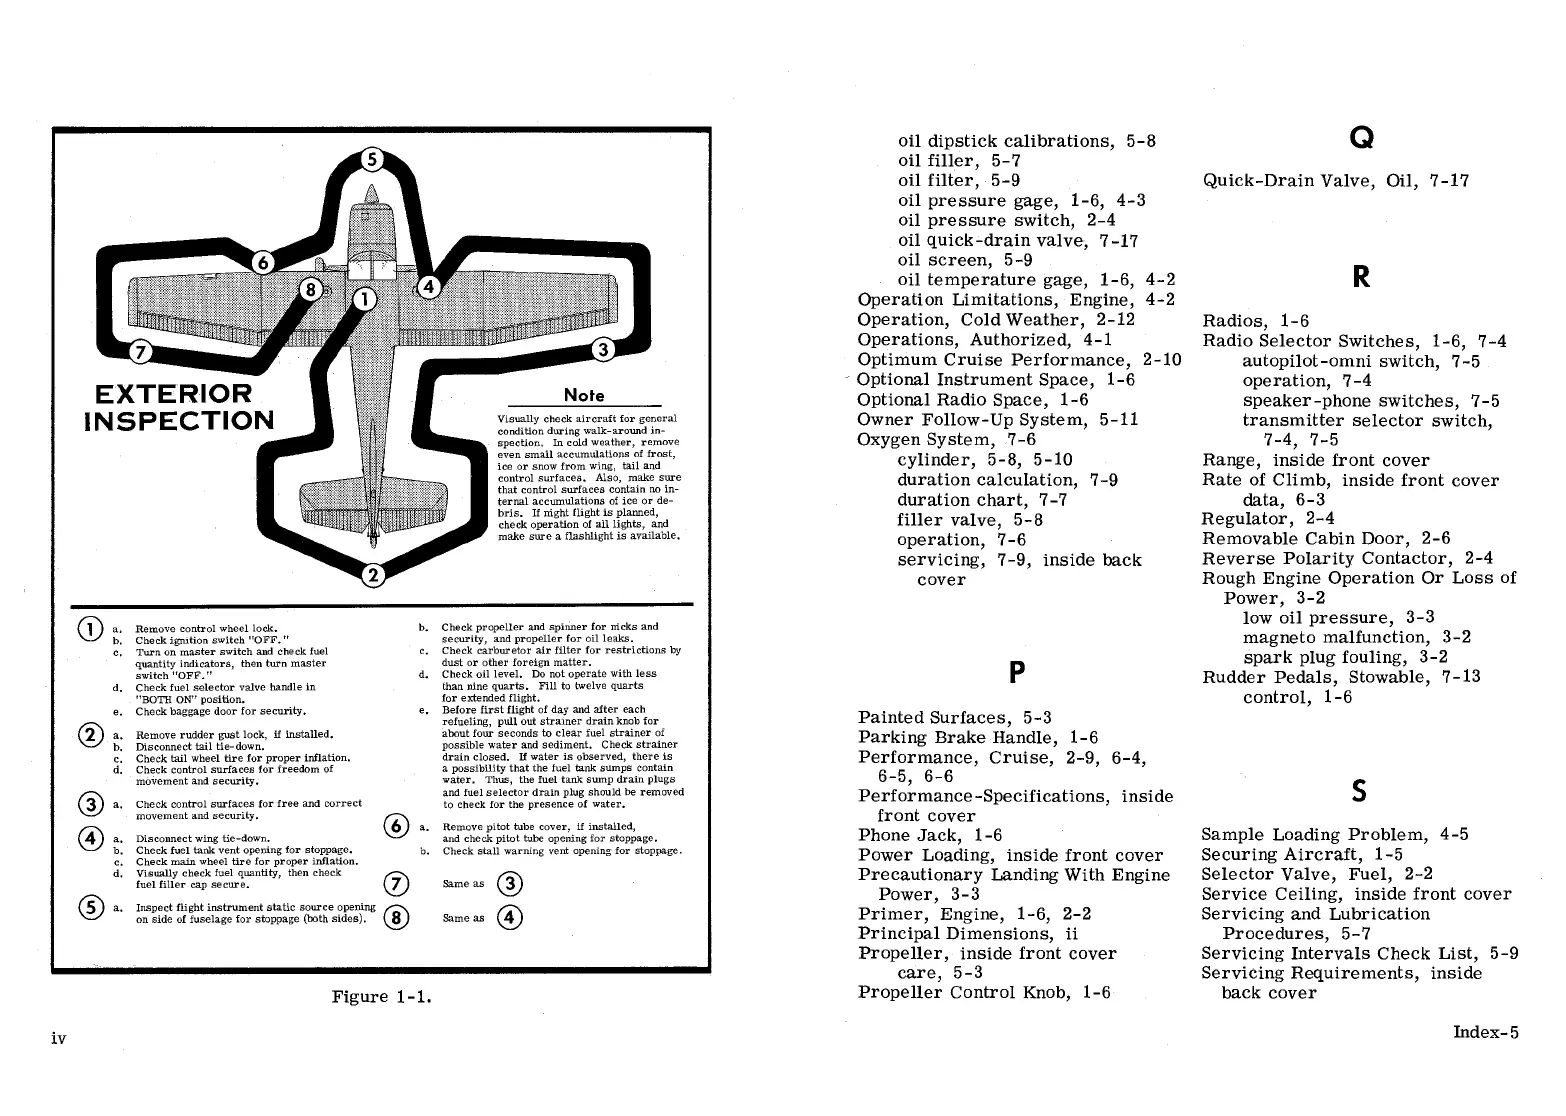
EXTERIOR
Note
Optional Radio
Space,
1-6
speaker-phone
switches,
7-5
INSPECTION
ede
al
Owner Follow-Up
System,
5-11
transmitter
selector
switch,
spectior.
Incoldweather,
remove
Oxygen
System,
7-6
7-4,
7-5
c'e",r""n?
Ice
a
neofa"d°"'
cylinder,
5-8,
5-10
Range,
inside front cover
t"c°on'rii
« c
"iane s
duration
calculation,
7-9
Rate
of
Climb, inside front cover
ternal
accumulations of
ice or
de-
duration
chart,
7-7
data,
6-3
b
sck
pe
onofhalll e
nd
Îiller
Valve,
5-8
Regulator,
2-4
make sure a
flashlight is
available
Operation,
7-6
Removable Cabin
Door,
2-6
servicing,
7-9, inside
back
Reverse
Polarity
Contactor,
2-4
cover
Rough
Engine Operation
Or Loss of
Power,
3-2
.
low oil pressure,
3-3
a.
Remove control
wheel lock.
b.
Check
propeller and spinner for mcks
and
b.
Check
igmtion
switch "OFF."
security,
and
propeller for oil leaks.
magneto malfunction,
3-2
c.
Turn on
master
switch and check fuel
c.
Check carburetor air
filter for restrictions by
quantity indicators,
then
turn
master
dust or other foreign
matter.
Spark plug fouling,
3-2
switch
"OFF."
d.
Check oil level. Do not
operate with less
Rudder
Pedals,
Stowable
7-13
d. Check fuel
selector valve
handle in
than nine
quarts. Fill to
twelve quarts
"BOTH
ON" position,
for extended flight.
COntrol,
1-6
e.
Check baggage
door for security,
e, Before
first flight of
day
and
after
each
.
refueling,
pulloutstrainer drainknobfor
Pamted
Surfaces,
5-3
a.
Remove rudder
gust
lock,
if installed,
about four seconds
to clear
fuel strainer of
Parkin
Brake Handle
1-6
b.
Disconnect tail
tie-down.
possible water and sediment.
Check
strainer
c. Check
tail wheel tire
for proper
inflation,
drain closed. If
water is
observed,
there is
POTÎOrmance, Cruise, 2-9,
6-4
d. Check
control surfaces
for freedom
of a
possibility that the fuel tank
sumps contain
'
movement and security,
water. Thus, the fuel tank sump
drain
plugs
6-5,
6-6
a. Check
control
surfaces for free and
correct
and
Ikselrectorpdrain plug should be removed
POTÎOrmance
-Specifications, inside J
movement and security.
ÎTORÉ
COVer
a.
Remove pitot tube
cover,
if installed,
4
a.
Disconnect wing
tie-down.
and check
pitot tube openîng for stoppage.
Phone
Jack,
1-6
Sample
Loading Problem,
4-5
C f
ta
e
nLopeninpgroprer
i
aag
b. Check
stall
warning
vent opening for
stoppage.
POWer
Loading,
inside front cover
Securing Aircraft,
1-5
d. Viel
111ercheck
feuel quantity, then
check
Same
as
3
PTOCRUÉÎOnary Landing With Engine
Selector
Valve,
Fuel,
2-2
Power,
3-3
Service
Ceiling,
inside front cover
5
a. Insp de
o a
f
re sp agce (o
es dpees
Same as
Primer, Engine,
1-6,
2-2
Servicing and Lubrication
Principal
Dimensions, ii Procedures,
5-7
Propeller,
inside front cover
Servicing Intervals Check List,
5-9
care,
5-3
Servicing Requirements,
inside
Figure
1-1.
Propeller Control
Knob,
1-6
back cover
Index-5



 To Next Page