2
Setting Injection Mode and Rate
Starting the Pump in Auto Mode
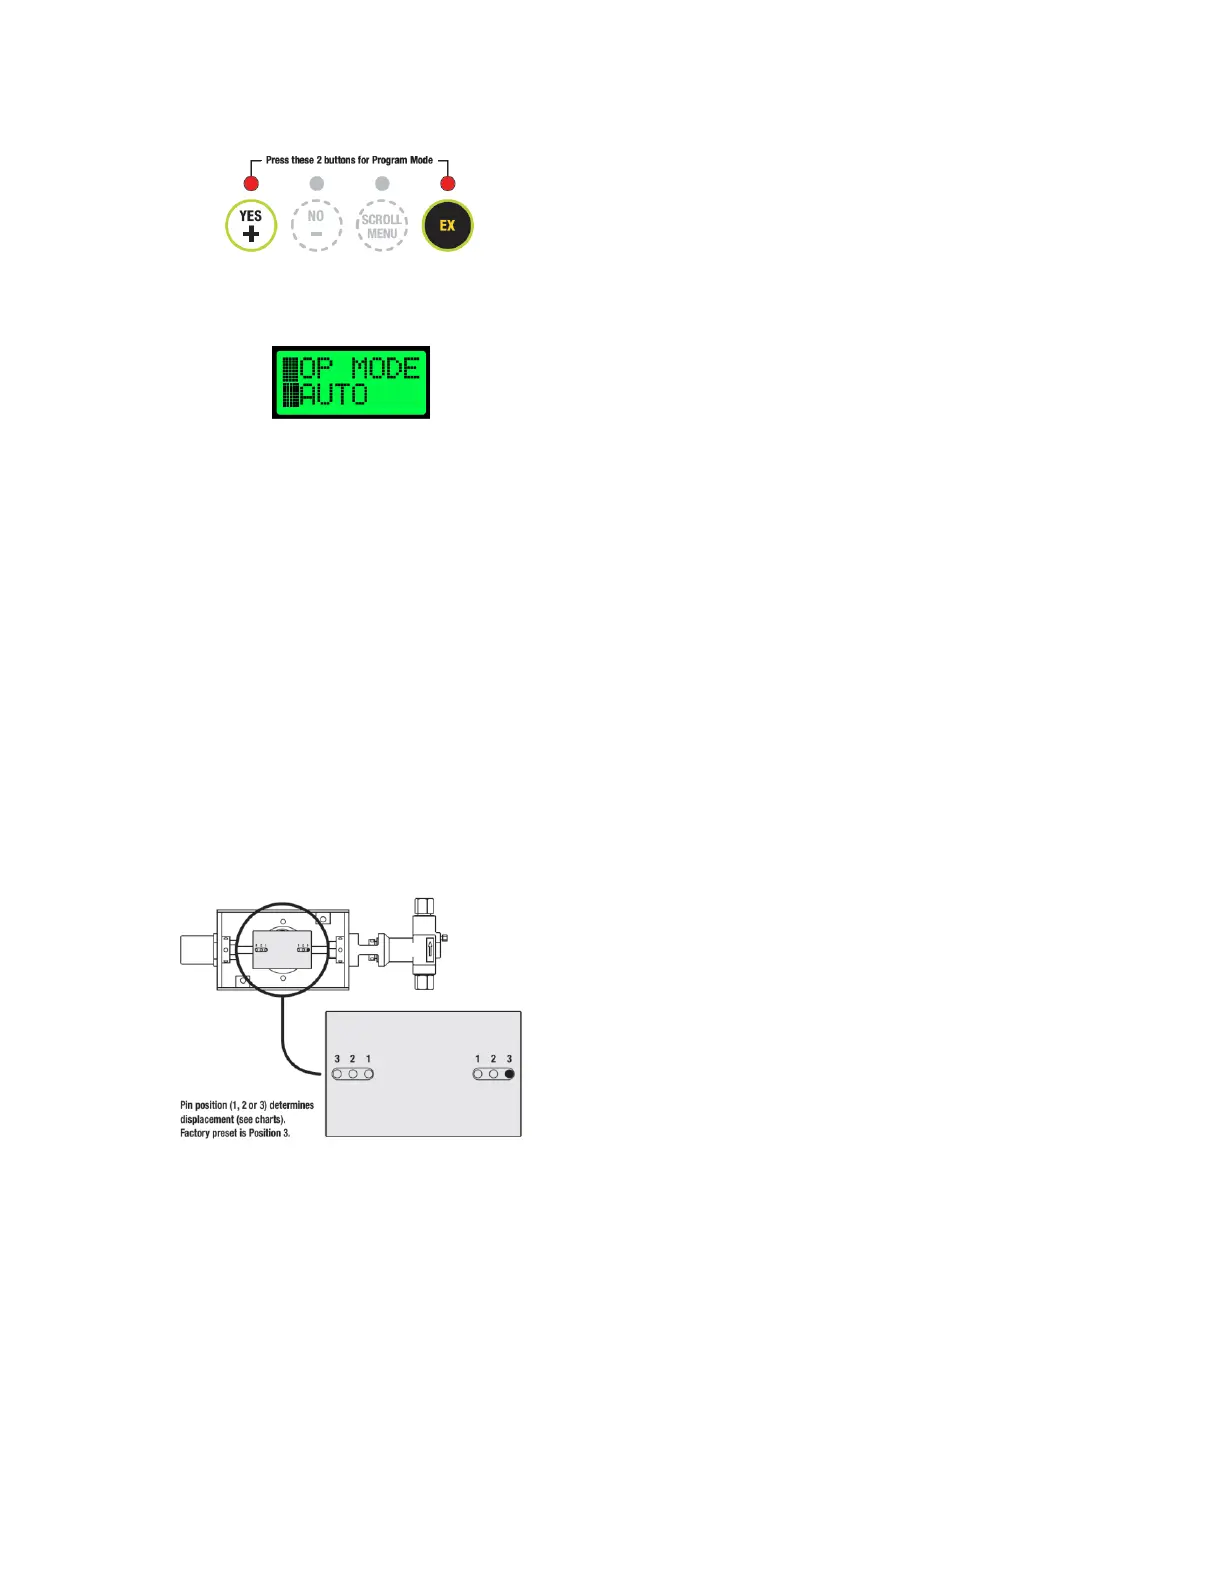
1. While on any idle screen, press (YES/+) and (EX) to enter program
mode.
The first screen displayed will be the operation mode selection screen.
Programming mode will be indicated by two ‘blocks’ on the left side
of the screen. The first screen displayed will be the operation mode
selection (□OP MODE).
NOTE: While in programming mode, output will be disabled.
Programming mode may be manually exited to resume injection, or
after 60 seconds with no input the pump will resume normal
operation.
Save the current settings and exit programming mode at any time by
pressing the (YES/+) and (EX) buttons.
2. Set Operation Mode (□OP MODE) - Use the (YES/+) and (NO/-)
buttons to scroll between AUTO and MANUAL modes. Select AUTO
mode for direct quarts per day injection. Press (SCROLL/MENU) to
select this option while it is currently displayed and advance to
selecting the plunger size.
3. Set Plunger Size (□PLG SIZ) - Use the (YES/+) and (NO/-) buttons to
select the diameter of the plunger currently installed on the pump
that the controller will be operating. Press (SCROLL/MENU) to select
the option that is currently displayed and advance to the pin position
setting.
4. Set Pin Position (□PIN POS) - Use the (YES/+) and (NO/-) buttons to
select the current pin position(s) of the pump plunger(s) the controller
will be operating. Factory setting will be position 3 for all controller
and new pump setups. Press (SCROLL/MENU) to select the option
that is currently displayed and advance to setting the quarts per day
flow rate.
5. Set Quarts per Day (□QTS/DAY) - Use the (YES/+) and (NO/-) buttons
to adjust the desired flow rate in quarts per day (1.0 to 200.0). Press
(SCROLL/MENU) to lock in the flow rate that is currently displayed and
advance to the next screen.
NOTE: Quarts per day value shown is the per-head flow rate. For dual
head pump applications, enter ½ of the desired overall flow rate.
AUTO flow rates are based on calculated injection volumes. It is
always recommended to verify flow rates with a draw down test.
6. Enable/Disable Temperature Mode (□TEMP MO) - Use the (YES/+)
and (NO/-) buttons to scroll through ON and OFF selections. Press
(SCROLL/MENU) to select the option that is currently displayed and
advance to the temperature setpoint entry screen.
7. Set Temperature Setpoint (□TEMP SP) - Use the (YES/+) and (NO/-)
buttons to adjust the desired temperature setpoint.
Note: The current temperature will be displayed on the right hand side
of the screen and is noted with CT. A value of -40 may indicate that
the temperature sensor may be disconnected or malfunctioning if this
does not match the current temperature.
Press (YES/+) and (EX) to save changes and exit the programming
menu. Pressing (SCROLL/MENU) will return to the initial operation
mode selection screen.
NOTE: The pump output is disabled as long as the measured
temperature is above the user defined setpoint, and temperature
mode is enabled. This value will have no effect is temperature mode
is disabled.
Starting the Pump in Manual Mode
1. Enter programming mode similar to step 1 of the “Starting the Pump
in Auto Mode” section. The first screen displayed will be the
operation mode selection screen.
2. Set Operation Mode (OP MODE) - Use the (YES / +) and (NO / -)
buttons to scroll between AUTO and MAN modes. Select MANUAL for
direct entry of ON and OFF pump cycle times. Press (SCROLL / MENU)
to select this option while it is currently displayed and advance to the
next screen.
NOTE: Charts are provided at the end of this manual to assist with
setting the ON/OFF times for desired flow rates based on pump
configuration. Note that these charts are to be used as a starting point
only—it is always recommended to verify injection rates with a draw
down test.
8. Set On Time (□ON TIME) - Use the (YES/+) and (NO/-) buttons to
adjust the desired pump ON TIME in seconds. Press (SCROLL/MENU)
to lock in the time that is currently displayed and advance to setting
the OFF TIME.
9. Set Off Time (□OFF TIM) - Use the (YES/+) and (NO/-) buttons to
adjust the desired pump OFF TIME in seconds. Press (SCROLL/MENU)
to lock in the time that is currently displayed and advance to the
temperature mode enable/disable screen.
10. Enable/Disable Temperature Mode (□TEMP MO) - Use the (YES/+)
and (NO/-) buttons to scroll through ON and OFF selections. Press
(SCROLL/MENU) to select the option that is currently displayed and
advance to the temperature setpoint entry screen.
11. Set Temperature Setpoint (□TEMP SP) - Use the (YES/+) and (NO/-)
buttons to adjust the desired temperature setpoint.
Note: The current temperature will be displayed on the right hand side
of the screen and is noted with CT. A value of -40 may indicate that
the temperature sensor may be disconnected or malfunctioning if this
does not match the current temperature.
Press (YES/+) and (EX) to save changes and exit the programming
menu. Pressing (SCROLL/MENU) will return to the initial operation
mode selection screen.
NOTE: The pump output is disabled as long as the measured
temperature is above the user defined setpoint, and temperature
mode is enabled. This value will have no effect is temperature mode
is disabled.
Pump Override
“Pump” Override is designed to allow for an easy means to enable pump output
during initial pump priming.
To enable the Pump Override—
1. While on any idle screen, press (YES/+) and (NO/-) simultaneously.
2. YOU SURE will be displayed. Press (YES/+) to being pump override.
Pressing (NO/-) will cancel the pump override request.
3. If (YES/+) is pressed, pump output will be enabled for 2 minutes.
During this time, PRIME PUMP will be displayed on the controller.
After 2 minutes, the controller will resume normal operation.
4. press (YES/+) and (NO/-) simultaneously at any time while in Pump
Override to disable and resume normal operation.
 Loading...