13
9.Keep one clasp end blocked and simultaneously pull the belt
andslideitinsidetherelativering(O),toadjustthetensionofthe
safetyharness(Fig.12).
BOOSTER CUSHION
10.The reducercushion (D)-(DD)is idealfrombirth andcanbe
removedaccordingtoneeds.Toxittotheseat,placeitonthe
seatandslidethecrotchstrapthroughthehole(Fig.13).Thread
thesafetyharnessintherelativesideslotsofthereducercushion
(Fig.13A).Placetheheadrest(DD)tothedesiredheight,itcan
bechosenwithinthreedierentheights;xtheheadresttothe
seat,slidingthestrapsthroughtheslotandcloseitagainusing
thevelcrostrap(Fig.14).
TOYBAR
11.Fastenthetoybar(E)totheframeinsertingthelowerendsinthe
relevantfasteningholeofthetoybar(Fig.15).
WARNING: Always check that the toybar is properly fastened
beforeeveryuse.Thetoybarcanbeusedintwodierentmodes,
slightlyliftingitfromitsseatandturningittothedesiredposition
(Fig.16).
12.Thetoyscanbefastenedtothetoybarinsertingthebeltsinthe
holesinthebar(Fig.17).
WARNINGS ELECTRICAL PARTS
•Toreplacethebatteries:loosenthescrewonthebatterycompart-
mentcoverwithascrewdriverandopenthecover.Thenremove
the spent batteries and t new ones, paying attention that the
polesareintherightdirection(asshownontheproduct),closethe
batterycoverandtightenthescrew.Repeatthesameoperation
fortheVibratingBox(Toybar2AA1.5Volttypebatteries-Vibration
Box1LR201.5Vbattery).
•Batteriesmustonlybettedbyanadult.
•Onlyusealkalinebatteriesofthesametypeorequivalenttothe
typerecommendedforthecorrectfunctionofthisproduct(Toy-
bar2AA1.5Vbatteries-VibrationBox1LR201.5Vbattery).
•Makesurethebatteriesarettedwiththeirpolesintherightdirection.
•Nevermixnewandoldordierenttypesofbatteries.
•Alwayskeepbatteriesandtoolsoutofthereachofchildren.
•Donotshort-circuitthepowerterminals.
•Alwaysremovedischargedbatteriesfromtheproducttoavoidany
possibleliquidleaksthatmaydamageit.
•Alwaysremovethebatteriesiftheproductwillnotbeusedfora
longperiodoftime.
•Removethe batteries fromthe toybarand vibratingbox before
disposingoftheproduct.
•Donotthrowdeadbatteriesinreorleavethemintheenviron-
ment;theymustbedisposedofthroughwastesorting.
•Ifthebatteriesareleakingliquid,replacethemimmediately,mak-
ingsuretocleanthebatterycompartment;thoroughlywashyour
handsinthecaseofcontactwiththeliquid.
•Alwaysdisposeofleakingbatteriesimmediately:theycancause
burnsorothertypesofinjuries.
•Donottrytorechargenon-rechargeablebatteries:theymayexplode.
•The use of rechargeable batteries is not recommended as they
mayreducethetoy’soperability.
•Ifusingrechargeablebatteries,removethemfromthetoybefore
rechargingthem.
•Donotleavetheproductoutsideundertherain;waterinltrations
willdamagetheelectroniccircuit.
•Rechargeablebatteriesmustbechargedonlyunderadultsupervision.
REMOVABLE SOUND TOY
Thetoybaristtedwithasoundsandlightspanelthatisactivated
bypressingthebuttonsonthefrontsection(Fig.F).
F1:Onbutton-volume
F2:Itplayssoothingandrelaxingtunes
F3:Itplayslullabies
F4:Itplaysfunnymusic
F5:Voicerecordingbutton
F6:Soundandmusicactivationhandle
F7:Microphone-Led
Forthevoicerecordingactivation,checkthatthesoundtoyison.
KeeptheF5buttonpressed;assoonastheredLEDashes,theown
voicecanbe recorded,tostop recordingreleasethe button(the
childtoclimborcausingchocking
orstranglinghazards.
•Donotplacethechairnearwindows
or walls to prevent the risk for the
childofoverreachingandfallingover.
•Do not attach any strings to ex-
tendthefasteningsystemsofthe
toybar’s hanging toy and do not
makeknots/loops:Thiscouldlead
torunningknotsfromaccidentally
formingwhichcouldleadtostran-
gulation.
• WARNING:Thistoymustonlybe
usedunderadultsupervision.
• WARNING: Check the product
regularly for signs of wear and
damage and to ensure that it is
assembled correctly. Should any
partsonthetoybarorhangingtoy
bedamaged,donotusethemand
keepoutofreachofchildren.
•Keeptheproductoutofchildren’s
reachwhenitisnotbeingused.
CARE AND MAINTENANCE
FABRIC COMPOSITION
COVER:
Outercover:100%polyester.Padding:100%polyurethane
BOOSTER CUSHION:
Outercover:100%Polyester.Padding:100%Polyester.
•Thisproductrequiresperiodicalmaintenance.
•The cleaningand maintenanceoperations mustonly becarried
outbyanadult.
•Periodicallyinspectthereclinedcradletocheckforbroken,tornor
missingparts:Ifthisisthecase,donotuseit.
•Pleaserefertothecarelabelforinstructionsoncleaningtheswing.
Washbyhandincoldwater
Donotbleach
Donottumbledry
Donotiron
Donotdryclean
•Checkthatthefabricandstitchingareingoodconditioneachtime
youwashit.
•Prolongedexposuretodirectsunlightcancausethefabriccolours
tofade.
COMPONENTS
Components
A-Base
B-Feet
B1-Non-sliprubber
B2-Open/closebuttons
C-Seat
D-Boostercushion
DD-Headrest
E-Toybar
E1-Soundtoyreleasebutton
F-Removablesoundtoy
G-Toys
H-Toybarcouplingslot
I-Fabrichandles
I1-Strapforthesoundtoyfastening
L-Safetyharness
M-Buckles
N-Clips
O-Ringfortheadjustmentofthesafetyharness
P-Recliningbutton
Q-Clickbuttons
R-Vibrationbox
S-Seatbuttonhole
ASSEMBLY
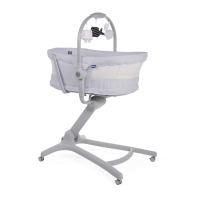
Thereclinedcradlecomesalreadyassembled.Touseit,thefollow-
ingoperationsmustbeperformed:
1.Toopenthereclinedcradlepulltheseatupward(Fig.1),when
youhearitclick,itmeanstheproductiscorrectlyopened.Make
surethatbothsidesofthereclinedcradleareproperlyopen.
2.Fastenthetoybarinsertingthelowerendsofthetoybarinthe
relevantfasteninghole(Fig.2).
HOW TO ADJUST THE BACKREST
3.Toadjustthebackrestfromahigherpositiontoamoreinclined
one, take the two sidebuttons (Fig. 3) and pullthem upward,
keepingthempresseddown;choosethedesiredrecliningwithin
the4availablepositions.Thisoperationmayalsobecarriedout
withthechildsittinginthereclinedcradle.Inthiscaseitcanbe
moredicult.
WARNING:Alwaysguidethebackrestwiththengerswhenad-
justingthereclining.
Tomovefromthemostinclinedpositiontoalessinclinedposition,
justpullthebackrestup(Fig.4-5).
WARNING:Alwayscheckthatthebackrestisproperlylockedbeforeuse.
Thereclinedcradleisequippedwithtransporthandlesmadeoffabric.
WARNING:Thetransporthandles(I),whennotused,shallbexed
onthebackofthebackrestwiththevelcroribbons.
FIXED OR ROCKING MODE
4.Thereclinedcradlecanbeusedinxedorrockingmode:
-Fixedmode:turnthefrontfeet(B)forwarduntilthelowerpartof
thefoottouchestheground(Fig.6);
-Rockingmode:turnthefrontfeet(B)intheoppositedirection,so
thatthefootisnottouchingtheground(Fig.7).
HOW TO CLOSE THE CHAIR
5.Thereclinedcradlecanbeclosedfortransport.
WARNING:Thereclinedcradlemustneverbeclosedwiththechild
sittinginit.Removethechildfromthereclinedcradlebeforeclos-
ingtheframe!
6.Toclosethereclinedcradle,pressthe2buttonsinsidethefront
feet(Fig.8)simultaneously.
7.Toopenthereclinedcradleagain,justpulltheseatupward(Fig.9)
untilyouhearaclickthatindicatesthecorrectopening.
USING THE SAFETY HARNESS
8.Whenusingthesafetyharnessforthersttime,theyarealready
tted(Fig.10).
Toreleasethem,pressthetoothedendsoftheclaspandremove
thetwoclasps(Fig.11).Thereclinedcradleisreadyforthechild.
WARNING: Whenusing,alwaysfastenthebeltsinsertingthemin
thecrotchstrapandchecktheyaretightenoughandintheright
position.

 Loading...