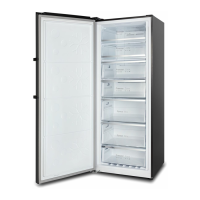
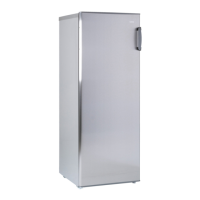
This document describes a hybrid upright freezer, specifically models CSH311NWL, CSH311NWR, CSH310NBSL, and CSH310NBSR, designed for domestic use. It functions as a single-door inverter refrigerator with electronic control, offering switchover capability between fridge and freezer modes.
Function Description
The appliance can operate in two primary modes:
- Freezer Mode: Ideal for long-term preservation of items like fish and meat that require freezing.
- Fridge Mode: Suitable for storing fresh foods such as fruits, vegetables, eggs, and milk.
The unit incorporates advanced technologies for optimal performance:
- Computer Control: Features an LED display screen for managing and setting temperature and other working parameters.
- Inverter Technology: Integrates precise frequency conversion, noise reduction, and energy-saving capabilities. The inverter compressor automatically adjusts its working efficiency based on ambient and set temperatures, ensuring the fridge-freezer operates in its optimal state.
- Green Technology: Utilizes freon-free refrigerant and foaming insulation material, which do not damage the ozone layer and have a minimal impact on global warming, making it an environmentally friendly product.
- User-Friendly Designs: Includes features such as a wide working voltage range, automatic temperature control, power-cut memory, power-on delay, automatic alarm, fast freezing, and quick cooling.
Operating Instructions
The display panel, located on the door, shows various symbols and functions:
- Digital Display: Shows the current temperature.
- Celcius Degree: Indicates temperature in Celsius.
- Freezer Mode: Lights up when the unit is in freezer mode.
- Fridge Mode: Lights up when the unit is in fridge mode.
- Fast Freezing: Activates a rapid freezing function.
- Quick Cooling: Activates a rapid cooling function.
- Alarm: Indicates an alarm condition.
- Child Lock: Indicates when the child lock is active.
- Temperature Setting: Allows adjustment of the temperature.
- Function Selection: Used to select different functions.
- OK/Lock: Confirms selections or toggles the child lock.
When first connected to power, all icons illuminate for 2 seconds, and the system defaults to freezer mode at -18°C. The display turns off automatically when the door is closed and lights up when the door is opened or any key is pressed. Key operations are only valid when the keys are unlocked and illuminated.
Usage Features
- Child Lock Function: Automatically enables if no key operation occurs within 3 minutes, indicated by the lock symbol. When active, temperature and function settings cannot be changed, preventing accidental adjustments. To enable or disable, press and hold the OK/Lock button for more than 3 seconds until a beeping sound is heard.
- Fast Freezer Mode: Sets the unit to -32°C. This function runs for 26 hours automatically, then turns off. It is beneficial for rapidly cooling food to preserve nutrition and freshness. This mode can only be enabled in freezer mode. To activate, press the Function key until "Fast freezer" flashes, then quickly press OK to confirm. To deactivate, repeat the process.
- Fast Cool Mode: Sets the unit to 2°C. Similar to fast freezer, it rapidly cools food to preserve nutrition and freshness. This mode can only be enabled in fridge mode. To activate, press the Function key until "Fast cool" flashes, then quickly press OK to confirm. To deactivate, repeat the process.
- Temperature Setting: Before adjusting, ensure the child lock, fast freezer, and fast cool modes are off. Use the '+' or '-' keys to adjust the desired temperature, then press OK or wait 5 seconds to validate.
- Fridge Mode Range: 2°C to 8°C.
- Freezer Mode Range: -16°C to -24°C.
- The displayed number shows the setting temperature, which may differ slightly from the actual internal temperature. Different sections of the refrigerator compartment may vary in temperature, with the back wall and lowest shelf typically being the coolest, and the top front near the door being the warmest. Avoid placing raw vegetables too close to the coolest area to prevent frostbite.
- Switchover Between Fridge/Freezer Mode: Ensure the child lock, fast freezer, and fast cool modes are off. Press and hold the '-' Temp. key for 3 seconds to switch between modes; the corresponding freezer or fridge symbol will illuminate.
- Door Open Alarm: If the door remains open for more than 3 minutes, a continuous beeping alarm will sound. It can be temporarily stopped by pressing any key but will resume after 3 minutes if the door is still open. The alarm stops when the door is properly closed. If the alarm persists after a door reversal, refer to the door reversal instructions.
- Power Cut Memory: In the event of a power failure, the refrigerator retains its previous settings when power is restored.
- Power-on Delay: To protect the compressor from damage during short power failures (less than 5 minutes), the compressor will not restart immediately. It will restart after power has been restored for more than 5 minutes.
- Over-temperature Alarm (after power outage only): If the freezer sensor temperature is above -10°C when the system powers on, the freezer zone digits will flicker on the display. Pressing any key will show the freezer temperature, and the normal display will resume after 10 seconds or another key press.
- Fault Alarm: If E0, E1, E2, EH, or EC appears on the display panel, it indicates a fault. Contact CHIQ service centre for assistance.
Maintenance Features
General Care and Maintenance
- Initial Cleaning: Upon installation, thoroughly clean the appliance.
- Cleaning Procedure: Turn off and unplug the refrigerator. Remove all food. Wash the interior with a damp cloth soaked in lukewarm water and dishwasher liquid. Avoid using chemical detergents that could damage the coating.
- Door Gasket Maintenance: Keep the door gasket (seal) clean to ensure efficient operation and prevent dislodging or tearing.
- Drying: Dry both the interior and exterior with a soft cloth.
Vacation Time
- Short Vacations (less than three weeks): Leave the refrigerator operating.
- Long Vacations (several months): Turn off and unplug the unit. Remove all food. Clean and thoroughly dry the interior. To prevent odors and mold growth, leave the door slightly open, blocking it if necessary.
- Child Safety: Exercise extreme caution with children; the unit should not be accessible for play.
Repositioning and Relocating the Refrigerator
- Preparation: Unplug the power cord. Remove all food and drinks. Securely tape down all loose items inside. Tape the doors closed.
- Transportation: It is recommended to keep the refrigerator upright during transportation. If laid down for transport, lift it upright immediately afterward. Wait at least 24 hours before plugging it in.
Installation Instructions
- Unpacking: Remove all exterior and interior packing materials.
- Initial Standby: Before connecting to power, let the unit stand upright for approximately 4 hours to allow the cooling system to settle after transportation.
- Cleaning: Clean the interior surface with warm water and a soft cloth.
- Placement:
- The appliance is designed for free-standing use only; do not recess or build it in.
- Allow at least 5cm of space between the back and sides for proper air ventilation. Insufficient space can lead to cooling issues and void the warranty.
- Place the refrigerator on a level, even, and strong floor surface (concrete, tile, or waterproof floor is recommended) to prevent vibrations and potential water damage from defrosting or condensation.
- Adjust the two front feet to level or elevate the appliance.
- Avoid direct sunlight and heat sources (stove, heater, radiator) as these can affect the acrylic coating and increase power consumption.
- This unit is not designed for outdoor installation.
- Avoid moist or pest-infested areas.
- Plug into a dedicated, properly installed, and grounded wall outlet. Do not cut or remove the third (ground) prong from the power cord. Consult a certified electrician if you have questions about power or grounding.
- Initial Cooling: After plugging in, turn on the unit and allow it to cool for 4-6 hours before placing food inside.
- Weight Limit: Do not place heavy items on top of the appliance.
Energy Saving Tips
- Cool Foods: Allow hot foods to cool to room temperature before placing them in the refrigerator. Overloading forces the compressor to work harder, and slow freezing can reduce food quality or cause spoilage.
- Proper Wrapping: Wrap foods properly and wipe containers dry before placing them in the refrigerator to reduce frost buildup.
- Organization: Organize and label food to minimize door openings and extended searches. Remove multiple items at once and close the door as quickly as possible.
Door Reversal Instruction
The door can be reversed, requiring specific spare parts found in the accessory bag (top hinge, top hinge cover, bottom hinge, and plastic door closer). Two people are recommended for this task for safety. Tools required include a ladder, flat screwdriver, Phillips screwdriver, adjustable spanner, socket wrench, and an 8mm socket. The instructions provided are for right-hinge models and can be adapted for left-hinge models.
- Unplug the power cable.
- Remove screws from the upper hinge cover, disconnect wire connections, and place communication wires into the hole on top of the unit.
- Remove three bolts from the upper hinge, then remove the upper hinge and hinge bush. Crucially, remove the black magnet next to the hinge and insert it on the other side.
- Remove the wire cover under the hinge, place the door communication wire into the hole, and replace the wire cover.
- Remove three screws and cover from the left-side top, take out the wire harness, and install the hinge bush. Remove the wire cover on the top left door.
- Lift the refrigerator door, remove it from the bottom hinge, and place it stably.
- Remove the front leveling feet, then remove the hinge using an adjustable spanner or socket wrench.
- Install the lower left hinge from the accessory bag onto the bottom left side.
- Remove the metal door stopper and black plastic door closer from the door's right bottom. Place the metal door stopper on the door's left bottom and install a new black plastic door closer from the accessory bag using the screw from the right side.
- Place the door on the left hinge, ensuring it is level with the cabinet and the rubber gasket seals properly. Hold the door in position before installing the upper hinge.
- Install the upper left hinge from the accessory bag, fixing it with bolts and installing the ground wire (with a ring end) under one bolt. Connect the red/yellow/blue cable socket from the door to the matching color one from the cabinet.
- Remove a magnet sensor from the right top hinge cover (the one removed initially). This part has two wires and a two-pin socket. Install it under the new hinge cover from the accessory bag. Connect the two-pin socket to the wire harness from the cabinet.
- When installing the top left hinge cover, first position the front, ensuring a clip is attached to the metal hinge. Then push the back part into position and secure it with two screws. Double-check that the magnet is installed on the door's top left side near the hinge cover.
- Remove the handle cover, four screws, and the handle. Install the handle on the other side of the door.
- After the handle is installed, the door reversal is complete.
- Troubleshooting Door Reversal Beeping: If the unit beeps after door reversal, check:
- Step c: Ensure the magnet is moved to the new hinge side.
- Step l: Ensure the magnet sensor is properly placed under the new hinge cover.
- Step m: Ensure the hinge cover is properly positioned, with the clip under the front edge attached to the metal hinge.