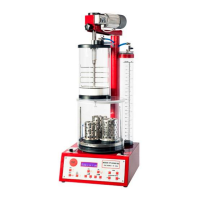
This document is an instruction manual for the CIMO St. Louis 82 Vacuum Investment Mixer, designed for the jewelry casting process.
Function Description
The CIMO St. Louis 82 is a vacuum investment mixer specifically engineered for the lost wax casting process in jewelry making. Its core concept revolves around total operability under vacuum conditions. Traditionally, investment was mixed with water in open air, leading to non-homogeneous results, imprecise mixtures, and a high percentage of porosity due to incorporated gases, which affected the smoothness and completeness of the cast precious metal surface. The St. Louis 82 addresses these issues by performing the entire mixing process under vacuum, ensuring precise timing, accurate quantity control, and exact water dosing. This approach guarantees the best quality results for one of the most delicate steps in the lost wax casting system.
Key features contributing to its function include:
- Water Degasification: Water is degasified in a dedicated dosing tank before being added to the investment powder.
- Total Investment Powder Degasification: The investment powder is degasified within the mixing container, further reducing air bubbles.
- Precise Water Quantity: The machine ensures an exact and precise quantity of water is added to the powder, maintaining a standard ratio of 1 kg dry investment powder to 400 cc water.
- Adjustable Mixing Parameters: Users can adjust the mixing speed and rotation direction during the mixing step.
- Pre-settable Mixing Timing: The unit allows for correct and pre-settable mixing times.
- Adjustable Vibration Intensity: An adjustable intensity vibration feature is available for invested flasks, aiding in proper filling and de-airing.
Important Technical Specifications
- Model: St. Louis 82 – 6 kg.
- Type: Vacuum investment mixer for jewelry casting process.
- Power Supply: 220 Volts, 50/60 Hz, Singlephase.
- Consumption: 3.5 KW.
- Protection Fuse: 2 fuses x 16 AMP (located on the circuit board).
- Max Investment Dry Powder Capacity: 6 kg.
- Vacuum Pump Requirement: Operates with a vacuum pump capacity of 18 CBM/hour. The vacuum pump is supplied separately as an integrated part of the unit and connects to a dedicated 220V plug on the rear of the machine basement.
- Water Dosing Tank Ratio: The sticker on the dosing water tank indicates kg and pounds, with numbers from 0 to 9 (kg). It is printed considering a standard ratio of 1 kg dry investment powder = 400 cc water. The lines and numbers indicate dry powder grams (or pounds) from the top line water level, with the quantity of water corresponding to 400 cc per kilogram.
Usage Features
The operation of the St. Louis 82 involves several preliminary steps and precise actions:
Preliminary Operations:
- Switch On: Turn on the machine using the main rear general switch.
- Access Mixing Chamber: Lift the top motor with its knob and turn it to the right. Remove the cap, the top mixing cover with its blade, and then the complete mixing chamber.
- Prepare Flasks: Place flasks on the round flask plate. The flask plate can be removed for easier preparation and must be matched to the hexagonal pin when replaced.
- Investment Powder Loading: Ensure the bottom pouring valve tap is closed. It is recommended to place the mixing container on a digital scale and tare it before loading the investment powder. Load the exact weight of powder, avoiding breathing the dust (mask and gloves are compulsory).
- Assemble Mixing Chamber: Place the mixing container back, ensuring correct matching on the flask chamber and alignment of the sticker line reference. Insert the mixing blade, ensuring the cover seals perfectly. Locate the top motor in its original position, ensuring the transmission shaft connects correctly. Replace the cap. Verify the pouring tap is closed.
Process Start:
- Set Mixing Time: Adjust the pre-set mixing time (in seconds) on the LED display using the +/- buttons. The machine will automatically work according to this time, and a buzzer will sound when mixing is complete.
- Blade Rotation Direction: The machine defaults to left-to-right rotation. This can be changed using the "INV. MOT" button. Blade speed can be adjusted with the +/- buttons under the "MIX" button.
- Vacuum Activation: Ensure the vacuum tap (REF. 5) is closed. Start the vacuum pump by pushing the "VAC" button. Release the hand from the cap once the vacuum level is stable. Check the vacuum gauge (REF. 9) to ensure a good vacuum situation (between -60 and -76, depending on altitude).
- Switch Off Vacuum Pump: Once the desired vacuum level is reached, switch off the vacuum pump. The process continues under vacuum, but with the pump off, to prevent excessive bubbling in the mixture.
- Water Transfer: Open the water tap (REF. 6) and immediately close it once the water level in the dosing tank reaches the line corresponding to the pre-loaded powder quantity (refer to the sticker for precise measurements).
- Start Mixing: Push the "MIX" button. Start slowly and adjust speed according to the mixture's density.
- Monitor Vacuum: Keep the vacuum level on the vacuum meter controlled, not lower than -55/-60.
- Flask Positioning: During mixing, check flask alignment with the pouring hole and adjust using the "SX" or "DX" buttons for "ROTAZIONE PIATTO" on the control panel. Blade speed and rotation can be adjusted during operation.
When Mixing Ends:
- Pouring: Open the pouring valve (REF. 8) to fill the flasks.
- Vibration: Activate the "VIB" button for slight vibration during pouring to aid flask filling. Adjust intensity with +/- buttons.
- Multiple Flasks: After filling the first flask, close the valve, rotate the flask plate to the next flask, and repeat.
- Vacuum Check: If the vacuum value has not significantly dropped, it's not necessary to restart the vacuum pump. Only restart if the gauge goes below -60.
When Flasks are Totally Filled:
- Final Vibration: Start the vibration process (max 3 minutes) by pushing "VIB" on the control panel. Adjust intensity according to flask size and quantity.
- Switch Off Vibration: Turn off the vibration.
- Release Vacuum: Open the vacuum tap (REF. 5) until the vacuum gauge reaches zero.
Maintenance Features
The manual outlines several final operations that double as maintenance steps:
- Hardening: Leave flasks in the unit for the mixture to harden.
- Cleaning Mixing Components: Remove the mixing chamber and blade. Wash and rinse all parts thoroughly, especially the bottom part of the mixing container where the pouring valve and its spring are located.
- Drying: Dry the container and blade before next use.
- Top Cover Cleaning: Clean the internal part of the top cover and cap, particularly around the blade shaft connection.
- Flask Plate Removal: Take the flask plate completely off the machine.
- Careful Flask Handling: This phase is delicate for accurate mold reproduction. The manual notes that a spare extra flask plate is provided for this reason.
- Water Refill: Load the water dosing tank again.
The unit is then ready for another investment preparation process. The manual also emphasizes that only technical staff authorized by the producer should service the machine, and any unauthorized modifications or repairs will void the warranty. Warranty covers twelve months for the machine, with electric and electronic components covered for six months, limited to repair or change of faulty parts, with labor, transport, customs, and other costs at the customer's expense.