Do you have a question about the Cisco MERAKI Go and is the answer not in the manual?
Instructions for creating an account and logging into the Meraki Go mobile application.
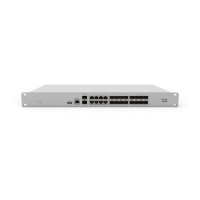
Guide for connecting the Meraki Go GX20 router firewall to the internet and powering it on.
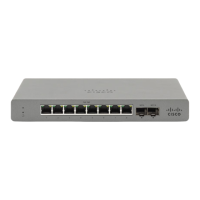
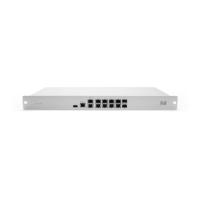
Steps for connecting Meraki Go GS110 switches to the network and powering them.
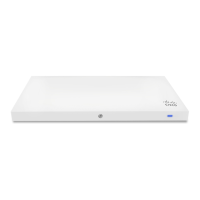
Details on powering and connecting Meraki Go GR10/GR60 WiFi access points to the network.
The Meraki Go Quick Start guide outlines the process for setting up and configuring Meraki Go networking solutions, designed specifically for small businesses. This guide covers the initial account setup, hardware installation, and network configuration, aiming for a complete setup within 30-60 minutes.
Meraki Go devices provide a fast, secure, and reliable networking solution. The product line includes router firewalls (GX series), switches (GS series), and WiFi access points (GR series), which can be deployed individually or in combination to create a comprehensive network infrastructure. The router firewall acts as the gateway to the internet, providing security and managing network traffic. Switches extend the network by connecting multiple wired devices and can offer Power over Ethernet (PoE) capabilities to power other devices like access points. WiFi access points broadcast wireless networks, allowing devices to connect wirelessly. The entire system is managed through a mobile app, providing a user-friendly interface for configuration and monitoring.
The setup process begins with account creation, which can be done via the Meraki Go website or the dedicated mobile app (available on iOS and Android). The app is the preferred method for account setup and subsequent hardware management. Once an account is created, users must verify their email address before logging in.
Adding hardware to the account is streamlined using QR codes located on each Meraki Go device. Users scan these QR codes with their mobile app's camera to quickly register the hardware. If QR code scanning is not feasible, devices can also be added by manually entering their serial numbers. The app provides a flashlight button to assist with scanning in low-light conditions. It's important to note that if a metal mounting plate is attached to the hardware, it needs to be removed to access the QR code. For users with existing dashboard.meraki.com accounts, a new email address is required for Meraki Go.
After hardware is added, the next step involves connecting it to the internet. The guide specifies a connection order for multiple Meraki Go products:
Meraki Go WiFi access points offer flexible power options:
Once hardware is connected, users should check the Ethernet port lights; a green light indicates a successful connection, while an amber blinking light signifies data transmission. The devices will then attempt to find an internet path and perform any necessary software updates, which can take up to 30 minutes. During this update process, the device's LED will cycle through a rainbow pattern, indicating connectivity establishment with Meraki Go servers. After the rainbow pattern, the LED may alternate between amber and white, with a white flashing light indicating software installation. A solid white light (for GX, GS Series) or solid green light (for GR Series) indicates that the device is fully operational.
The final step is to configure a WiFi network using the app. Users can create a network by tapping the "Networks" icon and then the "Create a WiFi network" button. They can assign a name and password to the network. An option to enable "guest network" functionality is available, which isolates clients from communicating with each other or with devices on the local network, enhancing security for guest access. Once a WiFi network is created and settings are configured, the Meraki Cloud automatically applies these settings to any additional Meraki Go devices added to the account.
The guide implicitly highlights several maintenance-related features:
| Wireless Standards | 802.11a/b/g/n/ac |
|---|---|
| Product Line | Meraki Go |
| Target Users | Small Businesses |
| Deployment | Indoor |
| Subscription Required | No |
| Wireless Standard | Wi-Fi 5 |
| Frequency Bands | 2.4 GHz, 5 GHz |
| Management | Cloud-based |
| Security | WPA2, WPA3 |
| MIMO | Yes |
| Mobile App | Yes |