51
2. Using a wire-stripping tool to strip both of the wires from the DC-input power source. Expose the wire to the
appropriate length for the DC power connector, about 0.25 inches.
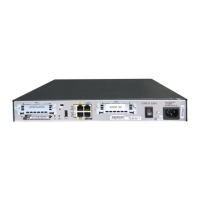
3. Insert the wires into the DC power connector terminals described in Figure 1 on page 46 and Table 1 on page 46.
Note: When you insert the wires in the terminals as shown in Figure 6 on page 51, ensure that the polarity matches:
negative-to-negative and positive-to-positive).
Figure 6 DC Power Connector Terminals
4. Use the screwdriver to tighten the two captive screws on the connector. The terminal screws are shown in Figure 6
on page 51. Torque the terminal block screws to 1.243 N-m (11 lbf-in).
5. Connect the DC power connector to the DC power connection on the router as shown in Figure 4 on page 49.
6. Use the screwdriver to tighten the two captive screws on the terminal block to the mating connector. The terminal
screws are shown in Figure 2 on page 48. Torque the terminal block screws to 1.243 N-m (11 lbf-in).
7. Enable DC power by plugging in the DC power supply cord to the power source, or by enabling power at the
designated circuit.
Power Cycling the Router
There are two reset buttons on the router cable panel, which can be used to power cycle the router and to reset the
router system software to the default configuration. Use the reset buttons as described in this section.
Caution: When you use the CONFIG Reset button to restore the router to the factory default software configuration, the
current software configuration is permanently deleted from the router.
Accessing the Buttons
You must provide a pin, paper clip, or other thin metal tool to access and press these buttons.
302220