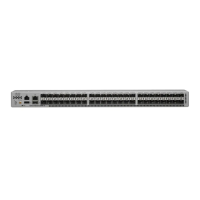
Front rack-mount bracket aligned to the module end
of the chassis
5Front rack-mount bracket aligned to the port end of
the chassis
1
Four M4 screws used to attach the bracket to the
chassis
6Four M4 screws used to attach the bracket to the
chassis
2
Two M4 screws used to attach the bracket to the
chassis
7Rear rack-mount guide aligned to the module end of
the chassis
3
Rear rack-mount guide aligned to the port end of the
chassis
8Two M4 screws used to attach the bracket to the
chassis
4
c) Secure the front-mount bracket to the chassis using four M4 screws and tighten each screw to 12 in-lb (1.36 N·m)
of torque.
d) Repeat Step 1 for the other front rack-mount bracket on the other side of the switch and be sure to position that bracket
the same distance from the front of the switch.
Step 2 Install the two rear rack-mount brackets on the chassis as follows:
a) Align the two screw holes on a rear rack-mount bracket to the middle two screw holes in the remaining six screw
holes on a side of the chassis. If you are aligning the guide to holes that are near the port connections end of the
chassis, see Callout 3 in the previous figure. Otherwise, see Callout 7 in the previous figure.
b) Attach the guide to the chassis using two M4 screws (see Callout 4 or 8 in the previous figure). Tighten the screws
to 12 in-lb (1.36 N·m) of torque.
c) Repeat Step 2 for the other rear rack-mount bracket on the other side of the switch.
Cisco Nexus 3500 Hardware Installation Guide
14
Installing the Chassis
Installing the Switch Using the N3K-C3064-ACC-KIT Rack-Mount Kit
 Loading...