Large blue-head open lever
Sensor arm open lever
"Media": Usually a roll of labels,
card tickets or tags
Media Holder Assembly:
Slide the Media holder guide
on to the Media holder bar
Fixed media guide
Media
(1)
Moveable media guide
Media
(2)
(3)
( f )
(e)
1
2
Ribbon holders
Paper core
Unused full ribbon
Media guide arm
(in raised position)
Media width adjustment knob
Media thickness adjustment screw
Media thickness
check window
Media width check window
3
Media Installation
6
Using narrow width or thick media
7
For non-standard media sizes and shapes, you may need to adjust the media sensors. The adjustable sensor is standard fitment.
a. Load media in to the printer as described
elsewhere. Ensure the media guide arm is lowered
and clicked down, but leave the printhead
mechanism open.
b. By rotating the adjustment knob, move the
adjustable sensor to the required position. The
yellow mark visible through the adjustment
window should be used to align the sensor with
the required position across the media.
Unusually Shaped Media Adjustment
8
Printer Driver Installation
If the drivers are not included with the printer, you can download the
latest version free-of-charge from our web site, details of which are on
the back of this Quick Start Guide.
Under the latest versions of Windows
®
, the computer will often
automatically detect the presence of the printer. Therefore it is
advisable to download the drivers from our web site before installing the
printer so the files are ready for installation.
During installation of the printer driver, the computer may ask you to
select the printer required.
You will need to click on the "Have Disk..." box then tell the computer
the location of the driver files on your CD ROM. You will usually need to
look for the "Citizen.Inf" file.
Your supplier will assist you with the correct drivers and software which
are compatible with your particular computer system if you are not
using Windows
®
.
Windows
®
is a trademark of Microsoft
®
Corporation.
Windows
®
Drivers
4
Ribbon Installation
5
Printer Configuration
a. Open the top cover and then push the Head open lever to release the
mechanism. You should not open the media guide bar as this keeps the
media in place.
b. Place the unused ribbon and
the empty paper core (tube)
on to the ribbon holders.
Insert the ribbon holders all
the way in to the ribbon and
paper core.
c. Install the unused ribbon and holder
in to the rear ribbon drive unit.
The splines on the ribbon drive gear
mechanism engage with the end of
the ribbon holder.
d. Pull the ribbon past the bottom of
the head unit to the ribbon winding
side. Ensure approximately 30 cm
(1ft) of extra ribbon is pulled
through.
e. Using adhesive tape fix the
ribbon that you have pulled
through the printer on to the
paper tube. Wind (roll) it on the
ribbon holder in an
"anticlockwise" direction.
f. Put the ribbon holder on which
the paper tube has been set in
the ribbon drive unit, then
rotate it in the direction shown
by the arrow to remove slack
and wrinkles from the ribbon.
g. Close the main printer mechanism. Firmly push down on the green part of
the mechanism as (as shown in section 3f) until it clicks closed. Make sure
you hear the "click" from the mechanism otherwise it is not closed.
h. If the ribbon is wrinkled, push the FEED key until the wrinkles disappear. In
the unlikely event the wrinkles do not disappear you may need to adjust
the ribbon tension settings as described in the full user manual on the CD
supplied. This will only usually be needed for specialist or very narrow
ribbons.
Installing the Media
a. Media installation is very straightforward and easy. Firstly, open the printer
cover to view the printer’s mechanism and media holder.
b. Push down the Head open lever to release the printhead. Then push down
the Sensor arm open lever to lift the Media guide up.
c. Insert the “Media holder assembly” into the core of roll of media. Put this
on the media holder and push it to the left side wall and secure roll of
media.
d. (1) Push media against the fixed media guide on the left side.
(2) The moveable media guide should be adjusted so it touches and guides
the media. It must not bend or restrict the media from passing through
the printer.
(3) The media should run through the printer straight so the left edge is
aligned with the notch in the tearing plate.
e. Holding media so as to ensure it cannot move or skew, push down the
Media Guide to close it.
f. Close the main printer mechanism.
Firmly push down on the green part
of the mechanism as shown below
until it clicks closed.
Make sure you hear
the “click” from the
mechanism otherwise
it is not closed.
g. Close the printer cover
and turn ON the power
switch of the printer.
The LCD screen on the
control panel will show
‘On Line Ready.’ Then
press the FEED key and media will advance to the next label position and
stop.
h. With the power switched on, push the FEED key to feed the media. It will
halt at the next print start position.
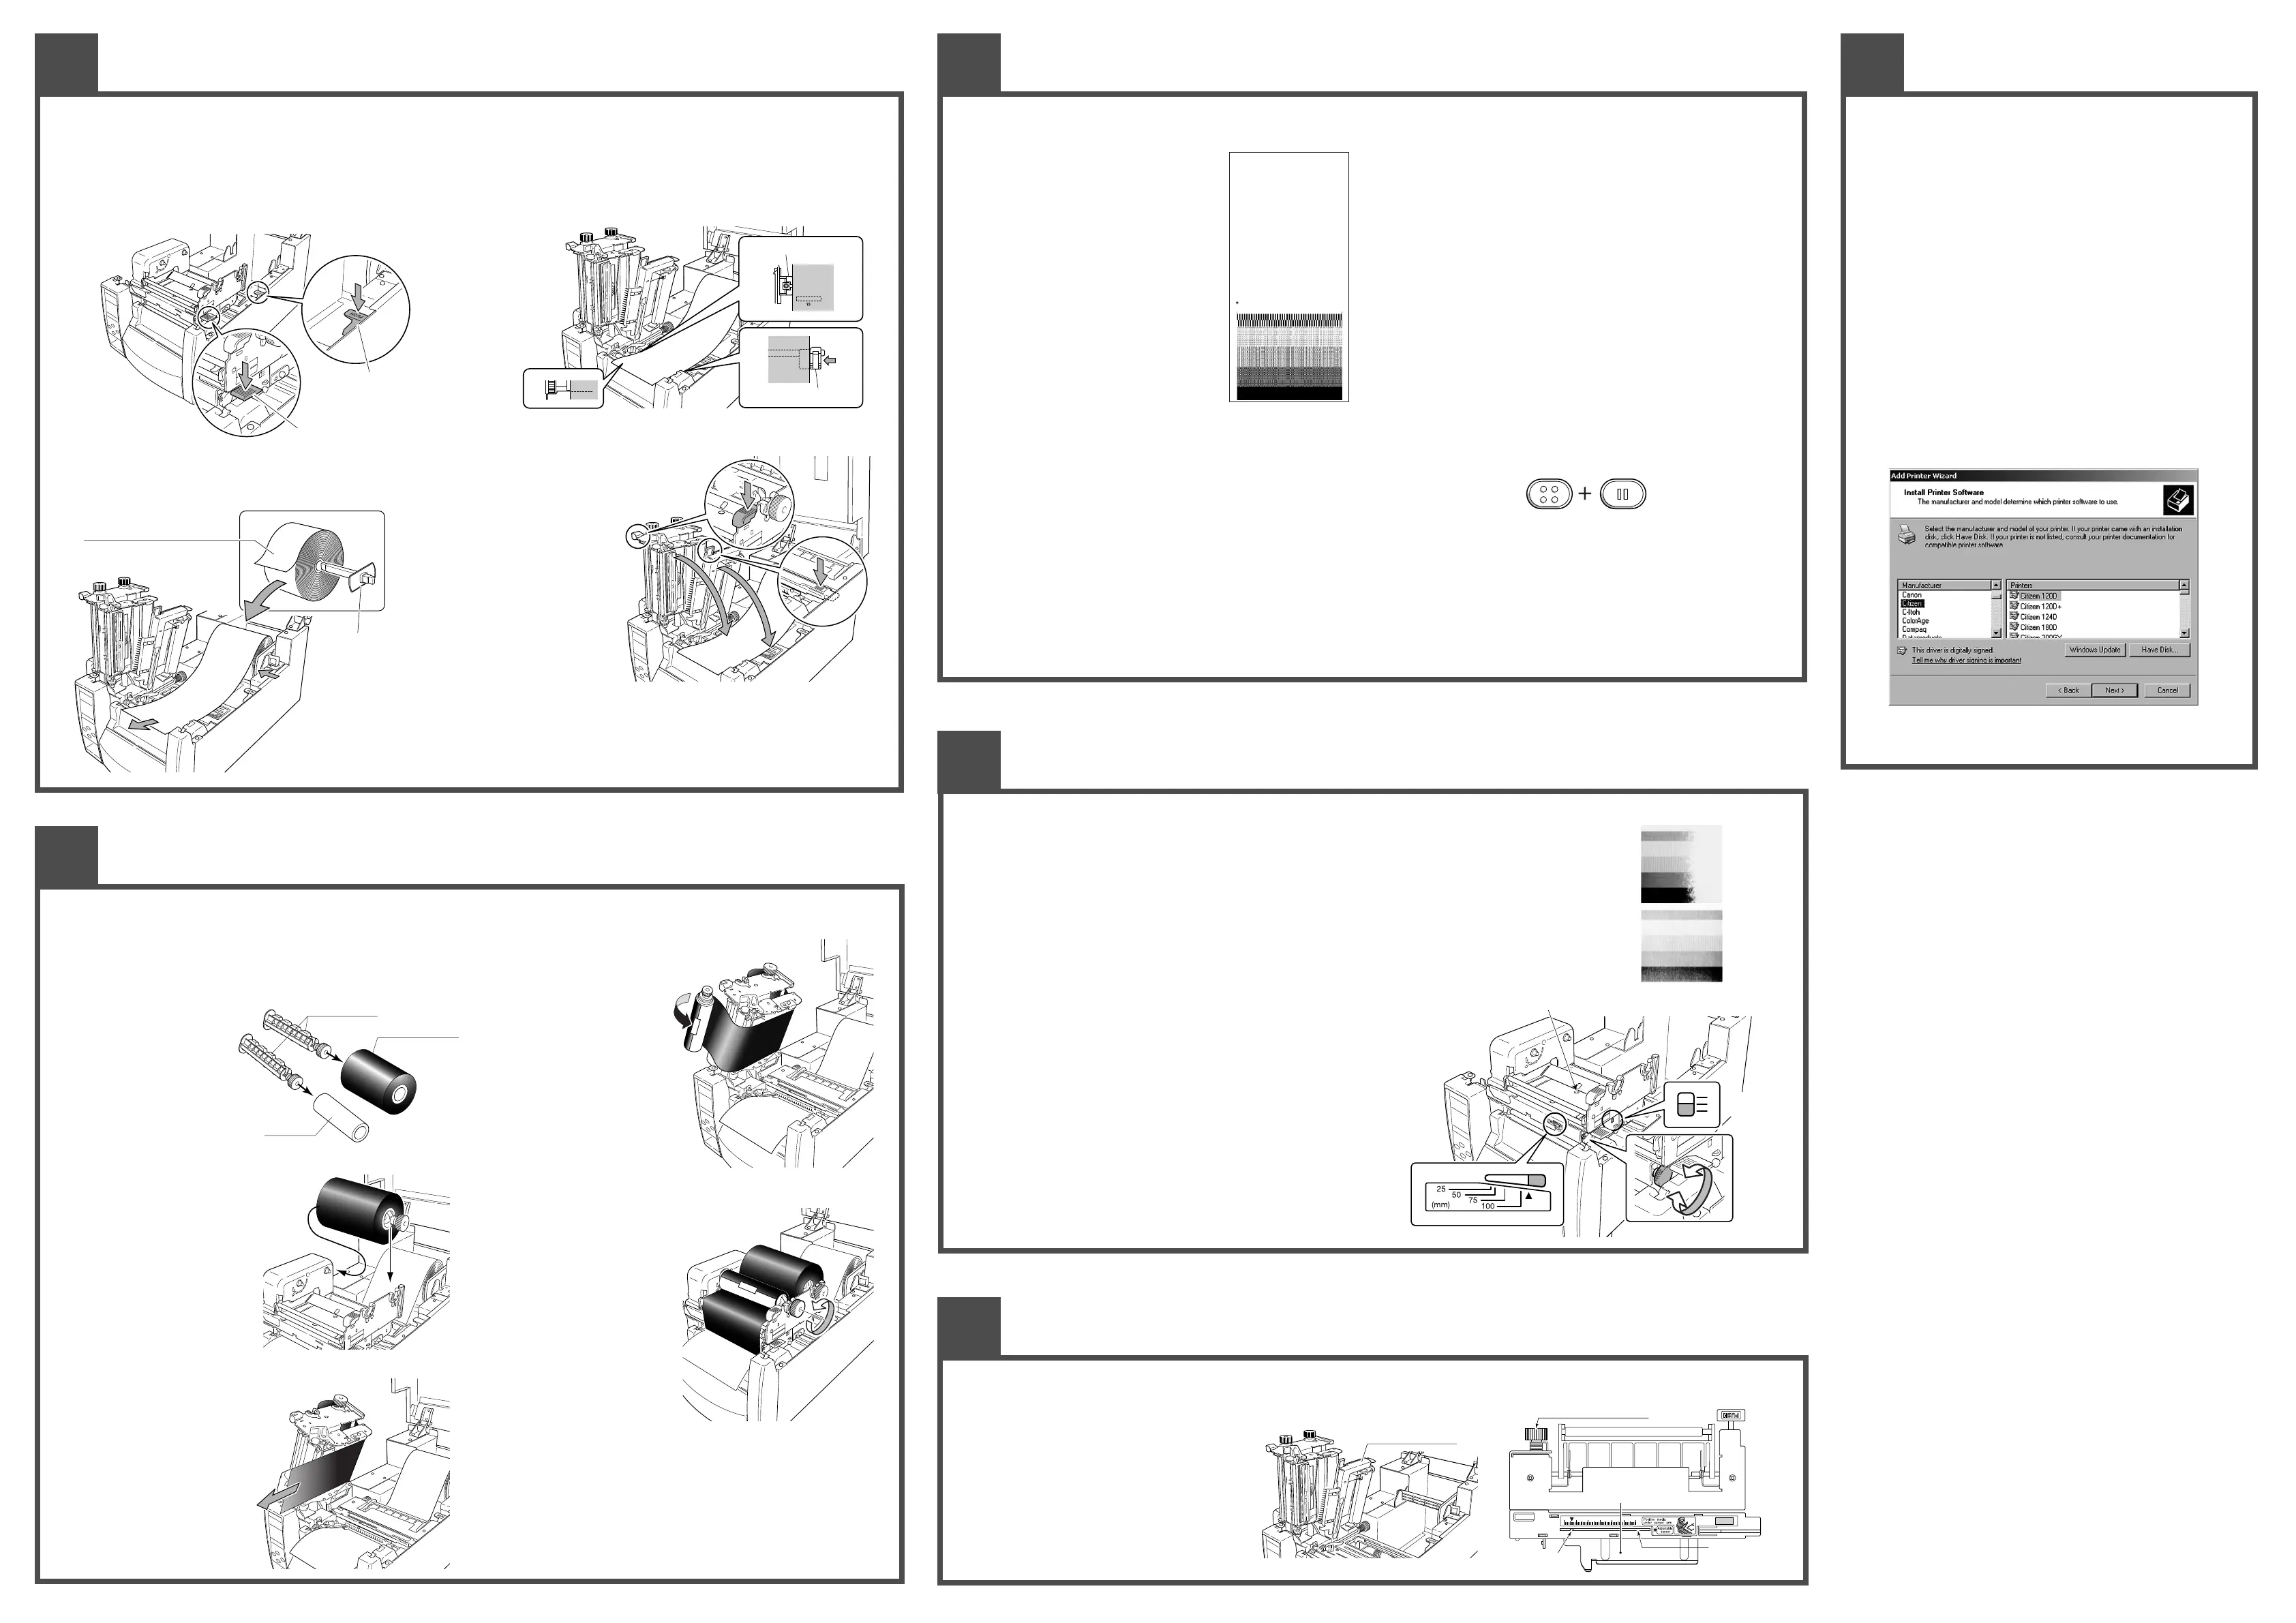
Configuration Print
Performing a self test print is an easy way to
check on the configuration of the printer. Install
the media as explained elsewhere and then
operate the printer as follows.
For label media
Turn on printer power while pushing the FEED
key. When the LCD indicates "Self Print Mode"
and "Label Media", release the FEED key.
For continuous media
Turn on printer power while pushing the FEED
key. When the LCD indicates "Self Print Mode"
and "Label Media", and then changed to "Self
Print Mode" and "Cont. Media", release the
FEED key.
The printer will produce the configuration report shown.
To restart printing, press the FEED key again.
To exit, switch off the printer.
Changing the Configuration
If the MENU key is pressed while the printer is in the On Line Ready state, the
printer enters menu setup mode. In this mode, the printer's configuration can
be changed using the operation panel. During menu setting mode, the LCD
indicates the current menu settings and the key function.
Functions of the keys
In the menu setup mode, the four keys become “cursor keys” to navigate the
menu. Refer to the four small arrows in the centre of the keypad rather than
the names of the keys.
The 5 key (Feed key) goes up the menu system or selects a higher value
The ∞ key (Menu key) goes down the menu system or selects a lower value
The 3 key (Stop key) selects or saves the item or enters a menu
The 2 key (Pause key) exits the current item (goes back) and eventually exists
the menu system
The menu settings are stored temporarily in the printer's memory. They are
only permanently stored in the printer setup when you exit the menu system
and say “Yes” to the “Save Settings” question.
Quick selection between DT and TT
The print method (thermal transfer method/direct thermal method) can be
set using operation panel in addition to menu setting mode.
Caution:
Ensure the printer is not printing or in pause mode. You cannot change
between print methods unless the printer is in 'On Line Ready' mode.
Setting method
Keep the MENU key held down. Each time the PAUSE key is pushed, the
printer switches between thermal transfer mode and direct thermal mode.
7If thermal transfer is selected, the buzzer sounds once and the LCD briefly
displays “Print Method, TT” before returning on-line.
7If direct thermal is selected, the buzzer sounds twice and the LCD briefly
displays “Print Method, DT” before returning on-line.
Note:
If you just press the MENU button on its own and do not press PAUSE, you
will enter the full Menu Setup Mode.
Thermal Transfer Ribbon Installation
Using the Configuration / Self Test Print as described above, you can make adjustments to the
printer settings such as media width and media thickness (printhead pressure).
Width Adjustments
The sample, top right, shows an incorrectly set "media width adjustment" . The printed image disappears on the right side of
the image.
To change the media width setting, rotate the small adjustment knob on the right side of the printhead, as shown in the
diagram. The indicator window (which may be obscured by the ribbon) shows an approximation of the setting. The small
arrow indicates "full" width of just over 4 inches, 100mm.
Thickness Adjustments
The second sample, right, shows an incorrectly set "media thickness adjustment".
The printed image appears light, grey or speckled. This can also be caused by
incorrect heat setting.
To adjust the media thickness, use a cross-point screwdriver inserted in to the
"thickness adjustment" hole on the top of the mechanism (which may be obscured
by the ribbon).
Turning the screw clockwise cause the indicator to drop. This is for thicker media
such as card and tags. Turning anti-clockwise the adjustment indicator raises which
is for thinner media like thermal paper rolls.
The centre line is the factory setting and is suitable for normal labels.
Yellow mark
Media guide arm
(viewed from above)
Sensor adjustment knob
Adjustment
window
Machine Information
Model Number : CL-S700
Boot Version : ****
ROM Version : ********
ROM Date(DD//MM//YY) : 07/10/03
ROMCheck Sum : ****
Head Check : OK
Print Counter : 0002.234km
Service Counter : 0002.234km
Sensor Monitor : 1.50V
Option Interface : None
Current Menu Setting
[PageSetup Menu]
Print Speed : 10 IPS
Print Darkness : 10
Darkness Adjust : 00
Print Method : Thermal Transfer
Continuous Media Length : 4.00 inch
Vertical Position : 0.00 inch
Horizontal Position : 0.00 inch
Sensor Select : Rear Adj Sensor
Media Sensor : See Through
Small Media Adjustment : Off
Small Media Length : 1.00 inch
Symbol Set : PM
MENU
PAUSE
Hold Press/Release

 Loading...


