1/2
E210 Abbreviated instruction
• This watch is solar-powered. Expose the dial to light and use it sufficiently charged.
• To see details of charging time, specifications and operations, refer to the instruction manual:
E210 instruction manual
English
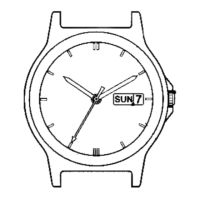
Component identification
• Models with the crown at the 3 o'clock position
7
60
3
12
ON
OFF
500
400
300
250
120
130
140
150
160
180
200
220
80
85
90
95
100
110
65
70
75
T
A
C
H
Y
M
E
T
E
R
60
CHARGE
45 15
9
Button
B
Button
A
Chronograph second
hand
Hour hand
Alarm hand
Second hand
Minute hand
Date indication
Crown
Chronograph minute
hand
Power reserve indication
hand
Button
C
(recessed
button)
Chronograph hour hand
Alarm indicator hand
Alarm crown
• Models with the crown at the 12 o'clock position
Button
B
Button
A
Chronograph second
hand
Hour hand
Power reserve
indication hand
Minute hand
Alarm hand
Crown
Chronograph minute
hand
Button
C
(recessed
button)
Chronograph hour
hand
Alarm crown
Alarm indicator hand
Second hand
Date indication
• Actual appearance may differ from the illustrations.
• The crown has two positions when pulling it out.
• Refer also to our web page for detail of usage of the
scale and bezel on the watch.
(
http://www.citizenwatch-global.com/support/pdf/
enhanced/e.pdf
)
Checking the power reserve
You can see current power reserve level by referring to the power reserve
indication hand. Use the watch with sufficiently charged.
Level
3 2 1 CHARGE
Indication
(Models with the
crown at the 3
o'clock position)
Indication
(Models with the
crown at the 12
o'clock position)
Duration (approx.)
8 ‒ 7 months 7 ‒ 5 months
5 months ‒ 7
days
7 days or
shorter
Meaning
Power reserve is
sufficient.
Power reserve is
OK.
Power reserve is
getting low.
Insufficient
charge warning
has started.
OK for normal use. Charge immediately.
Setting the time
1.
Pull the crown out to position
2
when the second hand points
0 second.
The second hand stops.
2.
Rotate the crown to set the time.
• Change of date indication shows it just became AM. Take care the time set
is AM or PM.
• Move the hands 4 or 5 minutes forward and move them back to the right
time to set the time more precisely.
3.
Push the crown in to position
0
in accordance with a reliable
time source to finish the procedure.
The second hand starts moving.
Setting the date indication
• Do not adjust the date indication while the watch shows 9:00 PM ‒ 1:00 AM.
Otherwise, the date indication may change incorrectly thereafter.
• Date indication adjustment is required on the first days of March, May, July,
October and December.
1.
Pull the crown out to position
1
.
2.
Rotate the crown counterclockwise to set the date indication.
3.
Push the crown in to position
0
to finish the procedure.
Crown's position
0 1 2