DBX 18..27
7 Installation(Fortsetzung) Installation(continuation)
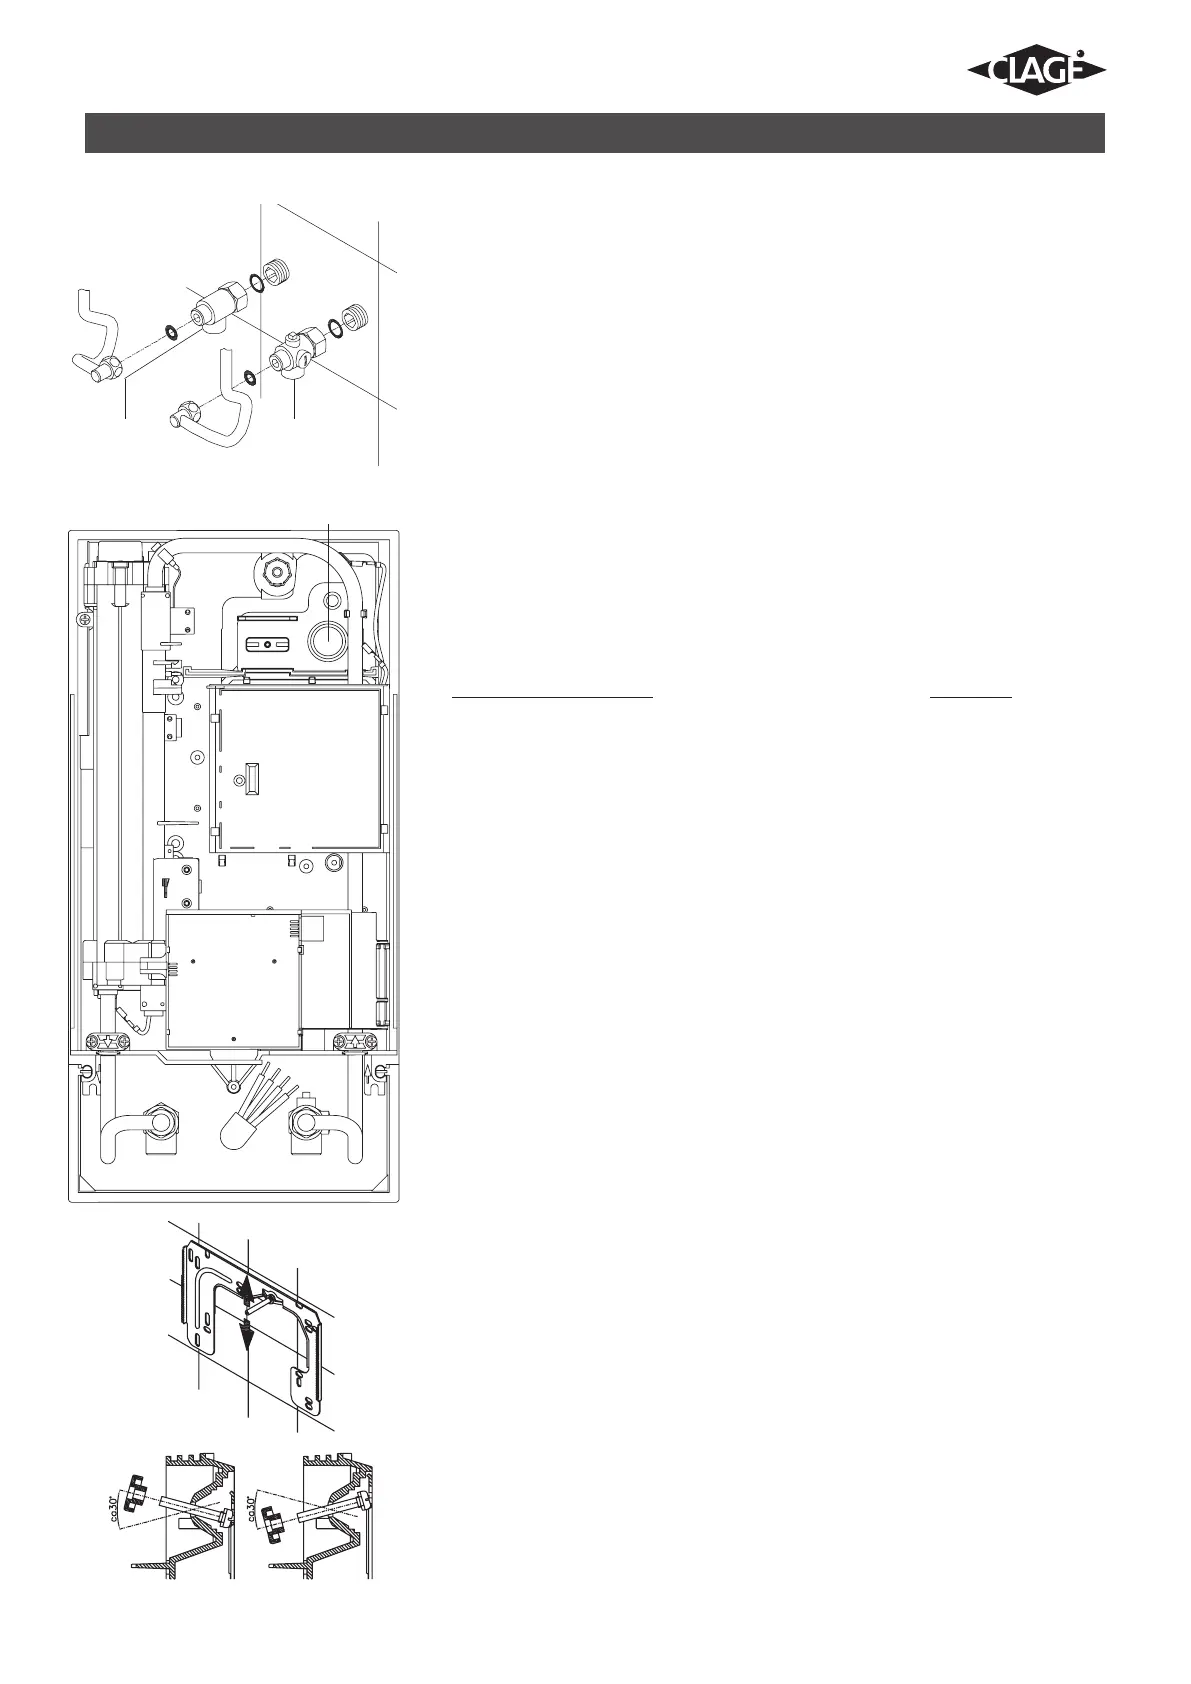
Installing connection pieces
1. As shown in the illustration, screw the
cold water connection piece (20) with
the union nut and the 1/2“ seal onto
the cold water connection.
2. Screw the hot water connection piece
(1) with the union nut and the 1/2“ seal
onto the hot water connection.
Installing the appliance
1.To open the appliance hood, take off
the faceplate and unscrew the main
hood screw.
• Whenreplacinganappliance,the
electricalpowersupplycablemaybe
connectedintheupperpart.Onlyin
suchcase,pressagainsttheprepared
breakingpoint(S)withablunt
implement(e.g.screwdriver).
• Slitthegrommet(22)tomatchthecable
size.Theopeninginthegrommetshould
beslightlysmallerthanthe
cross-sectionofthecableinorderto
ensureoptimumprotectionagainst
water.Fitthegrommetintotheopening.
Theprotectiongrommetmustbeused!
• Stripthecableroughly6cmabovethe
pointwhereitemergesfromthewall.
Holdthepreparedappliancesothatyou
canroutethecableintothegrommet
withtheotherhand.
2. Place the appliance on the heater
bracket (9) so that the threaded rod
of the wall bracket fits in the provided
hole of the appliance. If necessary,
slight corrections are possible by
carefully bending the threaded rod
of the wall bracket. However, it must
be possible to screw on the water
connection pipes of the appliance
without applying force.
Anschlussstücke installieren
1. Schrauben Sie gemäß Abbildung das
Kaltwasseranschlussstück (20) mit
Überwurfmutter und der 1/2“-Dichtung
an den Kaltwasseranschluss.
2. Schrauben Sie das Warmwasser-
anschlussstück (1) mit Überwurf-mutter
und der 1/2“-Dichtung an
den Warmwasseranschluss.
Gerät montieren
1.ZumÖffnendesGehäusesdieBlende
abnehmen und die zentrale Hauben-
schraube lösen.
•ImAustauschfallkannesvor-
kommen,dassdieElektrozuleitung
imoberenGerätebereichvorhanden
ist.NurdannöffnenSiedieSoll-
bruchstelle(S)anderPrägungdurch
kräftigenDruckmiteinemstumpfen
Werkzeug(z.B.Schraubendreher).
•SchneidenSiedieDurchführungs-
tülle(22)entsprechenddem
Zuleitungsquerschnittauf.Dabei
solldieÖffnunginderTülleetwas
kleineralsderQuerschnittdesKabels
sein,umeinenoptimalenSchutz
gegenWasserzuerzielen.PassenSie
dieTülleindenDurchbruchein.Die
Schutztüllemussverwendetwerden!
•MantelnSiedasElektrokabel
ungefähr6cmüberdemWand-
austrittab.NehmenSiedasvorbe-
reiteteGerätsoindieHand,dassSie
mitderanderenHanddasKabelin
dieGummitülleführenkönnen.
2. Setzen Sie das Gerät auf den Wand-
halter (9), so dass die Gewindestange
des Wandhalters in das vorgesehene
Loch des Gerätes passt. Durch vorsich-
tiges Biegen der Gewinde stange des
Wandhalters lassen sich gegebenen falls
kleine Korrekturen vornehmen. Die
Wasseranschluss leitungen des Gerätes
müssen sich jedoch ohne Gewalt-
anwendung anschrauben lassen.
20
S
1
8
 Loading...