When finished, remove all shavings and sawdust from the machine and surrounding area
and dispose of safely, accumulation of dust and shavings is a fire hazard and should not
be allowed to build up.
Blade Replacement
Plane blades require sharpening or replacing. Care should be taken at all times when
handling them, they are very sharp, even when dull.
Blades must always be fitted as a pair, and must be of the same type, only fit blades
recommended by the manufacturer.
Blade Removal
First, ensure the machine is switched OFF and isolated from the main electrical supply by
removing the plug from the socket.
NOTE: store all parts removed for reuse when reassembling.
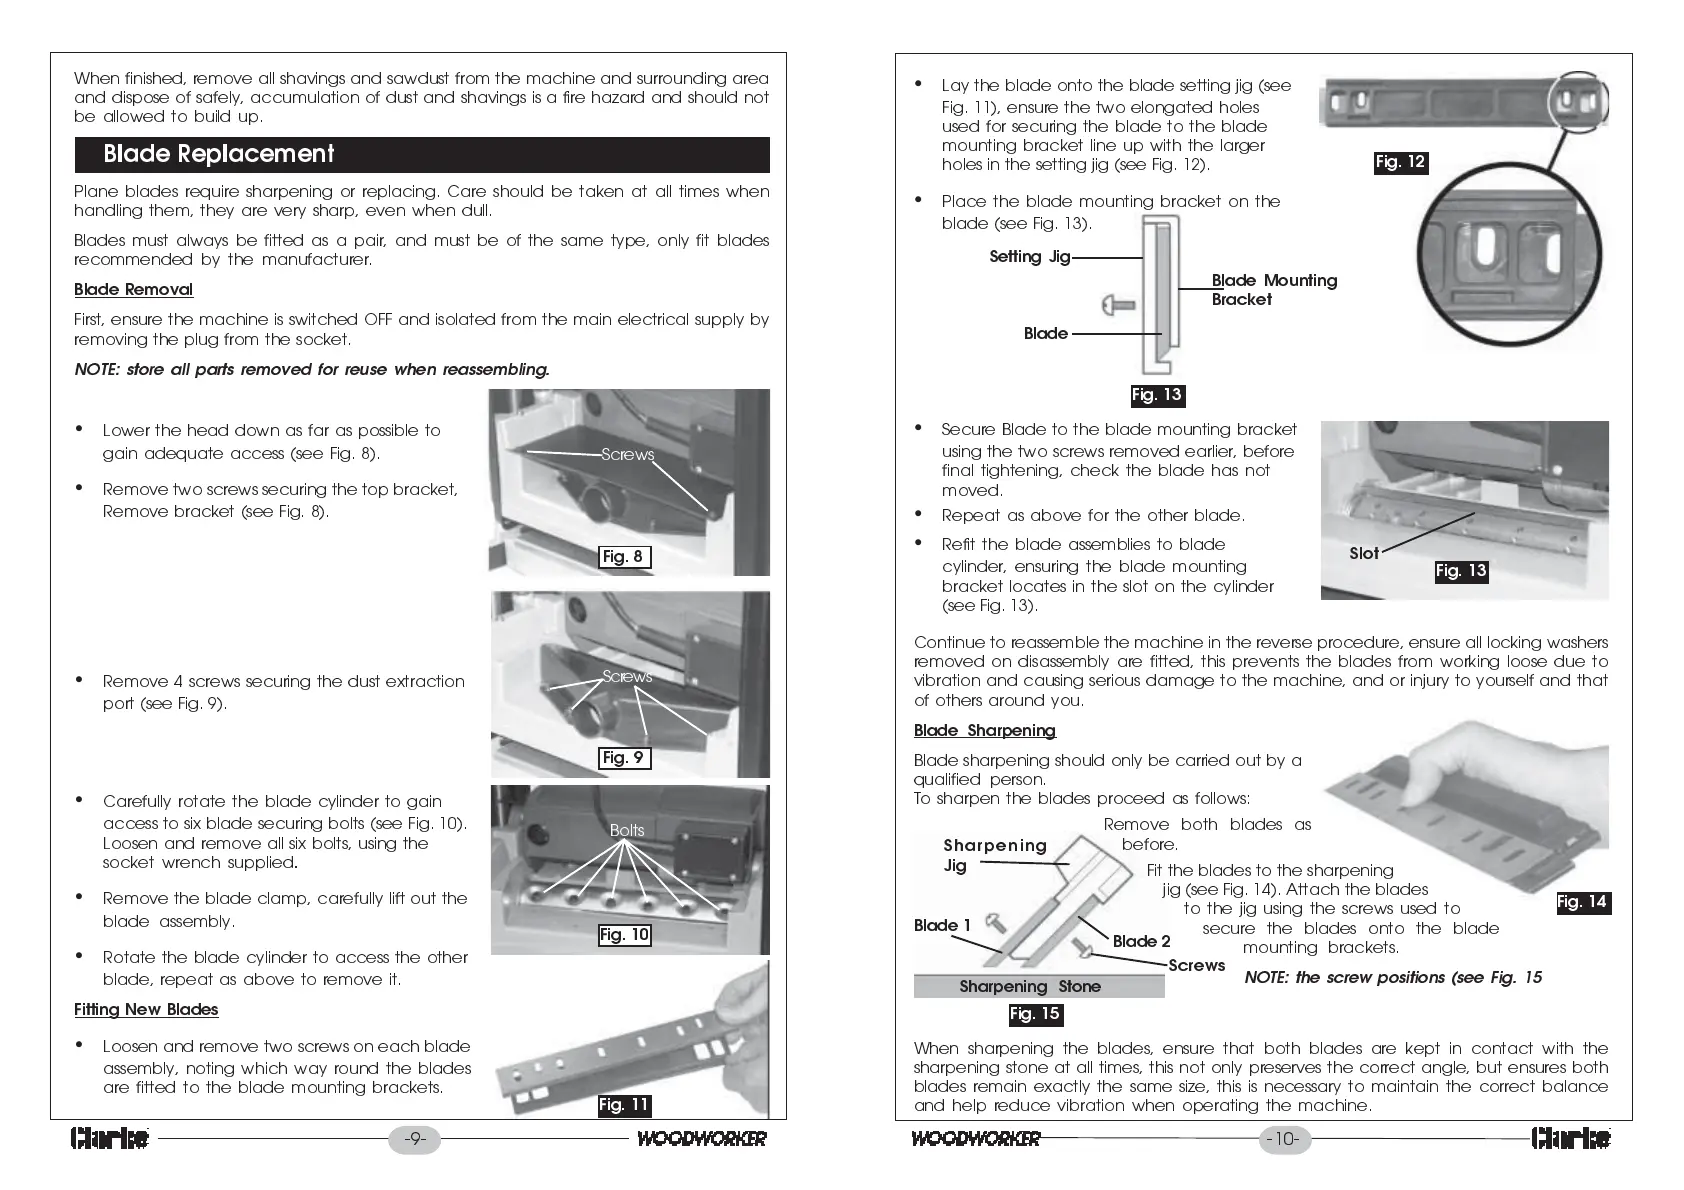
Lower the head down as far as possible to
gain adequate access (see Fig. 8).
Remove two screws securing the top bracket,
Remove bracket (see Fig. 8).
Remove 4 screws securing the dust extraction
port (see Fig. 9).
Carefully rotate the blade cylinder to gain
access to six blade securing bolts (see Fig. 10).
Loosen and remove all six bolts, using the
socket wrench supplied
.
Remove the blade clamp, carefully lift out the
blade assembly.
Rotate the blade cylinder to access the other
blade, repeat as above to remove it.
Fitting New Blades
Loosen and remove two screws on each blade
assembly, noting which way round the blades
are fitted to the blade mounting brackets.
Fig. 8
Fig. 9
Fig. 10
Screws
Bolts
Screws
Fig. 11
Fig. 12
Fig. 13
Setting Jig
Blade
Blade Mounting
Bracket
Slot
Fig. 13
Sharpening
Jig
Blade 1
Blade 2
Screws
Sharpening Stone
Fig. 14
Fig. 15
When sharpening the blades, ensure that both blades are kept in contact with the
sharpening stone at all times, this not only preserves the correct angle, but ensures both
blades remain exactly the same size, this is necessary to maintain the correct balance
and help reduce vibration when operating the machine.
Lay the blade onto the blade setting jig (see
Fig. 11), ensure the two elongated holes
used for securing the blade to the blade
mounting bracket line up with the larger
holes in the setting jig (see Fig. 12).
Place the blade mounting bracket on the
blade (see Fig. 13).
Secure Blade to the blade mounting bracket
using the two screws removed earlier, before
final tightening, check the blade has not
moved.
Repeat as above for the other blade.
Refit the blade assemblies to blade
cylinder, ensuring the blade mounting
bracket locates in the slot on the cylinder
(see Fig. 13).
Continue to reassemble the machine in the reverse procedure, ensure all locking washers
removed on disassembly are fitted, this prevents the blades from working loose due to
vibration and causing serious damage to the machine, and or injury to yourself and that
of others around you.
Blade Sharpening
Blade sharpening should only be carried out by a
qualified person.
To sharpen the blades proceed as follows:
Remove both blades as
before.
Fit the blades to the sharpening
jig (see Fig. 14). Attach the blades
to the jig using the screws used to
secure the blades onto the blade
mounting brackets.
NOTE: the screw positions (see Fig. 15
-9-
-10-


 To Previous Page
 Loading...