This document describes the COMFIER TENS EMS Massager, Model AS8015, a portable, DC 3.7V battery-powered multifunction device offering both Transcutaneous Electrical Nerve Stimulation (TENS) and Powered Muscle Stimulation (PMS) capabilities. It is designed for temporary relief of pain associated with sore and aching muscles and for stimulating healthy muscles to improve performance.
Function Description
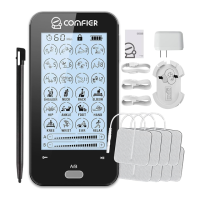
The AS8015 TENS EMS Massager delivers specific electrical pulses through adhesive electrode pads to targeted areas of the body. It features 24 pre-programmed operation programs, allowing users to select treatments tailored to their needs. The device is equipped with a touchable LCD display screen that shows the remaining treatment time, battery power, program icons, output channel, current intensity, selected intensity, and lock state.
TENS (Transcutaneous Electrical Nerve Stimulation):
The TENS function is intended for temporary relief of pain in the shoulder, waist, back, upper extremities (arm), and lower extremities (leg) resulting from exercise or normal household activities. It works by suppressing the sensation of pain.
PMS (Powered Muscle Stimulation):
The PMS function is designed to stimulate healthy muscles, aiming to improve and facilitate muscle performance. It is not intended as therapy for any medical condition.
Usage Features
General Operation:
Before use, users are advised to read the manual carefully. Key operational points include using the device on healthy skin, ensuring electrode pads are for single patient use, adjusting intensity based on comfort, starting sessions with low intensity and short duration, and consulting a physician if pain, dizziness, or discomfort occurs.
Device Components:
The device includes an On/Off button, a touchable display screen, a lock screen key, a pause key, Intensity buttons (+/-), an A/B channel button, a T button for timer, output ports, and a USB port for battery charging. Accessories include electrode pads (snap button type and lead wire type), electrode cables, a battery charger, a USB cable, a pad holder, and a touch pen.
Powering On/Off:
To turn on, press the On/Off button for 3 seconds; the LCD will light up. To turn off, press the On/Off button for 3 seconds again, or the device will automatically turn off after the set cure time. In emergencies, electrode cables can be pulled from the device. It is crucial never to remove pads while the device is still on to prevent electric shocks.
Display and Controls:
The LCD displays various information, with default settings being Program 1, Output A, Intensity 00, and a 20-minute timer.
- Output Channels: The device has two independent output channels, A and B, selectable via the "A/B" button, allowing separate intensity settings for each.
- Programs: There are 24 preset treatment programs. Programs are selected by touching their icons on the LCD, with the selected program number flashing.
- Intensity Adjustment: Intensity can be gradually increased or decreased using the "+" and "-" buttons or icons until a comfortable level is reached. If a program is changed during treatment, the intensity level resets to "00" for safety. Users should aim for the highest comfortable intensity for best effect.
- Timer: The "T" button or timer icon allows adjustment of treatment time among 10, 20, 30, 40, 50, and 60 minutes. The device automatically turns off when the time elapses. Changing programs does not reset the timer unless done manually.
- Lock Screen: Pressing the lock key icon locks the screen, indicated by a lock icon at the top of the LCD. Pressing it again or clicking the icon unlocks the screen.
- Battery Power: Battery level is shown by four black squares. A flickering icon indicates low battery, prompting a charge. During charging, the icon animates, and a full battery cell is displayed when charging is complete.
Electrode Pad Connection and Placement:
The device supports both snap button type and lead wire type electrode cables. Cables connect to output ports at the bottom of the unit. Electrode pads connect to the cables. Before applying pads to the skin, remove their protective plastic shields. Two pads should always be used together as a pair. Avoid connecting two pads to each other to prevent electrical shorts.
Skin Preparation:
Proper skin preparation is essential for effective stimulation, prolonged electrode life, and reduced skin irritation. This involves determining placement sites, washing the area with mild soap and water (no alcohol), rinsing and drying thoroughly, and applying skin lotion when not wearing electrodes. When removing electrodes, pull in the direction of hair growth.
TENS Application Principles:
- Placement: Place an electrode pair on either side of the pain point or one electrode on the painful site and the other nearby on the same side of the body (twin program). Opposed placement (on opposite sides of the body) is not recommended.
- Intensity: Gradually increase intensity until it becomes uncomfortable, then reduce slightly to stay below the discomfort threshold.
- Duration and Program: First-time users should start with Program 1 at a low intensity for 10 minutes per day, gradually increasing to 3 times a day. Intensity and time can be increased as comfort allows. If no relief is felt after trying different programs and intensities, consult a physician.
- Sensation Changes: If stimulation weakens or disappears, increase intensity. If it becomes uncomfortable, decrease intensity. Always stay below the point of discomfort.
- Adverse Reactions: Stop use and consult a physician if skin irritation, redness, burns, other painful sensations, or unusual discomfort occurs.
- Excessive Treatment: Over-long treatment or strong stimulation can cause muscular fatigue and adverse effects. Start with short times (10 minutes) and low intensity, gradually increasing as you adapt, but never exceeding comfort levels. Each treatment should be less than 60 minutes, with at least 2 hours of rest between uses.
PMS Application Principles:
- Placement: Identify the targeted muscle. Place two electrodes from one channel on opposite ends of the muscle or close to its belly. For both channels, place the second pair near the first or on another muscle.
- Intensity: Gradually increase intensity until it becomes uncomfortable, then reduce slightly to stay below the discomfort threshold.
- Duration and Program: First-time users should start with program 1 at a low intensity for 10 minutes per day, gradually increasing to 3 times a day. Intensity and time can be increased as comfort allows. If no benefit is achieved after a period of muscle training, consult a physician.
- Sensation Changes: If stimulation weakens or disappears, increase intensity. If it becomes uncomfortable, decrease intensity. Always stay below the point of discomfort.
- Adverse Reactions: Stop use and consult a physician if skin irritation, redness, burns, other painful sensations, or unusual discomfort occurs.
- Muscle Training: Muscle training can be done daily using alternate muscle groups every other day. Abdominal and calf muscles can be trained daily. Sessions should be 20-40 minutes per muscle group.
- Workout Limits: Each workout should be less than 60 minutes, with an interval of more than 12 hours between workouts to allow for recovery.
Maintenance Features
Readjustments, Alterations, and Repairs:
Users should not disassemble, repair, or modify the device without authorization, as this voids the warranty. The manufacturer is responsible for safety and performance only when repairs are carried out by authorized individuals and in accordance with user instructions. Qualified technicians can access circuit diagrams, PCB drawings, component lists, and setting instructions from the manufacturer.
Cleaning and Maintenance:
- Main Unit: Clean the controller with a soft, dry cloth for dust or a soft, damp cloth for dirt. Do not use cleaning solutions. Avoid storing or using the device near magnetic fields, electric waves (e.g., TV, speakers), high temperatures, high humidity, or direct sunlight. Keep out of reach of children. Dispose of worn accessories according to local regulations.
- Electrode Pads: After each use, unplug the output cord, cover pads with the protective film, and store them in the reusable bag in a shady place. Stockroom temperature should be +5°C to +27°C (41-80°F) with 30% to 80% humidity. Sterilization is not needed. Never apply pads to skin areas other than your own. The life of electrodes varies. Replace pads when they dry out and no longer stick. The smallest application area for electrode pads is 25cm². Electrodes are for single patient use only. Do not plunge pads into water or apply solvents. Wash and dry skin thoroughly before applying electrodes. Apply the entire surface of the pads firmly to the skin; do not use pads that do not adhere properly. Minor redness at stimulation sites is normal and should disappear within 30 minutes; if it persists, discontinue use until it resolves.
- Cables: Disconnect cables from the stimulator and electrodes by pulling on the connectors, not the cables themselves. Store the stimulator and cables in a clean, dry place.
Storage:
Do not store in damp areas, as dampness can cause rust. Normal working ambient temperature is 5°C to 40°C (40-104°F) with humidity ≤80%RH. Storage and transport ambient temperature is -20°C to 55°C (4°-131°F) with humidity ≤93%RH.
Charging the Battery:
The Lithium battery can be recharged via an AC adapter or computer USB input. When the battery is low, the LCD screen blinks, indicating a charge is needed. Turn off the unit, connect it to the charger with the USB extension cord, and plug the charger into a power outlet. The LCD will show charging animation, and the process takes approximately 2-3 hours. A full battery cell icon indicates completion. The battery should be charged for about 10 hours before first use.
Technical Checks:
Technical checks should be performed every 24 months, including verifying the presence of user instructions and documentation, checking for completeness of equipment, visual inspection for mechanical damage or cable damage, and functional safety checks (output signals, frequency, pulse width). These checks must be performed by appropriately trained individuals, and results recorded.
Disposal:
Dispose of the unit, accessories, and packaging materials according to local regulations to prevent adverse ecological effects.