EasyManua.ls Logo

COMPX elock - User Manual

COMPX elock
16 pages
Print Icon
To Next Page IconTo Next Page
Loading...
1
CompX eLock Instructions
Thank you for purchasing the CompX eLock. The information contained in these instructions is intended to serve
as a guide so as to allow the eLock to be quickly and easily put into service. CompX’s Network eLock (if equipped)
can be configured to work in conjunction with existing 802.11g or Ethernet networks, making it the 1st and only
product to provide networked access control and temperature monitoring in one device.
For complete set up and installation instructions for networked and stand-alone eLocks, please see the “Help”
section in CompX’s LockView v4 software.
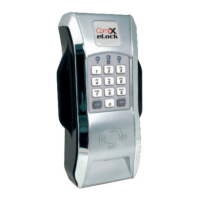
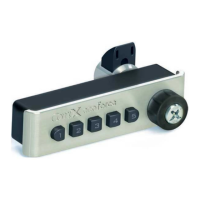
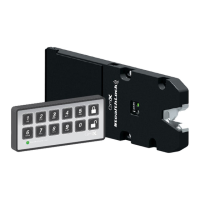
1. 3-position LCD adjustment
2. Dot matrix LCD
3. Wi-Fi antenna cover (if equipped)
4. Red LED & Green LED
5. Network button (blue LED)
6. Alpha-numeric keypad
7. USB port (USB A to mini B cable)
8. “CLEAR” button
9. Beeper location
10. “UP” button
11. “BACK/CANCEL button
12. “MENU” button
13. “NEXT/SELECT” button
14. “DOWN” button
15. - button
16. + button
17. “LO BATT” indicator
18. Battery pack (6 AA) (BATTERIES
NOT INCLUDED)
19. AC adapter plug-in (2.5 mm)
(ADAPTER NOT INCLUDED)
20. Ethernet connector (if equipped)
(ETHERNET CABLE NOT
INCLUDED)
21. Magstripe reader location (if
equipped)
22. “ENTER” button
23. HID PROX or HID iCLASS reader
location (if equipped)
24. Door switch connector (SWITCH
NOT INCLUDED)
25. Dual eLatch connector (if
equipped) (LATCH NOT
INCLUDED)
26. RTD probe for temperature
monitoring (if equipped)

Other manuals for COMPX elock

Question and Answer IconNeed help?

Do you have a question about the COMPX elock and is the answer not in the manual?

COMPX elock Specifications

General IconGeneral
BrandCOMPX
Modelelock
CategoryLocks
LanguageEnglish

Summary

Setting up the eLock

Getting Started Out of the Box

Initial setup steps for eLocks, including battery installation and entering FACTORY mode.

Operating the eLock

LockView Mode Instructions

Passage Mode

Temperature Monitoring Settings

Set Upper;Lower Temperature Limits

Defines acceptable temperature range for the eLock, adjustable in 1/10th degree increments.

Manual Programming Guide

Temperature Menu Functions

Accesses functions like Turn Alarm On/Off, Reset Observed Temperatures, Temperature Limits, and Alarm Settings.

Log Intervals

Mute Alarm (Manual)

Reset Alarm (Manual)

Credential Menu

Add Credential

Process for adding new User or Supervisor credentials to the eLock.

Delete Credential

View Credential

Edit Credential

Set;Edit Your 2 nd PIN

Network Test

Reset Net Schedule

Installing the VERTICAL mount refrigerator kit

Mounting the CompX eLock Housing (Vertical Kit)

Installing the HORIZONTAL mount refrigerator kit

Step 1: Install the Strike

Instructions for installing the strike using foam tape or drilling.

Step 2: Secure Strike and Attach Cover

Securing the strike plate and attaching the plastic strike cover.

Mounting the CompX eLock Housing (Horizontal Kit)

Step 3: Mount eLock Housing

Mounting the main eLock body to the refrigerator door using foam tape or screws.

CompX eLock Accessories

Related product manuals