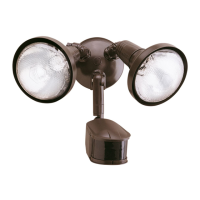
2
•Locatesensorawayfrommovingobjectssuchas
trees,largeshrubsandstreettrafc.
•Donotinstallmorethanonemotionactivated
oodlightononewallswitch.
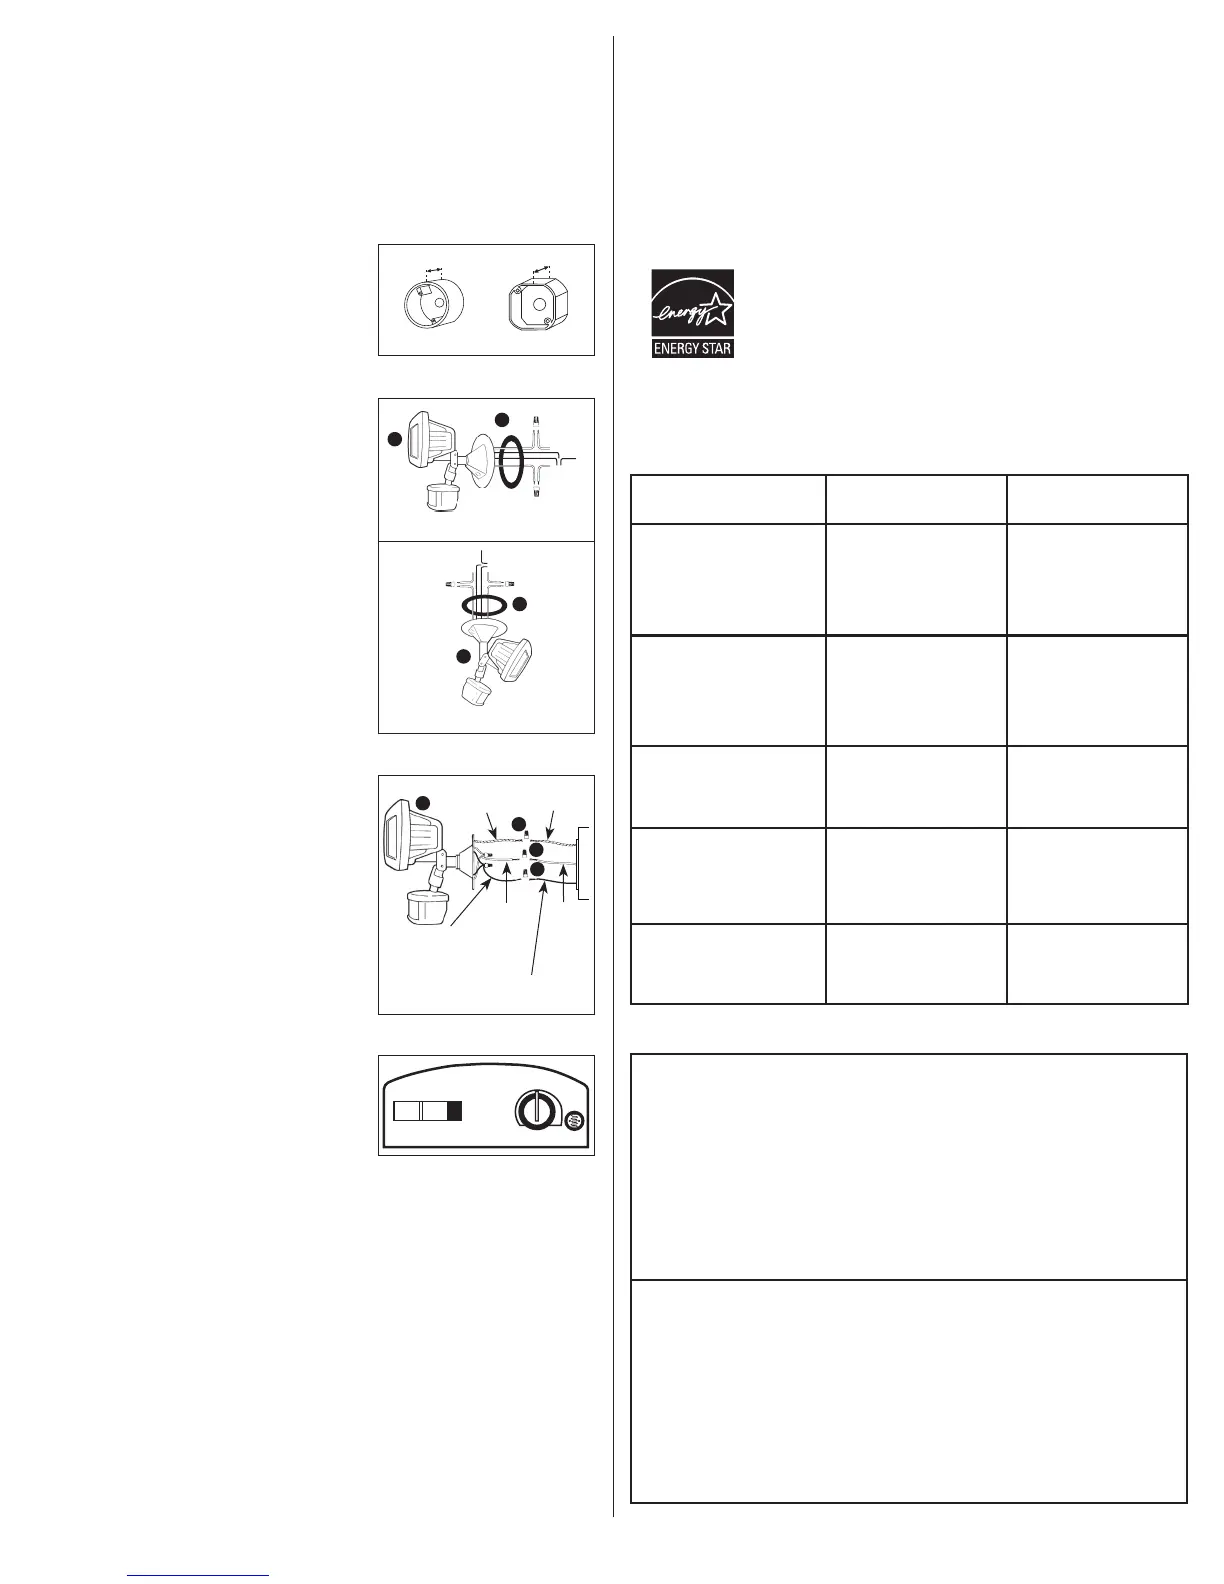
MOUNTING AND WIRING YOUR FIXTURE
WARNING: Risk of electric shock. Disconnect
power at fuse or circuit breaker before installing
or servicing.
NOTE:Fixturecanbewalloreavemounted.
NOTE:Junctionboxmustbeatleast1-1/2inchin
depthforproperinstallation(Fig.2).
1. Matchupscrewsontheoodlightcoverplate(C)
withthejunctionboxscrewholes.(Ifnecessary,
lightlytapselectedcoverplateholeswithahammer
andscrewdrivertoopenthem.)
2. Threadxturewiresthroughcoverplategasket(C)
(Fig.3).
3. Positionthegasket(C)onthecoverplateand
connecttheblackwirefromthexturetotheblack
housesupplywireandthewhitewirefromthe
xturetothewhitesupplywireusingthewirenuts
(E)provided.Attachthegroundwirecomingfrom
yourhousetothecoppergroundwirefromthe
xtureusingwirenut(E)provided.Ifnohouse
groundwireisavailable,attachthecopperground
wirefromthexturetothejunctionboxifitismetal
andgrounded.Ifjunctionboxisnotmetalandno
housegroundwireisavailable,analternativeground
sourcemustbeusedforsafeoperation(Fig.4).
4. Attachxture(A)tothejunctionboxwithtwoofthe
screws(D)provided.Either(2)#6or(2)#8screws
willworkwithmoststandardjunctionboxes.
5. Applysiliconecaulkaroundtheedgesofthe
coverplatetoprovideawatertightsealfromrain
andmoisture.
6. Turnonpoweratmainfuse/breakerbox.
OPERATING YOUR FIXTURE
1. Moveslideswitchonbottomofthesensor
to“TEST”.Setsensitivityknobtomedium
(halfway)(Fig.5).
2. Turnonthepowertoxture.Allowxturetowarm
upapproximately90secondsbeforetesting.(Lights
maynotcomeonduringwarm-upperiod.)
3. Aimsensorheadtowarddesireddetectionarea,
maintaininga15°downangletoallowmoisture
todrain.
NOTE:Maintainairspacingbetweenlampsand
sensorhead,atleast1inch.Makesuresensor
headispositionedwithcontrolswitchesfacing
towardstheground.
4. Walkacrossthedetectionzoneatthefarthest
distanceyouwishyourdetectortodetectmotion.
5. Adjustsensitivityuntilyougetdesiredresults.Light
willturnoff4secondsafterallmotionstops.
NOTE:Formaximumrangeperformance,allowxture
tooperateinanymode(withpowertotheunit)forat
least48hours.
6. Moveslideswitchto4min.or12min.(AUTO
mode).Lightmayturnonfortheselectedtime,and
thenwilloperateatduskintheAUTOsetting.
NOTE:Donotpositionlamphousingwithintwoinches
ofhouse.
REPLACING THE BULBS
NOTE:Disconnectpowerandallowxturetocool
beforeremovingburned-outbulbs.
1. Removescrewsfrombehindlensframe.
2. Pusholdbulbintospring-loadedsocketandpull
oppositeendoutoftheothersocket.
3. Usingacleanclothorgloves,removenewbulb
frompackageandprotectivewrap.
NOTE:Nevertouchbulbwithbarehandsasoilfrom
yourskincancauseprematurefailure.
4. Toinstallbulb,positionbulbintospring-loaded
socketandpushbulbtowardsocketuntilit
depresses.Positionotherendofbulbintostationary
socket(oppositesocket).Besureeachendofbulb
issecurelypositionedagainstthesocket.
Fig.2
OctagonalRound
Fixture
ground
House
ground
Black
xture
wire
White
xture
wire
White
house
power
wire
Blackhouse
powerwire
E
E
E
A
Fig.4
TEST 4 MIN. 12 MIN.
SENSITIVITY
Fig.5
5. Replaceglasslenscover.Insertandtightenthe
screwsthatsecuretheglasslenscover.
NOTE:Makesureyourlamphousingisnotpositioned
withintwoinchesofhouse.
CAUTION: When replacing bulb in fixture, always
replace with the same wattage bulb or a lower
wattage bulb. DO NOT replace with a bulb of
greater wattage than specified on the fixture.
To do so could create a fire hazard and/or shorten
the life of the bulb.
ENERGY STAR
®
TomeetENERGYSTAR
®
requirements,thephotosensorcontrolknobmustbeinthe
“Auto”modetopreventoperationduringfulldaylight.Maximumlampwattagecannot
exceed250watts.
SELECTING YOUR DESIRED FEATURE
TROUBLESHOOTING
Mode of MODE Knob How to Set
Operation Adjustment Power Switch
Test Setting
LightsshouldturnONwith
motionbothdayandnight.
LightsshouldturnOFF
after4seconds.
Keepthepower
tothextureON.
TEST
“Auto” Setting
(motion activated)
LightsshouldturnONwith
motiononlyatnightand
shouldturnOFFafter
4-12minutesofnomotion.
AUTO4MIN
or
AUTO12MIN
Keepthepower
tothextureON.
Dusk-to-Dawn Setting
(activated only at night)
LightsshouldstayONfrom
dusktodawnandthenreset
to“Auto”settingat
thenextdawn.
AUTO4MIN
or
AUTO12MIN
Turnthepower
OFF-ON-OFF-ON
within3seconds.
Return to “Auto”
(motion activated) Setting
from any of
the above settings.
AUTO4MIN
or
AUTO12MIN
TurnthepowerOFF
foratleast90seconds
andthenbackON.
Standard Floodlight Setting
LightsshouldstayON
continuouslybothdayandnight
(mustberesetmanually).
TEST Turnthepower
OFF-ON-OFF-ON
within3seconds.
ENERGYSTAR
®
issponsoredbytheU.S.
EnvironmentalProtectionAgency&U.S.
DepartmentofEnergy.
Visitwww.energystar.govtolearnmore.
Outdoor Light
Comes On For No
Apparent Reason
At Night
Thereismotioninthedetectionzone.
• Makesurethesensorisnotpickingupmovingobjectssuchas
trees,trafc,etc.
TEST FOR YOURSELF.
• Coverthesensorlenswithcardboardtopreventsensorfrom
detectingmotion.Ifthelightstaysoff,somethinginthedetection
zoneistriggeringthesensor.
•Ifthisisthecase,reducethesensitivity.
• Repositionthesensor.
*Ifthelightstaysonwiththesensorlenscovered,contact
customerservice.
Light Stays On At
Night And Does
Not Turn Off
Thereismotioninthedetectionzone.
• Makesurethesensorisnotpickingupmovingobjectssuchas
trees,trafc,etc.
• Reducethesensitivity.
• Repositionthesensor.
Unitisinoverridemode(ifthereisnomotion).
• TurnthelightswitchtotheOFFpositionfor90seconds,andthen
turnbacktotheONpostion.Thiswillsendtheunitbackintothe
“Auto”mode.
*Ifthelightstaysonwiththesensorlenscovered,contact
customerservice.
Eavemount
Fig.3
A
Wallmount
C
A
C
1-1/2inch 1-1/2inch

 Loading...