WaveLinx
Quick Start Networked Relay Panel
Begin Here
Have a qualified electrician:
Install the relay panel per the instructions
Terminate power to the transformer
Clear all circuits and terminate wiring to the
relays and 0-10V dimmers
Have electrician/service personnel:
Configure Emergency operation jumpers on
Phase Monitoring and Relay Bypass Output
Modules in any Emergency relay panels
Address dimming modules with a unique
address (0,1 thru 0, F and 1,0)
Then:
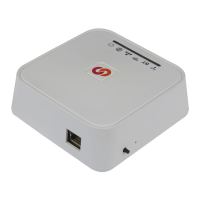
Connect the WaveLinx Area Controller to a
PoE port on a Network Switch
Connect the WaveLinx Relay Panel to a
standard port on a Network Switch
Install a current web browser on the device
that will be used for configuration
Install the WaveLinx Mobile
Application from the App
Store® or Google Play™ on a
mobile device with iOS 15+ or
Android™ 12+
Launch the app and tap Register to create
an account
The WaveLinx Networked Relay Panel provides
WaveLinx control for larger spaces and relay panel
retrofit locations. WaveLinx Panel relays and 0
-
10V dimmers operate from WaveLinx PRO and
CAT devices, expanding on the capabilities of the
hybrid WaveLinx archi
tecture.
The WaveLinx Networked Relay Panel
connects
WaveLinx Area Controller over the Ethernet.
configures the panel’s
Wi-Fi to communicate
the WaveLinx Area Controller.
This Quick Start Guide will walk through the
configuration
and initial connection of the
WaveLinx Networked Relay Panel
and WaveLinx
.
Contact Cooper Lighting Solutions Tech Support
(800) 553-3879
controltechsupport@cooperlighting.com