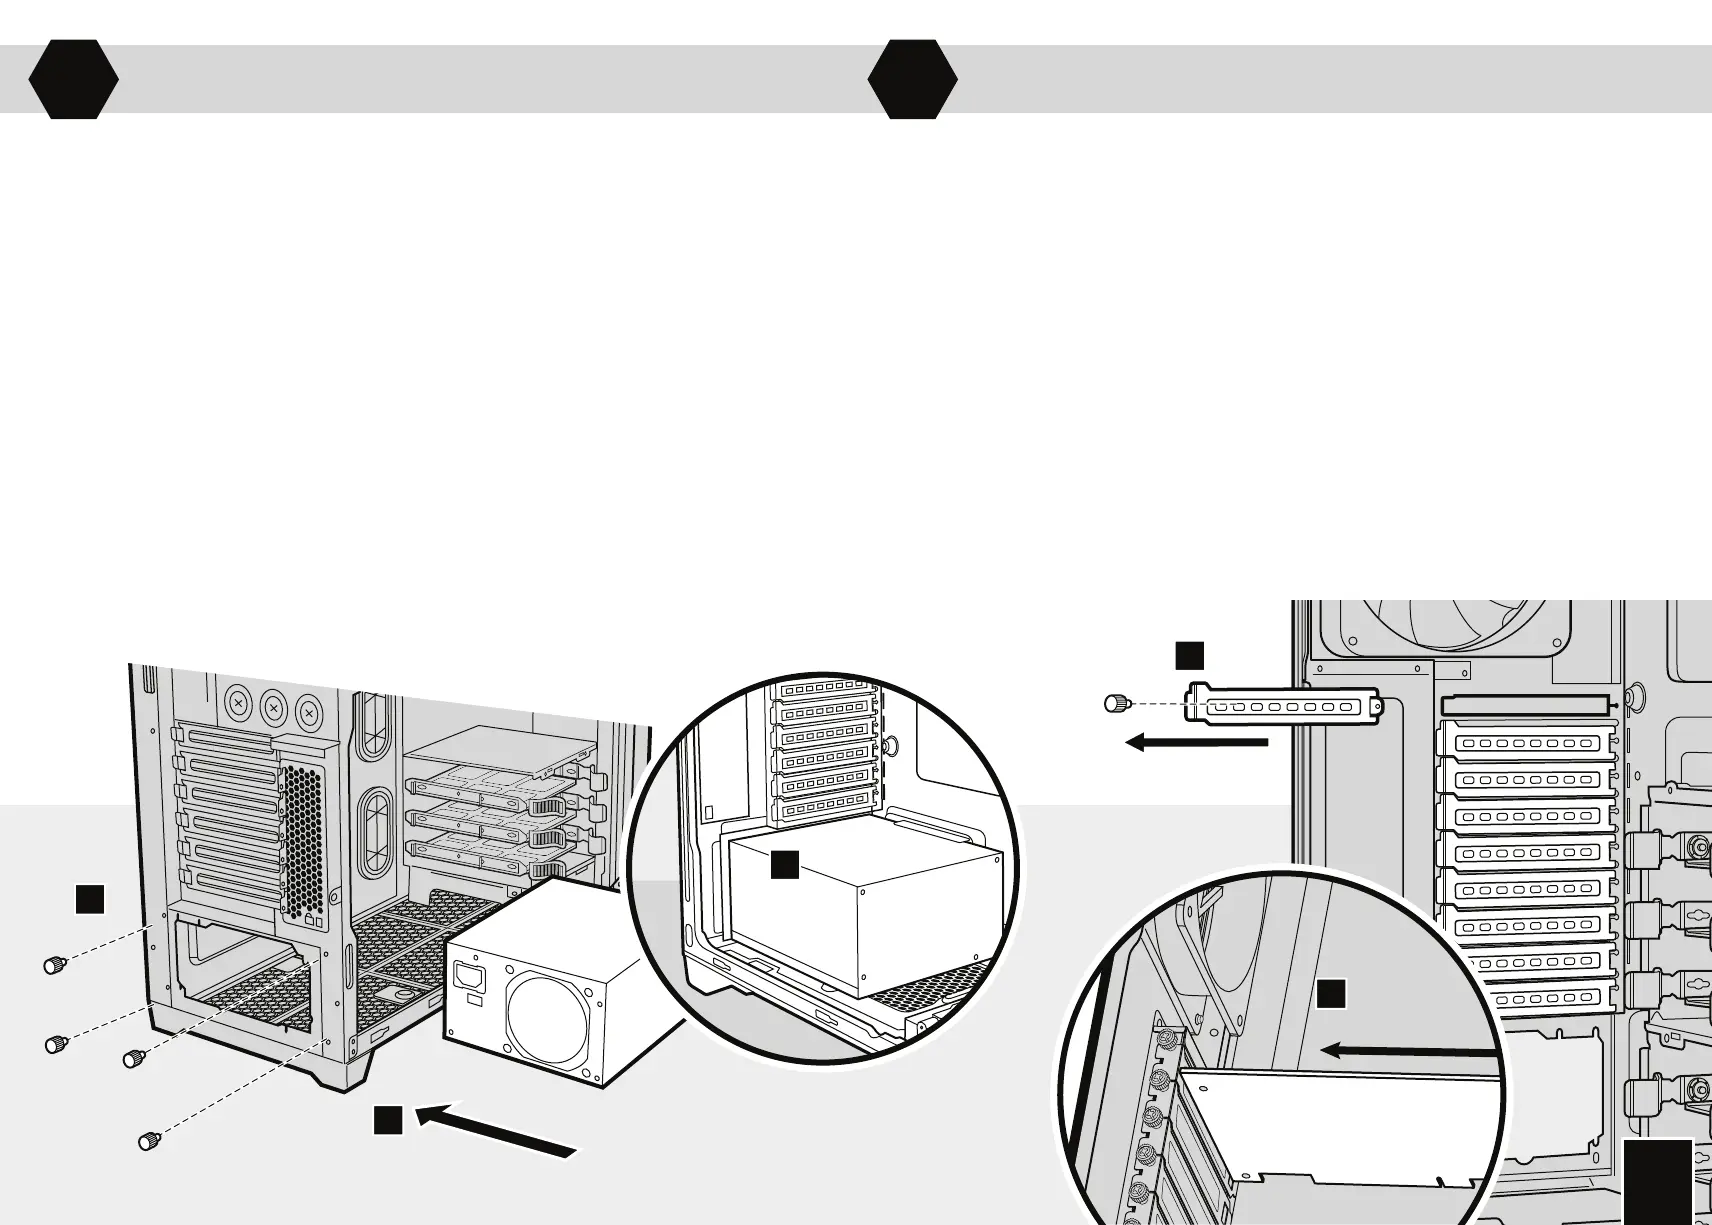
Installation du bloc d'alimentation
> Placez le bloc d'alimentation au fond du boîtier.
> Alignez-le sur les trous et fixez le bloc en
resserrant les vis.
Remarque: le ventilateur du bloc d'alimentation peut
être orienté vers le haut ou vers le bas.
Installation des Netzgerätes (PSU)
> Platzieren Sie das Netzgerät auf den Gehäuseboden.
> Richten Sie die Löcher aus und befestigen Sie das
Netzgerät mit Schrauben.
Hinweis: Das Netzgerät kann mit dem Lüfter entweder
nach oben oder nach unten installiert werden.
Installazione dell'alimentatore (PSU)
> Posizionare il PSU sul fondo del case.
> Allineare i fori e fissare il PSU con le viti.
Nota: il PSU può essere installato con orientamento
delle ventole verso l'alto o verso il basso.
Installation des cartes PCI-E/PCI
> Retirez les vis de serrage et le(s)
caches(s) correspondant(s).
> Installez la carte complémentaire et
fixez-la en resserrant les vis de serrage.
Installation der PCI-E-/PCI-Karten
> Entfernen Sie die Rändelschrauben und
dazugehörige Steckplatzabdeckungen.
> Installieren Sie die Addon-Karte und
befestigen Sie sie mit Rändelschrauben.
Installazione delle schede PCI-E/PCI
> Rimuovere le viti e le coperture degli slot
corrispondenti.
> Installare la scheda add-on e fissare con
le viti a testa piatta.
Instalación de la fuente de alimentación (PSU)
> Coloque la PSU en la parte inferior de la caja.
> Alinee los orificios y fije la PSU con tornillos.
Nota: la PSU se puede instalar con el ventilador hacia
arriba o con el ventilador hacia abajo.
Установка блока питания
> Положите блок питания на нижнюю панель корпуса.
> Выровняйте отверстия и закрепите блок питания с
помощью винтов.
Примечание. Блок питания можно установить вентилятором
вверх или вниз.
安装电源组件 (PSU)
> 将 PSU 装到机箱底部。
> 对齐孔洞并用螺丝固定 PSU。
注: 安装 PSU 时可采用风扇朝上或风扇 朝下的方式。
電源ユニットを取り付ける
> 電源ユニットをケース底部に据えます。
> ネジ穴を合わせ、電源ユニットをネジで固定します。
注: 電源ユニットは、ファンが上部、またはファンが 下部
のいずれの方向でも取り付け可能です。
Instalación de las tarjetas PCI-E/PCI
> Retire los tornillos y las cubiertas de las ranuras
correspondientes.
> Instale la tarjeta auxiliar y fíjale con los tornillos.
Установка плат PCI-E/PCI
> Отверните барашковые винты и соответствующие
крышки разъемов.
> Установите дополнительную плату и закрепите ее
барашковыми винтами.
安装 PCI-E/PCI 卡
> 拆下指旋螺丝和对应的槽盖。
> 安装附件卡并用指旋螺丝进行固定。
PCI Express/PCIカードを取り 付ける
> ハンドスクリューを取り外し、スロットカバーを取り外し
ます。
> 拡張カードを取り付け、ハンドスクリューで固定します。
> Remove thumbscrews and corresponding slot cover(s).
> Install the add-on card and secure with thumbscrews.
Installing the PCI-E/PCI cardsInstalling the power supply (PSU)
> Seat the PSU on the bottom of the case.
> Align holes and secure the PSU with screws.
Note: PSU can be installed in either fan up or fan down orientations.
 Loading...