EasyManua.ls Logo

Cosa XPDM - User Manual

Cosa XPDM
26 pages
Print Icon
To Next Page IconTo Next Page
Loading...
When calling for technical support..... ........
please have your serial numbers ready.
The Sensor and Instrument Serial Numbers are on the rear of the instrument, also see section
5.2.4.
Sensor Serial No.: _______________
Instrument Serial No.: _______________
Your Representative is:
COSA XENTAUR CORPORATION
84F Horseblock Road, Yaphank, NY 11980
Tel.: (631) 345-3434 - Fax.: (631)345-5349
Except as may be provided by contract, this document and all specifications and drawings contained
are the property of COSA XENTAUR Corporation, are issued in strict confidence, and shall not be
reproduced or copied, in any form or by any means, or used as the basis for the manufacture or sale
of apparatus, programs, or services without permission.
Check the Internet for updates; The latest revision of this manual is available in Adobe Acrobat
format at: http://www.COSAXENTAUR.com
Document No. XD0.01.D.0000, Rev E
Question and Answer IconNeed help?

Do you have a question about the Cosa XPDM and is the answer not in the manual?

Summary

1. Introduction

2. Precautions

3. Principle of Operation

4. Operating the XPDM

4.1 Sample Hook-up

Details fittings, recommended pipes, and sample conditioning for connecting the XPDM.

4.2 Measuring

Step-by-step guide for performing dewpoint measurements with the XPDM instrument.

5.0 The User Interface

5.1 Display Conventions

Explains the LCD display elements, pseudo-alphanumerics, symbols, and value formatting.

5.2 Operating State

5.2.1 Viewing Dewpoint Mode

How to view dewpoint readings in °C, °F, PPM, LBS, or G/M³, with pressure correction options.

5.2.2 Viewing Temperature at the Sensor

Instructions for viewing the sensor's internal temperature in °C or °F units.

5.2.3 Start Autocal Mode

Procedure for initiating and performing automatic calibration of the XPDM sensor.

5.2.4 Viewing Serial Number Mode

Guide to accessing and displaying the instrument's serial number.

5.3 Set-up State

6. Options

6.1 RS-232 C Communication

Details the RS-232C serial interface for data communication and querying dewpoint.

6.2 Current Loop Output

Explains the 4-20mA or 0-24mA current loop output for analog data transmission.

6.3 External Power Supply Operation

Requirements and specifications for operating the XPDM using an external AC or DC power source.

7. Automatic Calibration

8. Desiccant Cartridge and Battery Replacement

8.1 Changing the Battery

Instructions for battery replacement, safety warnings, and approved battery models.

9. Special Conditions for Safe Use

10. Error Messages and Indications

Appendix A: Operating State Flow Diagram

Appendix B: Setup State Flow Diagram

Appendix C: Reading and 4-20 mA Output Relationship

Appendix D: Uncertainty in LBS and PPMV Calculations

Appendix E: Battery Life Comparison

Overview

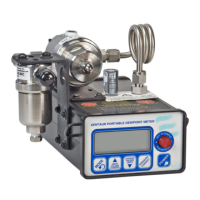
The XPDM is a portable, hand-held, microprocessor-controlled, battery-operated dew-point meter designed for quick and precise measurements in various applications. It features built-in dry-storage for the sensor, which is crucial for fast and accurate readings.

Function Description:

The XPDM measures dew-point, which is the temperature at which air or gas becomes saturated with water vapor, and condensation begins to form. It utilizes hygroscopic materials in its sensor that adsorb moisture. The design allows the sensor to move directly between a dry-storage position and a sample cell without exposure to ambient air, ensuring the sensor is drier than the gas being measured at the start of each measurement. This minimizes the time required for accurate readings. The instrument can display moisture content in various engineering units, including °C, °F, PPM (parts per million by volume), LBS (pounds of water per million standard cubic feet), and G/M³ (grams of water per standard cubic meters). It also offers pressure correction capabilities to account for different gas pressures at the sensor and in the sample.

Important Technical Specifications:

  • Operating Temperature Range: -10°C to +50°C.
  • Dewpoint Measurement Range: As low as -100°C.
  • Sensor Type: XTR-100 (-100°C to +20°C) or XTR65 (-65°C to +20°C) can be selected.
  • Pressure Rating: Sample cell/piston assembly tested up to 120 PSI. Measurements are typically taken at atmospheric pressures, with a pressure calculation feature for higher pressures.
  • Sample Port Fittings: 1/4” VCO® female, designed for proper seals even at low dewpoint measurements.
  • RS-232C Output: 9-pin sub “D” female connector, 9600 baud, Even Parity, 7 Bits, 1 Stop. Isolated from the sensor and case.
  • Current Loop Output: 4-20mA or 0-24mA, provided on the 9-pin sub “D” female connector (shared with RS-232C). Requires external power supply. Capable of driving loads from 0Ω to 500Ω.
  • External Power Supply: 2mm power jack, accepts 13VDC to 25VDC or 12VACrms to 25VACrms. Draws up to 50mA with backlight on and current loop output. Protected by a 250mA fuse.
  • Battery: Lithium battery (Duracell MN 1604, Energizer 522, Energizer L522, Varta C4922 for ATEX model).
  • Enclosure Material: Aluminum (for ATEX model, requires caution to prevent ignition sources from impact/friction sparks).

Usage Features:

  • User Interface: Features a custom LCD display, audio indicator (beep), 5 push buttons (Power, Mode, Up, Down, Pressure Correct), and a sensor actuator.
  • Power On/Off: Press 'Power' button until a beep is heard to turn on. Continue to depress for backlight.
  • Operating Modes:
    • Viewing Dewpoint Mode: Displays dewpoint in selected engineering units (°C, °F, PPM, LBS, G/M³). Up/Down buttons scroll through units. 'Pressure Correct' button toggles pressure correction. Long press on 'Pressure Correct' enters View/Set Sensor Pressure sub-state.
    • Viewing Sensor Temperature Mode: Displays temperature at the sensor in °C or °F.
    • Start Autocal Mode: Initiates automatic calibration. User is prompted to confirm and pull the sensor out of dry-storage.
    • Viewing Serial Number Mode: Displays the sensor's serial number (ESN).
  • Set-up State: Accessed by powering up while depressing the 'Mode' key. Provides capabilities for:
    • Testing optional analog output (low, high, mid values).
    • Displaying alternate units.
    • Selecting sensor type (XTR-100 or XTR65).
    • Adjusting low-end sensor attenuation and/or dewpoint (factory set).
    • Manual calibration (not yet available).
    • Output range setting for current loop.
    • Lock/Unlock the instrument to protect parameter settings.
  • Sample Hook-up: Recommends stainless steel pipes for dewpoints below -65°C and PTFE tubes for dewpoints above -65°C. Avoid rubber or plastic tubes.
  • Sample Conditioning: Advises against pre-filters for oil, particles, or liquid water when measuring dewpoints below -65°C, as they can store and release water vapor. Recommends using pressure regulators provided by the sales representative.
  • Measurement Procedure: Turn on, select units, note dry-storage dewpoint, introduce sample gas (output port unobstructed), wait for equilibrium, block outlet port to expose sensor, take reading, then return sensor to dry-storage.
  • Automatic Shut-off: The unit automatically shuts off if no buttons are pressed for 6 minutes (sensor in sample chamber) or 3 minutes (sensor in desiccant) when operating on battery.

Maintenance Features:

  • Technical Support: Requires serial numbers for sensor and instrument when calling for support.
  • Dry-storage: Consists of a stainless steel container filled with desiccant. The factory-supplied desiccant provides dry-storage dewpoints as low as -80°C when fresh.
  • Desiccant Cartridge Replacement: Unscrew and pull out the old cartridge (sensor must be in sample chamber). Remove the GREEN cap from the new cartridge (DO NOT open the RED cap). Screw in the new cartridge, ensuring seals (PTFE washer and Viton 'O' ring) are in place.
  • Battery Replacement: Replace when "LO BAT" displays at startup. Only replace in a safe area, never in an explosive gas atmosphere. Observe correct polarity. For ATEX models, use only approved battery types (Duracell MN 1604, Energizer 522, Energizer L522, Varta C4922).
  • Automatic Calibration: Recommended every 12 months. Performed by exposing the sensor to a micro-climate with a dewpoint above +20°C using a moistened calibration bulb. The sensor should be sufficiently dried down before calibration.
  • Sensor Exposure: Avoid long exposure of the sensor element to room air (longer than 1-2 minutes) to prevent supersaturation and prolonged dry-down times.
  • Cleaning: Surfaces contaminated with oils can be cleaned by factory-trained personnel.
  • Warranty Limitation: Warranty is voided if the sample cell/piston assembly is disassembled by the customer.

Precautions:

  • Avoid contaminated sample streams (corrosive gases, oils, solvents) as they can damage or coat electropolished surfaces, slowing down measurements.
  • Avoid liquid water in the sample cell, as it can damage the sensor.
  • Avoid high pressure; operate slightly above atmospheric pressure.
  • Exercise caution with hazardous gases; ensure use in a safe area and be aware of small leaks.
  • Avoid extreme temperatures and mechanical vibration/shock.
  • Do not force the Actuator; remove any port obstructions before operating.
  • For ATEX approved models, ensure proper installation to prevent ignition from impact or friction sparks.

Cosa XPDM Specifications

General IconGeneral
BrandCosa
ModelXPDM
CategoryMeasuring Instruments
LanguageEnglish