Do you have a question about the Craftsman 113.206891 and is the answer not in the manual?
Understand the tool's application, limitations, and potential hazards.
Ensure the tool is properly grounded via a 3-prong plug and receptacle for safety.
Avoid loose clothing and wear appropriate protective gear to prevent entanglement.
Always wear safety goggles; consider face/dust masks and ear protection as needed.
Understand causes of kickbacks and how to avoid them by proper technique and maintenance.
Follow precautions for personal safety, including protective gear and tool condition.
Crucial instruction to read and understand the manual before machine operation.
Emphasizes wearing safety goggles for eye protection during operation.
Details required motor HP, RPM, and voltage for the jointer-planer.
Explains proper grounding, outlet types, and extension cord usage for safety.
Instructions on how to verify and correct motor shaft rotation direction before use.
Lists the tools required for assembly and maintenance of the jointer-planer.
Provides a detailed list of all loose parts included with the machine.
Critical safety warnings regarding power connection and understanding instructions.
Lists specific hardware required for assembling the steel legs.
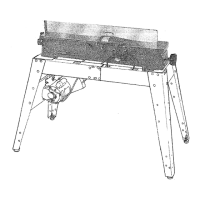
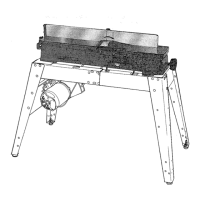
Provides sequential instructions for assembling the jointer-planer's steel legs.
Lists the specific hardware required to mount the jointer-planer onto the leg assembly.
Details the process of positioning and fastening the jointer-planer to the stand.
Lists the necessary tools for checking cutter blade alignment and tightness.
Step-by-step guide to verify cutter blades are properly aligned and secured.
Lists the parts required to mount the power outlet and switch.
Instructions for attaching the On/Off power outlet to the infeed table.
Details mounting the motor and the associated 'L' bracket for the guard support.
Steps for fitting and securing the motor pulley onto the motor shaft.
Steps for threading the V-belt around pulleys and ensuring proper tension.
Instructions for positioning and securing the motor pulley belt guard.
Lists the parts needed for the sliding guard assembly.
Step-by-step instructions for installing the sliding guard onto the fence.
Explains how to adjust the infeed table depth using the handwheel.
Describes the function and adjustment of the fence and its locking mechanisms.
Details how to read and adjust the fence tilt scale for precise angles.
Guide to aligning the fence to be square with the tables using stops and screws.
Explains how to set the fence to a 45-degree angle using the stop mechanism.
Describes how to attach an auxiliary fence for specific jointing operations.
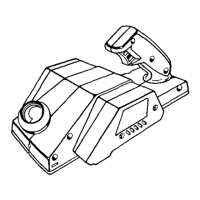
Explains the function and importance of the cutter guard and how to check its operation.
How to check if the infeed table is parallel to the outfeed table.
Steps to adjust the infeed table using leveling studs and lock screws.
Instructions on turning the machine ON, OFF, and locking the switch.
Explains the key system for preventing unauthorized or accidental startup.
Proper technique for feeding boards through the jointer-planer for smooth cuts.
Recommends light cuts for best results and safety during planing and jointing.
Guidance on supporting long pieces of wood for stable operation.
When and how to use hold down/push blocks for safety and control.
Describes the hand-over-hand motion for advancing workpieces safely.
Technique for beveling wood pieces wider than 3 inches.
Using push blocks for beveling wood narrower than 3 inches.
Critical safety warnings before performing maintenance or adjustments.
Steps to prepare the machine, like removing guards and setting the fence.
How to loosen setscrews and remove existing cutter blades and wedges.
Cleaning cutterhead, wedges, and screws with specialized cleaner.
Steps for inserting and setting new cutter blades using lifter screws.
Precisely adjusting cutter blades to the correct height above the table.
Lists the parts involved in installing the cutter guard spring.
Detailed steps for correctly installing the cutter guard spring.
Attaching the cutter guard with the pivot pin and tang.
Testing the guard's automatic return function and troubleshooting issues.
Method for honing blades using an oilstone to maintain sharpness.
When blades need replacement or regrinding, and professional services.
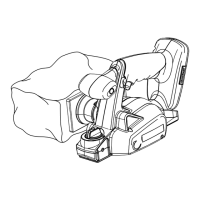
Advice on cleaning chips, dust, and pitch from the machine.
Recommends waxing tables and fence for smoother wood feeding.
States that ball bearings are factory-lubricated and require no further attention.
Identifies specific parts that need periodic lubrication with SAE No. 20 or No. 30 oil.
Details lubrication for motor bearings and recommended oil type.
How to protect the motor from sawdust and dust for proper ventilation.
Lists common motor problems and their remedies.
Addresses problems like workpiece striking tables and surface ripples.
Troubleshoots inaccurate cuts, loose tables, and malfunctioning guards.
Diagnosing and resolving issues related to motor noise and reduced power output.
Troubleshooting slow starting, failure to start, or motor overheating.
Identifying causes for motor stalls, blown fuses, or tripped circuit breakers.
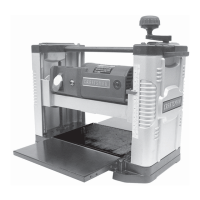
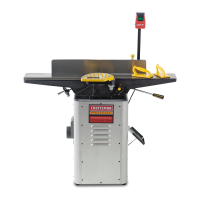
Identifies major parts like fence, infeed table, switch box via diagram.
Shows exploded view of motor, pulley, and related components.
Lists part numbers and descriptions for the main body and fence assembly.
Details part numbers for motor, pulleys, belts, and guards.
Identifies parts for the jointer-planer legs and frame.
Lists specific hardware for mounting the motor and legs.
Lists parts for the infeed table, including guard and linkage assembly.
Details specific screws, nuts, and washers for the infeed table.
Identifies parts for the fence, stops, and tilt scale.
Lists hardware specific to the fence assembly.
Lists parts for the On/Off switch, housing, and cord.
Crucial safety warning before connecting power to the machine.
Step-by-step guide for connecting motor wires to the correct terminals.
Catalog numbers for useful accessories like legs, stands, and blades.
Information on how to contact Sears for repair parts or service.
Guidelines for providing necessary information when ordering replacement parts.