EasyManua.ls Logo

Craftsman 139.53990DS User Manual

Craftsman 139.53990DS
76 pages
To Next Page IconTo Next Page
Page #1 background imageLoading...
Page #1 background image
Owner's IVlanual/IVlanual Del Propietario
[
3/4 HP
315_N= GARAGE DOOR OPENER
ABRIDOR DE PUERTA DE COCHERA DE 315_N.
For Residential Use Only/S61o para uso residencial
iViodel/IViodelo 139.53990DS
m
Z
m
O_
Z
Read and follow all safety rules
and operating instructions before
first use of this product.
Fasten the manual near the
garage door after installation.
Leer y seguir todas las reglas de
seguridad y las instrucciones de
operaci6n antes de usar este
producto por prirnera vez.
Guardar este manual cerca de la
puerta de la cochera.
Periodic checks of the opener are
required to ensure safe operation.
Se deben realizar revisiones
peri6dicas del abridor de puertas
para asegurar su operaci6n
segura.
Sears, Roebuck and Co., Hoffman Estates, IL 60179 U.S.A
www.sears.com/craftsman
m
t_
Z_
0
r_

Table of Contents

Question and Answer IconNeed help?

Do you have a question about the Craftsman 139.53990DS and is the answer not in the manual?

Craftsman 139.53990DS Specifications

General IconGeneral
Model Number139.53990DS
TypeChain Drive
Horsepower1/2 HP
Frequency60 Hz
Safety SensorsYes
Battery BackupNo
Drive TypeChain
Voltage120V
Remote Controls Included2
Warranty1 Year Limited

Summary

Introduction

Safety Symbols and Signal Words

Explains the meaning of safety symbols and signal words used throughout the manual.

Preparing Your Garage Door

Safety Precautions Before Installation

Advises on disabling locks, checking door balance, and avoiding entanglement hazards.

Assembly Step 1: Rail and Trolley

Assembly Step 2: Rail to Motor Unit

Assembly Step 3: Install Idler Pulley

Assembly Step 4: Chain and Cable Installation

Assembly Step 5: Chain Tightening

Important Installation Instructions

General Installation Safety Precautions

Lists crucial safety warnings before and during installation.

Installation Step 1: Header Bracket Location

Determining Header Bracket Placement

Explains how to find the correct position for the header bracket.

Installation Step 2: Install Header Bracket

Wall Header Bracket Mounting

Provides instructions for attaching the header bracket to the wall.

Ceiling Header Bracket Mounting

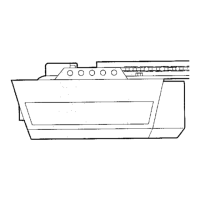
Details mounting the header bracket to the ceiling.

Installation Step 3: Attach Rail to Header Bracket

Connecting Rail to Header Bracket

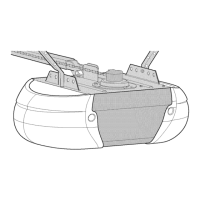
Guides on connecting the rail assembly to the header bracket.

Installation Step 4: Position Opener

Installation Step 5: Hang Opener

Installation Step 6: Install Door Control

Installation Step 8: Attach Emergency Release

Installation Step 9: Electrical Requirements

Installation Step 10: Install Protector System

Safety Reversing Sensor Installation

Details the installation and importance of the safety reversing sensor.

Installing Sensor Brackets

Mounting and Wiring Safety Sensors

Installation Step 11: Fasten Door Bracket

One-Piece Door Bracket Installation

Installation Step 12: Connect Door Arm to Trolley

One-Piece Door Arm Assembly and Adjustment

Adjustment Step 1: Travel Limits

Adjusting UP and DOWN Travel Limits

Explains how to set the door's open and close travel limits.

Adjustment Step 2: Adjust the Force

Testing and Adjusting Force Settings

Guides on testing and adjusting the force required for door operation.

Adjustment Step 3: Test Safety Reversal System

Performing the Safety Reversal Test

Details how to test the door's safety reversal mechanism.

Adjustment Step 4: Test Protector System

Testing the Safety Sensor System

Explains how to verify the Protector System's functionality.

Operation and Safety Guidelines

Key Safety Precautions During Operation

Lists critical safety instructions during operation.

Using the Wall-Mounted Door Control

Opening the Door Manually

Troubleshooting Common Problems

Sensor and Remote Issues

Addresses sensor problems preventing closure and remotes not activating the door.

Door Operation Malfunctions

Covers door reversal, humming motor, and binding issues.

Diagnostic Chart

Interpreting Diagnostic Flash Codes

Lists flash codes and troubleshooting solutions.

Programming Your Opener

Adding or Reprogramming Remote Controls

Provides instructions for programming additional remote controls.

Programming Keyless Entry

Setting Up or Changing Keyless Entry PIN

Details how to program or change the PIN for keyless entry.

Related product manuals