ENGLISH
6
SAVE THESE INSTRUCTIONS FOR
FUTURE USE
Motor
Be sure your power supply agrees with the nameplate
marking. Voltage decrease of more than 10% will cause loss
of power and overheating. These tools are factory tested; if
this tool does not operate, check power supply.
COMPONENTS (FIG. A)
Intended Use
This circular saw is designed for wood cutting applications.
DO NOT use under wet conditions or in presence of
flammable liquids orgases. DO NOT use water feed
attachments with this saw. DO NOT use abrasive wheels
or blades. DO NOT cut metal, plastic materials, concrete,
masonry, or fiber cement materials with this saw.
DO NOT let children come into contact with the tool.
Supervision is required when inexperienced operators use
thistool.
CUTTING SPECIFICATIONS
Bevel Angle 0° and 55°
Blade Size 7-1/4" (184 mm)
Max Cut Depth, 0° Bevel 2-1/2" (63 mm)
Max Cut Depth, 45° Bevel 1-7/8" (48 mm)
RPM no load 5500
ASSEMBLY AND ADJUSTMENTS
WARNING: To reduce the risk of serious personal
injury, turn unit off and disconnect it from
power source before making any adjustments or
removing/installing attachments or accessories.
An accidental start-up can causeinjury.
Components
Tool Use
circular saw wood cutting applications.
against the work or pushed forward into cut can lead to
stalling or sudden backward movement of saw.
• Never attempt to lift saw when making a bevel cut. This
leads to blade binding and stalling.
• Always secure work to prevent workpiece movement
during cut.
• Do not try to force saw back on line if your cut begins to
go off line. This can cause KICKBACK. Stop saw and allow
blade to coast down to a stop. Withdraw from cut and
start a new cut on the line.
• Set depth adjustment of saw such that one tooth of the
blade projects below the workpiece.
• Do not back up a rotating blade in the cut. Twisting the
saw can cause the back edge of the blade to dig into the
material, climb out of the work and run back toward
theoperator.
• Avoid cutting nails. Inspect for and remove all nails from
lumber before cutting.
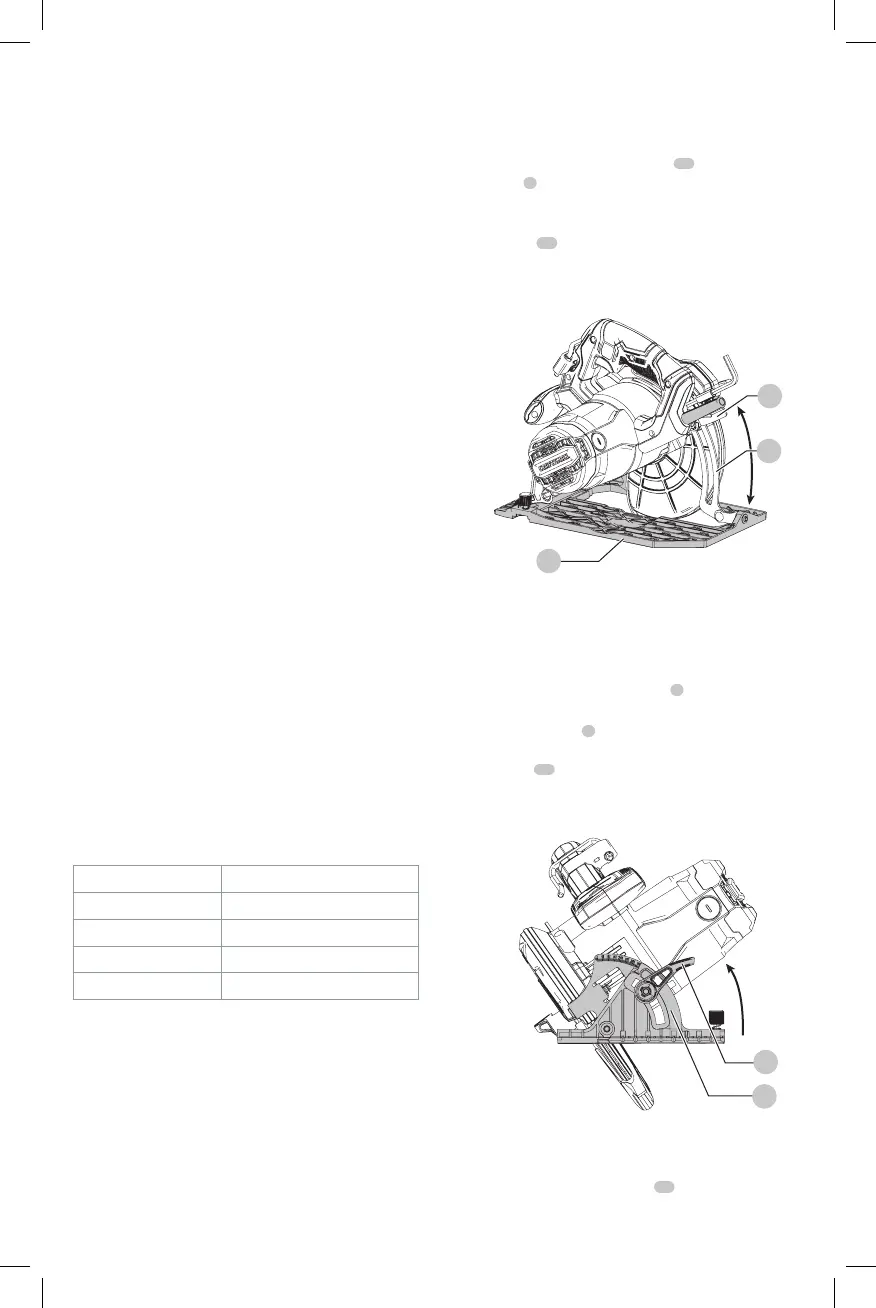
Cutting Depth Adjustment (Fig. F)
The depth of cut should be set according to the thickness of
the workpiece.
1. Loosen the depth adjustment lever
12
to unlock the
saw shoe
4
.
2. Move the saw shoe into the desired position. The
corresponding depth of cut can be read from the
depthscale
13
.
3. Tighten the lever to lock the saw shoe in place. Set
depth adjustment of saw such that less than one full
tooth of the blade projects below the workpiece.
Fig.F
12
4
13
Bevel Angle Adjustment (Fig. A, G)
This saw has two common bevel detents, 22.5° and 45°.
However it can be set to any bevel angles between 0°
and55°.
1. Loosen the bevel adjustment lever
9
to unlock the
sawshoe.
2. Move the saw shoe
4
into the desired position. The
corresponding bevel angle can be read from the bevel
angle scale
14
.
3. Tighten the bevel adjustment knob to lock the saw shoe
in place.
Fig.G
9
14
Installing the Blade (Fig. H)
NOTICE: Use only 7-1/4" (184 mm) blades.
1. Depress the spindle lock button
17
while turning the
blade until the button engages the spindle shaft.