EasyManua.ls Logo

Craftsman CMXEOCG472 User Manual

Craftsman CMXEOCG472
100 pages
To Next Page IconTo Next Page
Page #1 background imageLoading...
Page #1 background image
Owner's Manual
GARAGE DOOR OPENER
For Residential Use Only
MODELS CMXEOCG232 and CMXEOCG472
READ AND FOLLOW ALL SAFETY RULES AND OPERATING INSTRUCTIONS BEFORE FIRST USE
OF THIS PRODUCT.
FASTEN THE MANUAL NEAR THE GARAGE DOOR AFTER INSTALLATION.
PERIODIC CHECKS OF THE OPENER ARE REQUIRED TO ENSURE SAFE OPERATION.
DO NOT INSTALL ON A ONE-PIECE DOOR IF USING DEVICES OR FEATURES PROVIDING
UNATTENDED CLOSE.
UNATTENDED DEVICES AND FEATURES ARE TO BE USED ONLY WITH SECTIONAL DOORS. SEE
PAGE 3.
WWW.CRAFTSMAN.COM

Table of Contents

Question and Answer IconNeed help?

Do you have a question about the Craftsman CMXEOCG472 and is the answer not in the manual?

Craftsman CMXEOCG472 Specifications

General IconGeneral
Horsepower1/2 HP
Safety FeaturesSafety sensors
Remote ControlYes
Wi-Fi CompatibleYes
Security LightYes
Max Door Height7 ft
Smart TechnologyYes
Safety and Security FeaturesRolling code technology

Summary

PREPARING YOUR GARAGE DOOR

CARTON INVENTORY

HARDWARE INVENTORY

ASSEMBLY

ASSEMBLE THE RAIL AND INSTALL THE TROLLEY

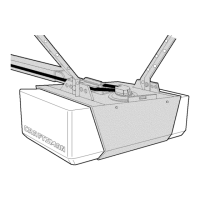
Step-by-step instructions for assembling the rail and installing the trolley.

INSTALL THE IDLER PULLEY

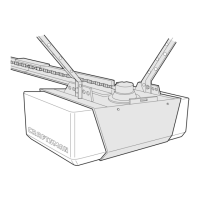
Detailed steps for installing the idler pulley onto the rail assembly.

INSTALL THE CHAIN/CABLE

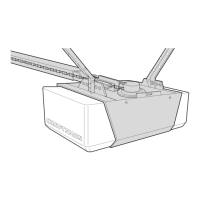
Instructions for installing the chain or cable onto the trolley and sprocket.

TIGHTEN THE CHAIN

Procedures for properly tightening the chain tension for optimal operation.

FASTEN THE RAIL TO THE MOTOR UNIT

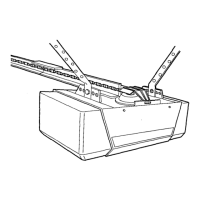
Instructions for securely attaching the rail assembly to the motor unit.

INSTALLATION

IMPORTANT INSTALLATION INSTRUCTIONS

Crucial safety warnings and guidelines for the installation process.

INSTALLATION STEP 1

DETERMINE THE HEADER BRACKET LOCATION

Guidance on finding and marking the correct location for the header bracket.

INSTALLATION STEP 2

INSTALL THE HEADER BRACKET

Detailed instructions for wall or ceiling mounting of the header bracket.

INSTALLATION STEP 3

ATTACH THE RAIL TO THE HEADER BRACKET

Instructions for connecting the rail assembly to the installed header bracket.

INSTALLATION STEP 4

POSITION THE OPENER

Guidance on positioning the opener relative to the garage door for optimal operation.

INSTALLATION STEP 5

HANG THE OPENER

Steps for securely hanging the opener unit using mounting brackets.

INSTALLATION STEP 7

ATTACH THE EMERGENCY RELEASE ROPE AND HANDLE

Steps for attaching the emergency release rope and handle to the trolley.

INSTALLATION STEP 8

FASTEN THE DOOR BRACKET

Instructions for attaching the door bracket to the garage door.

FASTEN THE DOOR BRACKET (CONTINUED)

INSTALLATION STEP 9

CONNECT DOOR ARM TO TROLLEY

Steps for connecting the door arm sections to the trolley.

CONNECT DOOR ARM TO TROLLEY (CONTINUED)

INSTALLATION STEP 11

INSTALL THE DOOR CONTROL - MODEL CMXEOCG232

Instructions for installing the wired door control for the CMXEOCG232 model.

INSTALLATION STEP 11

INSTALL THE DOOR CONTROL - MODEL CMXEOCG472

Instructions for installing the wired door control for the CMXEOCG472 model.

INSTALLATION STEP 12

INSTALL THE SAFETY REVERSAL SYSTEM

Instructions for installing and aligning the safety reversing sensors.

INSTALL THE SAFETY REVERSAL SYSTEM (CONTINUED)

WIRE THE SAFETY REVERSING SENSORS

Instructions for wiring the safety reversing sensors, with options for pre-wired or no pre-wiring.

INSTALLATION STEP 13

CONNECT POWER

Instructions for connecting the garage door opener to a power source.

INSTALLATION STEP 14

1 - PROGRAM THE TRAVEL

2 - AUTOMATIC FORCE SET UP

3 - TEST THE SAFETY REVERSAL SYSTEM

4 - TEST THE PROTECTOR SYSTEM®

myQ® SMARTPHONE CONTROL

OPERATION

IMPORTANT SAFETY INSTRUCTIONS

Comprehensive safety instructions for operating the garage door opener.

FEATURES

REMOTE CONTROL

TO ERASE THE MEMORY

TO OPEN THE DOOR MANUALLY

WARNING

Critical safety warnings for manual door operation.

CARE OF YOUR OPENER

TROUBLESHOOTING

DIAGNOSTIC CHART

A chart mapping diagnostic codes (flashes) to symptoms and solutions.

REPAIR PARTS - MODEL CMXEOCG232

REPAIR PARTS - MODEL CMXEOCG472

AUTOMATIC GARAGE DOOR OPENER SAFETY & MAINTENANCE GUIDE

GARAGE DOOR OPENER SAFETY - AN AUTOMATIC DECISION

Overview of garage door opener safety, stressing proper adjustment and operation.

ROUTINE MAINTENANCE CAN PREVENT TRAGEDIES

WARNING - SPRINGS ARE UNDER HIGH TENSION. ONLY QUALIFIED INDIVIDUALS SHOULD ADJUST THEM.

Critical warning about high spring tension and the need for qualified personnel for adjustments.

Test the opener safety features

How to test the opener's safety reversal and photoelectric sensor functions.

Related product manuals