3
Overview
Thank you for choosing the Creative Decoder DDTS-100.
With audio quality that rivals a component home theater system, your Creative Decoder DDTS-100 lets you
experience DTS
®
, DTS-ES
®
, DTS Neo:6
®
, Dolby
®
Digital, Dolby Digital EX, and Dolby Pro Logic
®
II multichannel
audio from your DVD player, game console, or personal computer.
Your Creative Decoder DDTS-100 gives you the flexibility of connecting different types of speaker systems and input
devices. Refer to the following chapters for recommended setup configurations. Before you begin, make sure your
decoder and the devices that you want to connect to it are turned off and disconnected from the wall outlet.
7
8
9
1
0
1
2
1
3
1
4
1
2
3
4
5
6
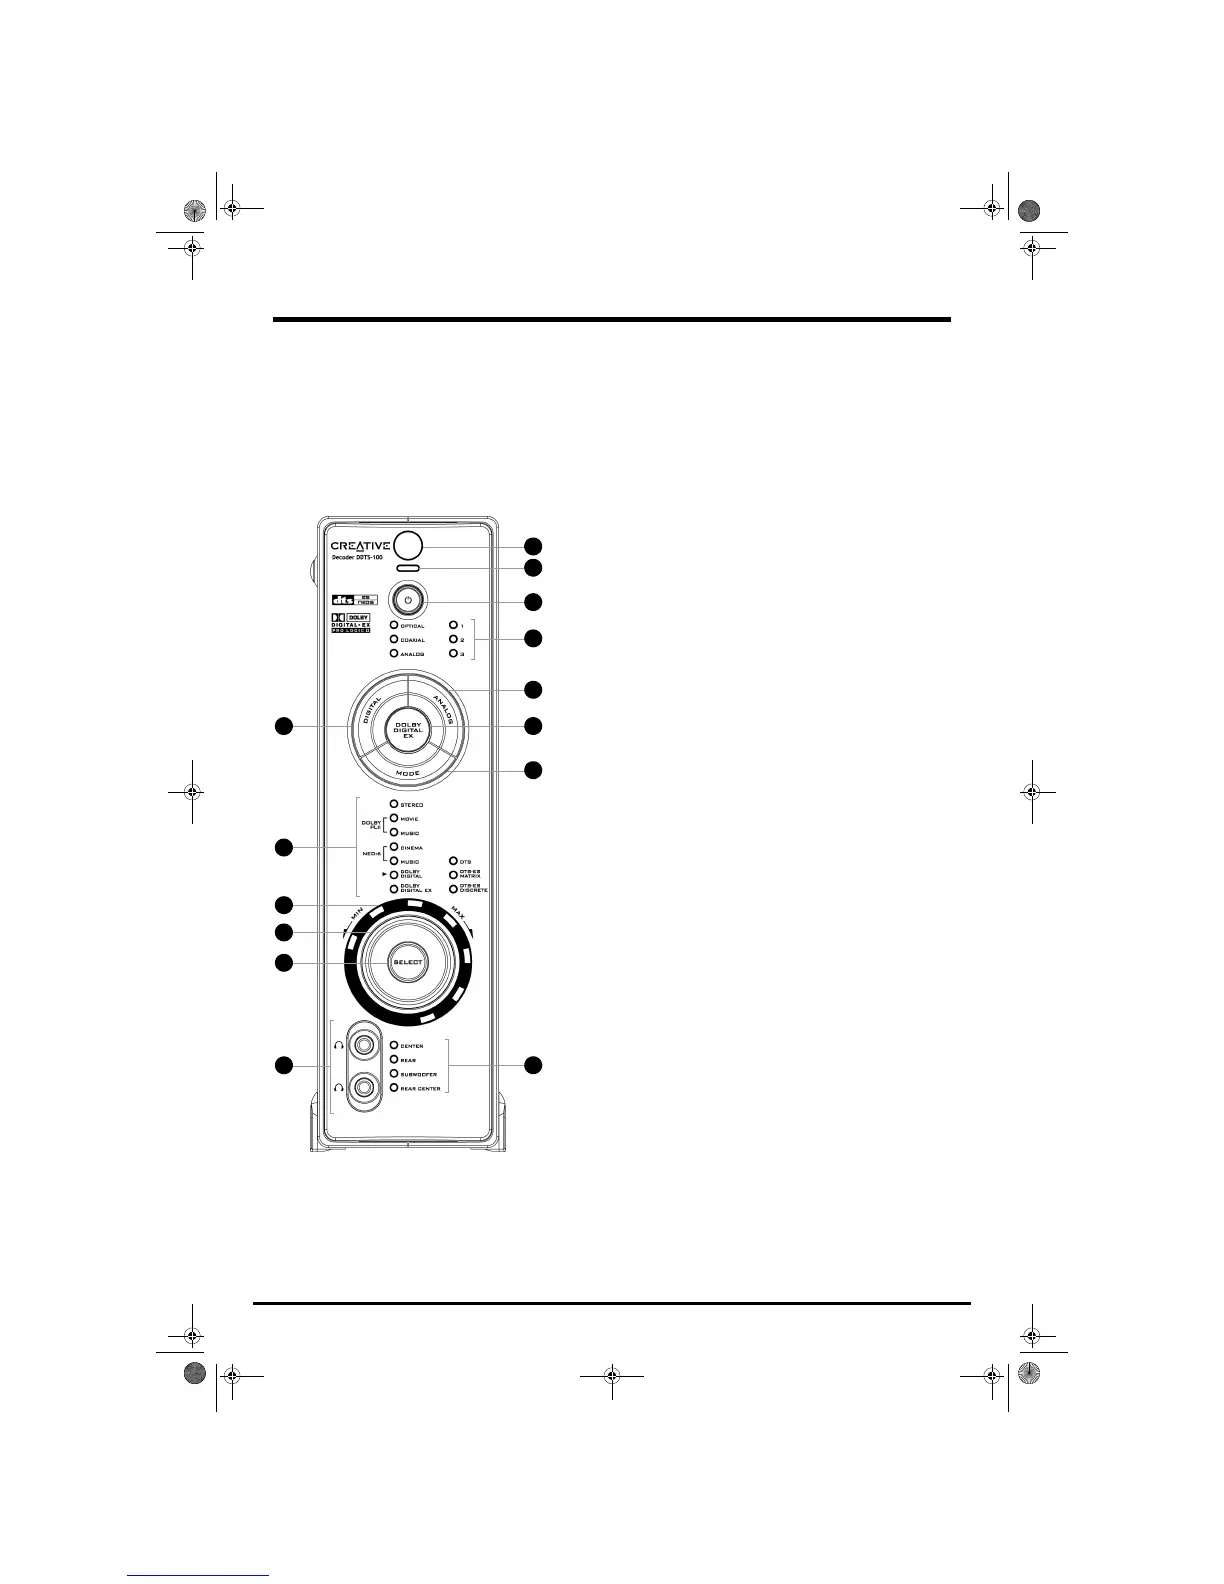
1 DIGITAL button
Press to select one of the following digital inputs:
OPTICAL 1, OPTICAL 2, OPTICAL 3, or
COAXIAL. For more information, see “Connecting and Selecting Input Devices” on
page 6.
2Mode LEDs
Indicate the media format of the selected mode.
3 Volume LEDs
Indicate the master volume, or the volume of the selected output channels.
4 Volume knob
Adjusts the master volume, or the volume of the selected output channels. For more
information, see “Adjusting Output Channels” on page 12.
5 SELECT button
Press to select one of the following output channels (for volume adjustment):
CENTER, REAR, SUBWOOFER, or REAR CENTER. For more information, see “Adjusting
Output Channels” on page 12.
6 Headphone jacks
Connect to headphones (available separately). Output to speakers is muted when
you connect headphones.
7 Infrared receiver
Receives infrared signals from the remote control. For reliable remote control
functionality, do not obstruct the infrared receiver.
8 Power LED
Lights up red when the decoder is set to Standby, and turns off when you turn on the
decoder.
9 Power button
Press to turn on the decoder, or set it to Standby.
10 Input LEDs
Indicate the selected audio input.
11 ANALOG button
Press to select one of the following analog inputs:
ANALOG 1, ANALOG 2, or ANALOG 3.
For more information, see “Connecting and Selecting Input Devices” on page 6.
12 DOLBY DIGITAL EX button
Press to upmix 5.1-channel audio to 6.1-channel audio (for 6.1 speaker systems
only). For more information, see “Connecting and Selecting Input Devices” on
page 6.
13 MODE button
Press to select the one of the following listening modes:
STEREO, DOLBY PLII MOVIE,
DOLBY PLII MUSIC, NEO:6 CINEMA, or NEO:6 MUSIC. For more information, see
“Selecting Modes” on page 9.
14 Output LEDs
Indicate the selected output channels (for volume adjustment). Master volume is
selected when none of the LEDs are lit.
1
1
Gimo1.book Page 3 Thursday, October 9, 2003 11:18 AM