the heading corrections requested by the gyro. In the absence of a response from the helicopter the gyro continues to increase the servo
command in an attempt to get the helicopter to obey. In flight the helicopter will, of course, respond to the tail servo movements and the system
will act normally. In order to minimise these movements the trim of the rudder stick needs to be very accurately set. To do this the ICG400,
during its auto-setup routine, samples the mid-stick signal to an accuracy much finer than one click of trim. This feature also accommodates the
variations in servo pulse standards adopted by RC manufacturers.
Flight Modes
The ICG400 has two flight modes selectable by the transmitter gyro gain switch (or Auxiliary channel switch).
Note:
A rotary knob or slider is
not
recommended as it is not possible to accurately and repeatedly set the gain with these.
Mode 0 (Standard Mode)
This mode gives flying characteristics that are similar to conventional gyro systems, but it also incorporates an auto trim that compensates for
small inaccuracies in the mechanical adjustment of the tail linkage, variations in engine performance, etc.
Mode 1 (Heading Lock Mode)
This mode provides a much higher resistance to unwanted yawing movements than can be obtained with a conventional gyro system. This mode
has great advantages in the following situations:
1) For the beginner, where this mode makes it possible for him/her to almost ignore the tail rotor control in the initial hovering phase, which is
made even easier as this mode allows the tail trim to be set before the helicopter leaves the ground. (see 'Trim Adjustment')
2) For cross-wind hovering manoeuvres where the natural tendency of the helicopter to weathercock into wind needs to be resisted.
3) For backwards flight manoeuvres and general "3D" flying.
The Standard mode may be employed for basic forward flight where the natural tendency of the helicopter to weathercock can be helpful,
especially to the less experienced pilot.
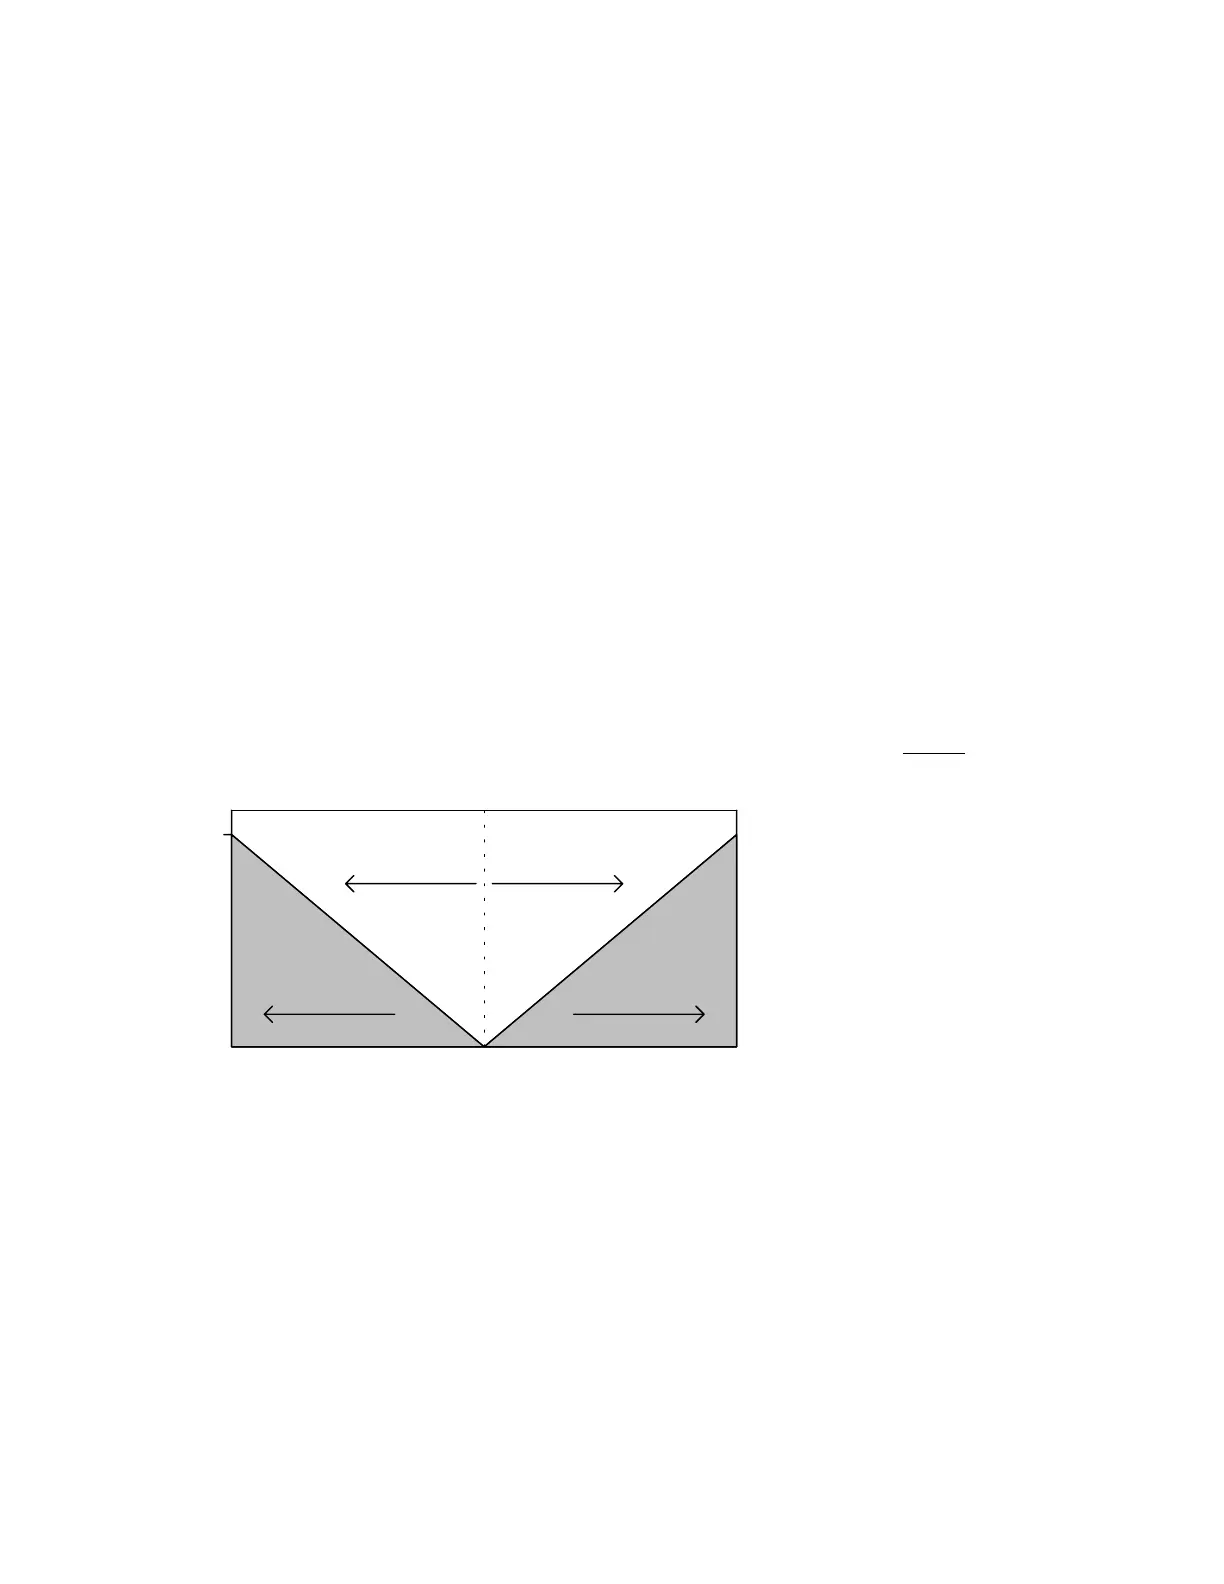
The graph (Figure 1) shows the way in which the gyro gain channel provides both mode switching and independent gain adjustment of the two
modes. If the gyro gain channel pulse is longer than the centre value the gyro is in Mode 0 while with the gain channel pulse shorter than the
centre value the gyro is in Mode 1. The travel adjustment (or ATV) settings for the two switch positions of the gain channel provide a
convenient way of adjusting (from the transmitter) the gain for the two modes. Increasing the ATV of the gyro gain channel increases the gain
for that mode. Please note that it is not possible to use the ICG400 with basic radio systems that lack a suitable channel for controlling the gyro
gain.
Gain channel operation
The centre pulse value is set at the factory at 1.51ms however the Auto-setup routine will adjust the gyro centre value to accurately match that
of your particular radio system. This accommodates the different pulse length standards adopted by different radio system manufacturers.
100%
centre value
0%
Short pulse Long pulse
Flight Mode 0Flight Mode 1
Gain channel pulse length
Gain
(Standard Mode)(Heading Hold Mode)
Increasing gain Increasing gain
First Switch Position
Increasing gain channel ATV
Increasing gain channel ATV
Second Switch Position
Gyro
Figure 1.
The Gyro gain channel acts as both gyro mode switch and gain control
Installation.
Preparing the helicopter mechanics
Attention to the tail control linkage is important to getting the best from this gyro. You should aim for a easy-moving but slop-free linkage
between the tail servo and the tail blades. Inspect the bearings/thrust races in the tail hub for smoothness of operation. Check the pitch slider
and ball links for slop and replace if needed. Some helicopters that have noticeable 'give' in the tail linkage may benefit from the addition of a
rear-mounted tail servo and rigid pushrod. You should also fit a long servo arm (between 15 & 20mm) to the tail servo.
Remember that during aerobatic manoeuvres the combination of a high performance gyro and a fast tail servo can place very high loads on the
tail rotor drive train. While you have the helicopter on the bench to install the gyro is a good time to check the condition of tail rotor gears etc.
Inspect them regularly to ensure that they are in good condition.
Mounting the gyro
The gyro may be mounted lengthways, or across, or indeed at any angle within the model so long as its axis of rotation (as marked on the back
of the gyro case) is parallel to the main shaft of the helicopter. For setting up you will need to see the LEDs so mount the gyro so that these can
readily be seen.