The gyro also samples the mid-stick pulse width at this time so you need to have the rudder trim and rudder sub-trim set to centre before
entering the auto-setup.
Make sure you do not touch the rudder stick at this time.
Gyro sense reversing
The first item to be set is the gyro sense reversing. Check that the yellow "REV" LED turns on and off as the rudder stick is moved fully left and
right. Now,
if the servo operating sense has been set correctly
as described previously,
simply push the rudder stick to the left and
release it back to the middle.
This will set the gyro sense to match your system. The servo will travel over to allow the user to check that left
tail command is indeed being given and once this has been checked
the gyro sense is 'entered' by toggling the gain switch once
(i.e. into
mode 0 and back to mode 1) The gyro will 'zip' the servo back and forth in acknowledgement and again park the servo in the middle.
Servo travel limits
Following the acknowledgement the servo travels over to the first travel limit and this can now be adjusted. Hold the stick over in the direction
of the servo deflection to increase the limit or hold it over against the deflection to reduce the limit. The servo will move as you change the limit
and with its slow movement it is possible to set the limit very accurately. When the correct limit has been found enter this value by toggling the
gain switch. Once again an acknowledging 'zip' is given.
Now the servo travels over to the remaining travel limit. Adjustment and entering is the same as the first limit. Once this limit has been entered
the auto setup routine is complete. A double acknowledgement is given to show this and the servo will centre, and the gyro will halt with no
activity until the power is cycled.
Restart checks
For the setup changes to take effect the gyro must be powered down and powered back up again. On turn on the gyro takes approximately 5
seconds to re-boot. Having re-started the system check the operation of the tail servo for rudder inputs and helicopter movements. Do this for
both flight modes. It is important to check the gyro operating sense. To do this simply set the gyro in mode 1 (Heading Lock mode) and rotate
the helicopter 90 degrees to the right (clockwise as viewed from above) then look at the tail blades. These should have their leading edges
pointing to the right.
Information on popular radio types.
The ICG400 is designed to accept a wide range of radio system parameters (frame rate, servo pulse timings etc.) however it is not possible to
provide information as to channel usage and radio setup details for all manufacturers' equipment. The information below covers the popular JR,
Futaba and Sanwa systems. If you are considering using this gyro with other types of radio system please consult your radio manual. In case of
difficulty please contact your radio manufacturer, look at our website (http://www.rcmodels.org/csm) or contact the CSM technical department
(Email tech@csm-ltd.co.uk) for advice.
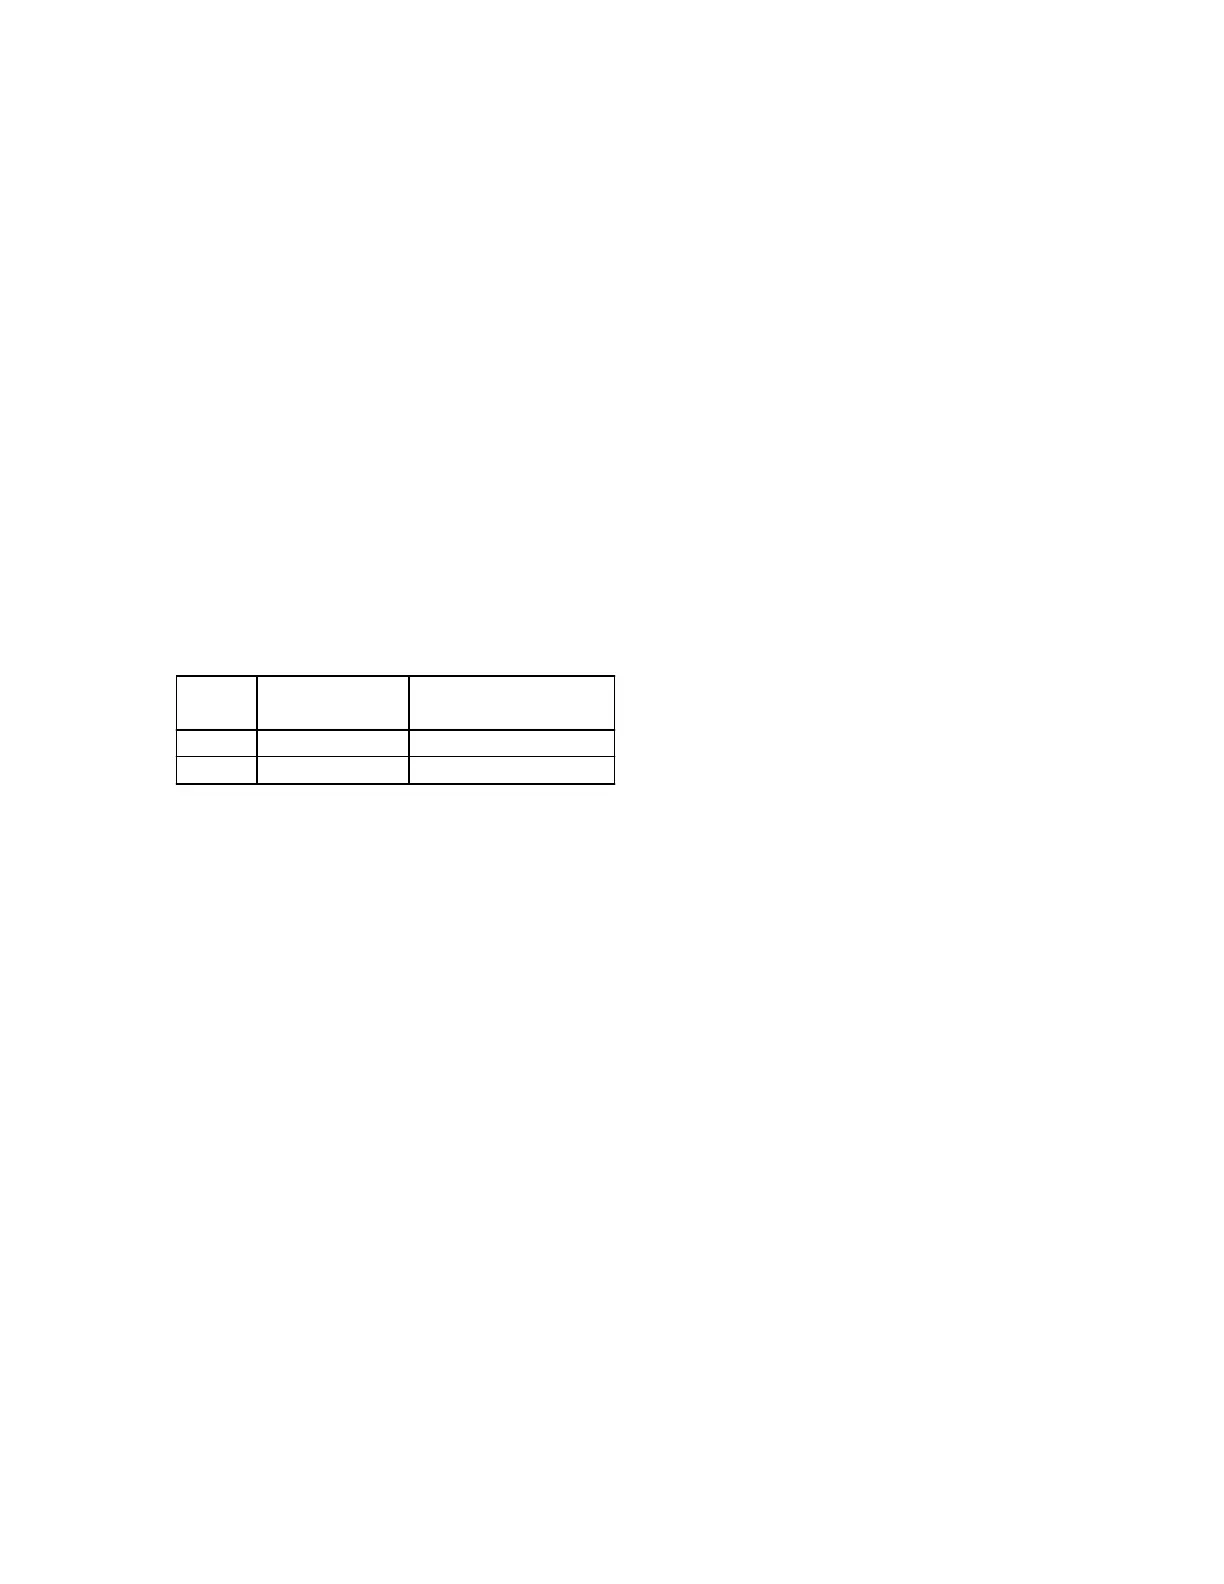
Connect the gyro to your receiver as indicated in the following table:-
Radio
Type
Gyro "RUD IN"
connect to
Gyro "GAIN"
connect to
Futaba
JR
Channel 4
Channel 5 or Channel 7
"Rudd"
"Gear", "Aux2" or "Aux3"
Connect the "SERVO" output to the tail rotor servo.
JR PCM10S/SX
Setup with 'code 44' disabled
On these radios it is easier to disable the JR 'code 44' (gyro sense adjust) and control the gyro gain by a switch. In this case the gain for the two
gyro modes is adjusted by the two travel adjustment values for the gyro channel. Initial values of 60% should be used.
Setup with 'code 44' enabled
If you wish the gyro to switch automatically between mode 0 and mode 1 as the Flight Mode (Idle Up) switch is operated you will need to
enable the JR 'code 44' gyro sensing facility.
When using 'code 44' you should remember that the ICG400 gain control works from the centre of the channel outwards. As a consequence an
LCD value of 50% (the channel centre) is in reality zero gain (the switchover point between the two gyro modes). Increasing the value above
50% will increase the gain in one flight mode while the other mode is adjusted by decreasing the value below 50%: be aware that this value will
be reversed so that an LCD value of 25% will actually be a higher gain value than a LCD value of 30%. Note: if the gyro is adjusted through the
JR gyro software, the gyro channel travel adjustments should be set to equal values each way. Initially set them to 100% and only increase them
if you run out of gain adjustment with the code 44 parameters. The starting point should be with the code 44 parameters set to 10% and 90%
JR X388S/X3810/X8103
On these radios it is easier to control the gyro gain through the gear channel as it is not always possible to have control over other channels on a
2 position switch. Note: if so desired it is possible to set the gyro up using the JR gyro software on the 3810/8103, see the PCM10 instructions
above.
Futaba 9ZHP/ZAP
With this transmitter it is important that, initially, all the flight conditions have the same gyro configuration. To check all the flight conditions
you will need to go into the various menus mentioned below and turn throttle hold on and off and then try each of the idle up positions in order
to see the status for all the conditions. (see your ZAP/ZHP manual for more detail). First ensure that
in all flight modes
the gyro sense mode is
set to INHIBIT. To do this go to the "GYR" entry of the "helicopter condition" menu and for each flight condition press the INH key to select
the INHIBIT state. Then press END to exit the gyro sense menu. Now check under the "PMX" entry that no throttle to rudder or rudder to gyro
mixing is active in any of the flight conditions. Then check in the "P->R" entry that pitch to rudder mixing is inhibited. Now enter the "ATV"
menu. Press "RUD" to select the Rudder channel and for all flight modes make RATE A and RATE B equal to 90%. Then press "GYR" to
select the Gyro menu and set RATE A and RATE B to 60% for all flight modes. Press END to exit the ATV menu.
Now press "MDL" to enter the "model menu". Use the "FNC" entry to allocate the gyro control to a switch of your choice. After the auto setup
has been done you may wish to return to the ATV menu to set the rudder ATVs to 60% until you are familiar with the gyro's handling
characteristics.
Sanwa RD6000
This particular radio demands a slightly different set-up than normal although it may be used with the CSM ICG400. There are no spare
switchable channels on the RD6000 so to change gyro mode you will have to use one of the flight mode switches. There are three flight modes
Normal, Flight Mode 1 and Flight Mode 2. There is no switch either for throttle hold and this function is usually achieved by using Flight Mode
 Loading...