10 se c t i O n 2— as s e M b l y & se t -up
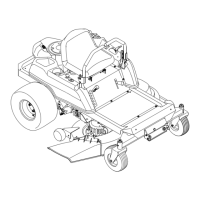
Install the discharge chute deflector using the carriage 3.
bolts, push nuts and flange lock nuts as shown in Fig. 3-3
and securely tighten the hardware.
brace (with tag) that may be holding the chute deflector
upward for shipment. If a brace is present, it must be removed
upward, remove the shipping brace by grasping it and rotating it
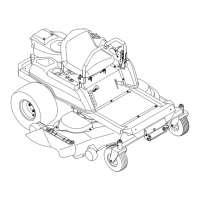
Install Operator’s Seat
To install the seat proceed as follows:
NOTE: The seat is shipped with the seat switch and seat pan attached.
Cut any straps securing the seat assembly and the drive
control levers to the tractor. Remove any packing material.
NOTE: Be careful not to cut the wiring harness connecting the
seat and the seat switch in the bottom of the seat.
Remove the two shoulder bolts and lock nuts in the seat 2.
pan as shown in Fig. 3-5.
Rotate the seat into position and secure the seat into place 3.
with the previously removed shoulder bolts and lock nuts.
Be careful not to crimp or damage the wire harness while
Position Drive Control levers
The drive control levers of the tractor are lowered for shipping
purposes. The flange lock nuts, hex screws, and flat washers that
normally secure the control levers in their operating position
are unfastened and installed in the slotted holes of the control
levers for shipment. The control levers must be repositioned to
operate the tractor. To reposition the control levers for operation,
proceed as follows:
Remove the hex screw, flat washer, and flange lock nut
from the slot of one of the drive control levers.
Figure 3-4
Discharge
Chute
Deflector
Flange Lock Nuts
Push Nuts
Carriage Bolts
Figure 3-3
Wire Harness
Seat Pan
Shoulder
Bolt
Lock
Nuts
Shoulder
Bolt
Figure 3-5
Wire Harness
Seat Bracket
Shoulder
Bolts
Lock
Nuts
Figure 3-6
 Loading...