This manual describes the D-Link Powerline Adaptor Kit, a solution designed to connect your Optus TV with Fetch Set Top Box to your broadband internet using your home's existing electrical wiring. This method offers an alternative to direct Ethernet cables or wireless connections, providing a convenient way to extend your network without running new cables. The kit includes two white adaptors and two Ethernet cables, enabling a straightforward setup process.
The primary function of the D-Link Powerline Adaptor Kit is to create a network connection over your home's electrical power lines. One adaptor is connected to your modem or router, and the other is connected to your Optus TV Set Top Box. The adaptors communicate with each other through the electrical wiring, effectively turning your power outlets into network ports. This allows your Set Top Box to access the internet for streaming content and other online services provided by Optus TV with Fetch.
Usage Features:
The setup process is designed to be incredibly simple, broken down into clear steps. Before beginning, it's important to identify suitable power points near your modem/router and your Set Top Box. Safety is emphasized, with a tip to turn off power points before plugging in or unplugging devices.
Step 1: Connecting the Adaptor to Your Modem or Router
- Location: Go to the room where your existing modem or router is located.
- Ethernet Connection: Plug one end of the included Ethernet Cable (B) into a spare Ethernet port on the back of your modem or router.
- Adaptor Connection: Plug the other end of the Ethernet Cable (B) into the top port of the White Adaptor (A).
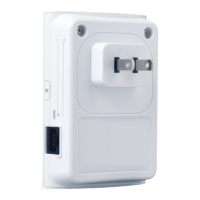
- Power Connection: Plug the White Adaptor (A) directly into a wall power point near your modem or router.
Important Note on Power Boards:
- DO: Plug the Adaptor (A) directly into a wall socket.
- DO: If you need to use an extension cord, surge-protection board, or powerboard, plug it into the front face of the Adaptor (A) only if the Adaptor (A) is already plugged directly into the wall. This means the adaptor acts as the first point of connection to the wall, and other devices can then be plugged into the adaptor's integrated power outlet.
- DON'T: Plug the Adaptor (A) directly into an extension cord, surge-protection board, or powerboard. This is crucial for optimal performance and to avoid potential issues with the powerline signal.
Step 2: Hooking Up the Other Adaptor to the Set Top Box
- Location: Go to the room with your Set Top Box and TV.
- Ethernet Connection: Plug one end of the included Ethernet Cable (D) into the port labeled 'INTERNET' on the back of your Optus Set Top Box.
- Adaptor Connection: Plug the other end of the Ethernet Cable (D) into the top port of the White Adaptor (C).
- Power Connection: Plug the White Adaptor (C) directly into a wall power point near your Set Top Box.
Important Note on Power Boards (for Set Top Box side):
- DO: Plug the Adaptor (C) directly into the wall socket.
- DO: If you need to use an extension cord, surge-protection board, or powerboard, plug it into the front face of the Adaptor (C) only if the Adaptor (C) is already plugged directly into the wall.
- DON'T: Plug the Adaptor (C) directly into an extension cord, surge-protection board, or powerboard.
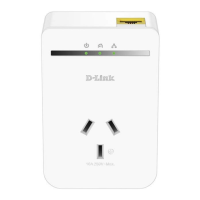
Step 3: Power Up and Light Indicators
- Power On: Turn on the power points for both Adaptors.
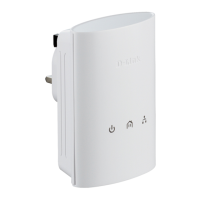
- Light Check: Observe the LED indicators on both adaptors.
- Power Light (1): Should blink initially, then turn a solid green.
- Solid: Electrical power is switched on.
- Blinking: Adaptor is resetting, in power saving mode, or the simple connect button is on.
- Off: No electrical power.
- Powerline Light (2): Should illuminate a solid color once the adaptors have successfully found each other and established a connection.
- Solid On: Adaptor is connected to a Powerline network. The color indicates the link rate (Green for above 50Mbps, Amber for 30-50Mbps, Red for below 30Mbps).
- Off: Adaptor has not found any other compatible Powerline devices.
- Ethernet Light (3): The Ethernet light on the adaptor connected to your modem/router should turn to a solid green. The Ethernet light on the adaptor connected to your Set Top Box will not turn green until the Set Top Box is fully set up.
- Solid On: Ethernet connection is up and running.
- Off: No Ethernet connection. Check modem/router or Set Top Box.
Once all lights are as described (Power and Powerline solid, modem-side Ethernet solid green), your internet connection via the Powerline adaptors should be correctly established. You can then proceed with the remaining setup steps for your Optus TV Set Top Box using its Quick Install Guide.
Maintenance Features / Troubleshooting:
The manual provides a dedicated section for common issues and troubleshooting steps:
- No Spare Ethernet Port on Modem/Router: If all Ethernet ports are occupied, you will need to unplug an existing device to free up a port for the Powerline Adaptor.
- Power Light Off: Ensure the adaptor is plugged directly into a wall socket and not into an extension cord, power board, or surge-protector board. Verify that power is supplied to the wall socket.
- Powerline LED Off: This indicates the adaptors haven't found each other.
- Try moving the white adaptor to a power socket location closer to the other white adaptor.
- Reset both adaptors to factory default settings using the simple connect button. Refer to the full D-Link User Guide for detailed instructions on this process.
- Powerline Light Amber or Red: This means the adaptors are connected but at a lower speed.
- Green: Above 50Mbps (optimal).
- Amber: Between 30Mbps and 50Mbps.
- Red: Below 30Mbps.
- Ensure both adaptors are plugged directly into a wall socket and not into power boards, extension cords, or surge-protection boards.
- If possible, try moving one of the adaptors to a different power socket to improve the connection quality.
- Ethernet Light Off:
- Verify that your modem/router and Set Top Box are powered on and functioning correctly.
- Check that both Ethernet cables are working and securely plugged into the respective devices and adaptors.
- Reset both adaptors to factory default settings using the simple connect button, referring to the full D-Link User Guide for instructions.
- Changing Default Encryption Key: The manual confirms that it is possible to change the default encryption key for enhanced security. Users are directed to the full D-Link User Guide for more information on this advanced feature.
For further assistance, users are encouraged to visit the Optus website (optus.com.au/optustv/plcinstall or optus.com.au/optustv/help) for video tutorials and the full user guide, or to contact Optus Technical Support. The D-Link support website (support.dlink.com.au) is also provided for additional help.