wheel to be
out of
the true.
Replace
damaged and missing
spokes,
and
with
a
spoke
wrench
or
smalladjustable
wrench, turn the nipples
of loose
spokes
clock-
wise to
achieve even tension.
Then,
if
the
wheel
is
off
center to the left, tighten
the spokes
on the right, and loosen the spokes
on
the left.
"Hop"isremoved
by
tightening
spokes
on
both sides of
the high
area.
Final spoke adjustments
should
be
done in
small
increments.
After
this adjustment
has
been completed,
if the
wheel
remains out
of
align-
ment,
your
bicycle should be taken
to a
professional
dealer
for
servicing.
6.3.13 Tires
and
Tubes
A.
Disassembly
Remove the
wheel as instructed
in Sec.
6.3.14. Deflate the tire
by
pushingin
on
the
pin
inside
of
the tire
valve,
squeeze
the tire to
force
out
as
much
air as
possible.
Pinch
the
tire together
all
around the
rim to break it loose
from
the
rim.
Roll the tire off the
rim,
starting
from
the
opposite
side
of
the tire
valve.
Note:
lf
tire removal or installation is too
difficult
to
do with
your
hands, have
it
done
by a
bicycle
service shop,
as
special tools
may be required.
Caution:
Do not
use
screwdrivers
or other
pointed
tools
which may damage
tire, tube
or rim.
Before installing
the tire, make certain that the
rubber rim
strip
is
not
damaged
and.covers all spoke
ends.
File
down
any spoke
ends
prolecting
out
from
the spoke
nipple.
Check
the inside
of the tire
for damage and any
object
that
mighr
punctrrre
the inner tube.
Then, inflate
the tube lightly to help
keep
it in
the
tire
and
gradually push
one
side
of
the tire
onto
the
rim,
again starting
from
the side
opposite
the infla-
tion
valve. Pull the
valve
firmly
through the valve
hole
in the
rim,
and install the
other
side
of the
tire starting
at the inflation value. lf the valve
does not
project
straight
out of
the
rim hole
after
the tire is
installed, slide
the tire around
the rim
until
it
is
properly positioned.
Inflate
the tire slightly
and then
release air to
straighten out the inner tube. Then
inflate tire as instructed
in Sec.
4.4 of this
manual.
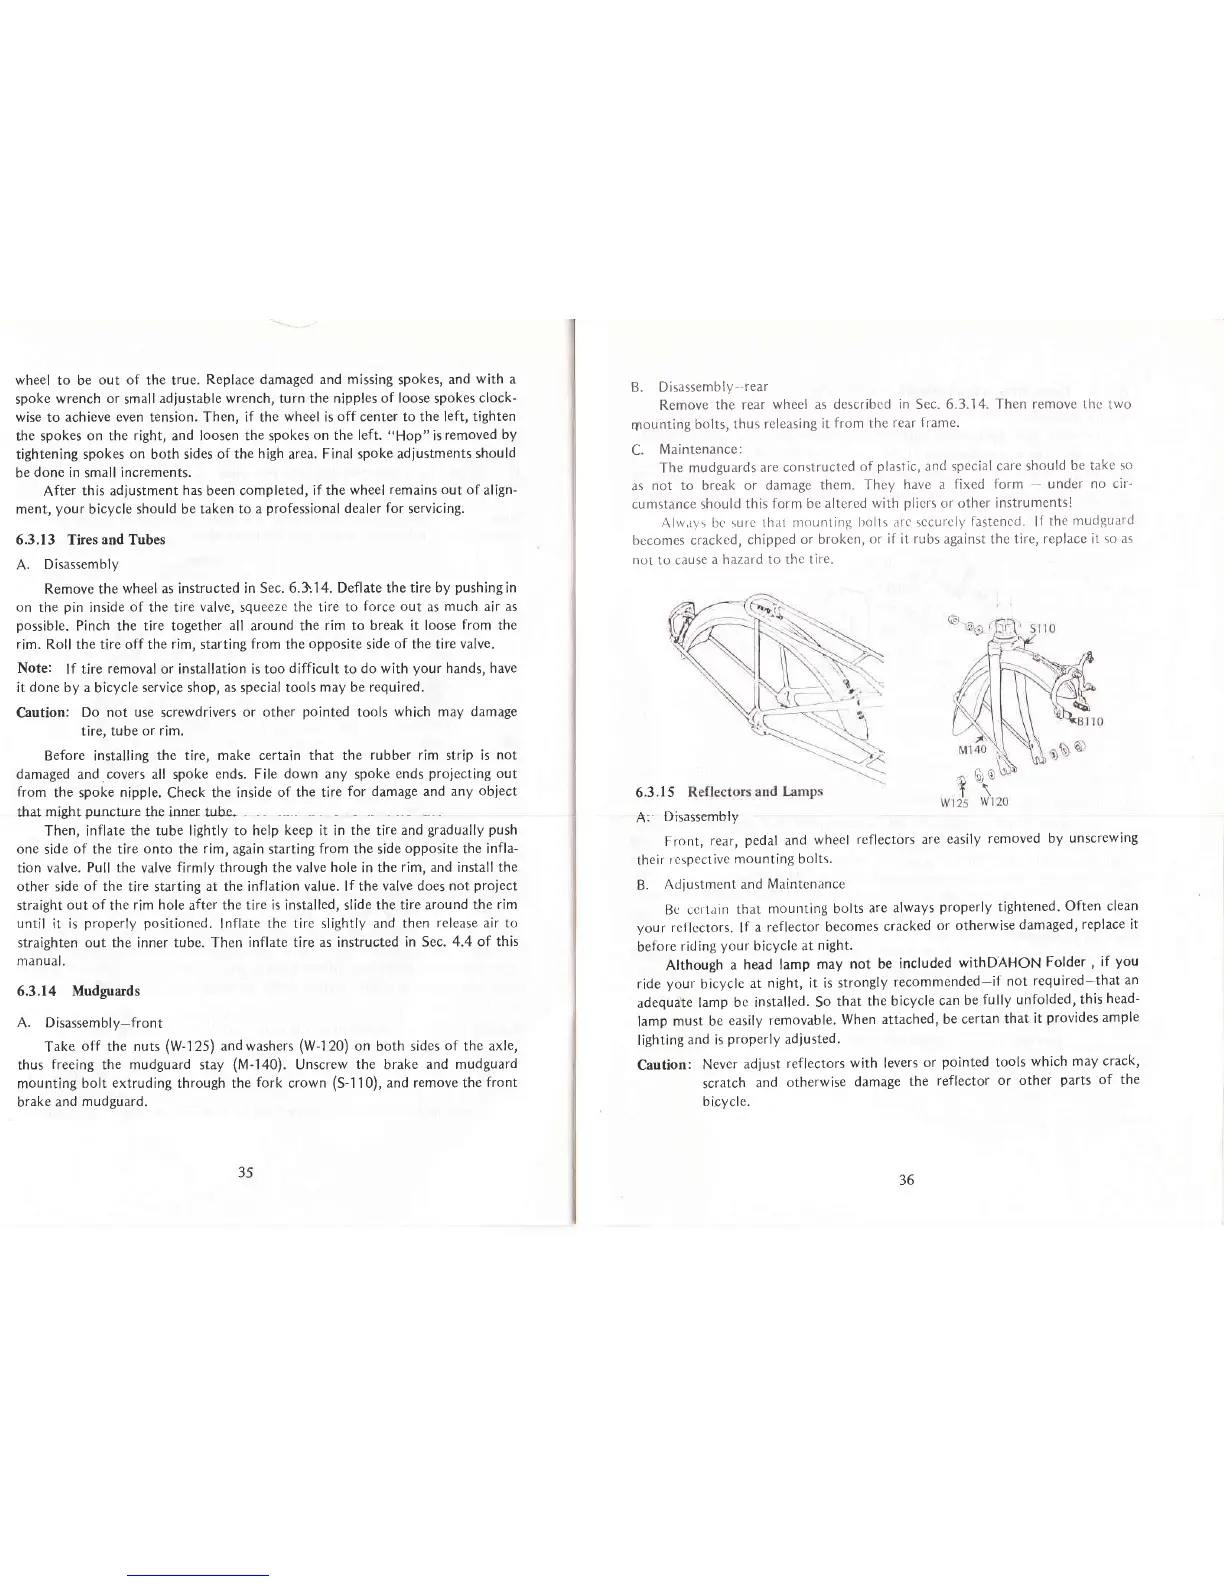
6.3.14 Mudguards
A. Disassembly-front
Take
off
the nuts
(W-125)
and washers
(W-1
20)
on
both
sides
of
the axle,
thus
freeing
the mudguard stay
(M-140).
Unscrew
the
brake
and mudguard
mounting
bolt extruding through the
fork
crown
(S-110),
and remove the
front
brake
and
mudguard.
J)
36
B.
Disassembly
rear
Remove
the rear
wheel as describcd
in
Sec.
6.3.14. Then remove
thc
two
mounting
bolts,
thus
releasing
it
from the
rear
frame.
C.
Maintenance:
The
mudguards
are constructcd
of
plastic,
and special care
should
be take
so
as
not to break
or damage
them. They
have a fixed
form
-
under no cir-
cumstance should
this form bc
altered with
plicrs
or other instruments!
Allv,rys bc surc that
nrounting
bolts irrc sccure
ly
f
astencd, lf
the
mudguard
becomes
cracked,
chipped
or broken,
or if it rubs
against the
tire, replace it
so as
not to cause
a hazard
to the tire.
6.3.r5
A:
Disassembly
Front,
rear,
pedal
and
wheel
reflectors are
easily
removed
by
unscrewing
their
rcspective
mounting bolts.
B.
Adjuslmcnt and
Maintcnancc
Bc
ccr
Lain that
mounting bolts
are always
properly
tightened.
Often clean
your
rcllcctors.
lf
a reflector
becomes
cracked
or otherwise
damaged,
replace it
before
riding
your
bicycle at
night.
Although
a
head lamp
may
not be
included
withDAHON
Folder
,
if
you
ride
your
bicycle
at
night, it is strongly
recommended-if
not
required-that
an
adequate
lamp
bc installed. So
that
the bicycle
can
be
fully unfolded,
this
head-
lamp
must be
easily
removable.
When
attached, be
certan
that
it
provides
ample
lighting
and is
properly
adiusted.
Caution:
Nevcr
adjust
reflectors
with levers
or
pointed
tools
which
may
crack,
scratch
and
otherwise
damage
the
reflector
or other
parts
of the
bicycle'
l^\ {}l
\