This document provides a comprehensive operation manual for the Daikin Wired Remote Controller, models BRC230Z4, BRC230Z8, BRC24Z4, and BRC24Z8. It covers essential information from basic button functions to advanced timer and zone control settings, as well as maintenance procedures.
Read Before Operation
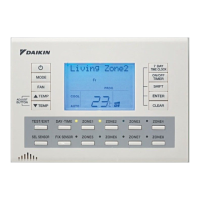
The manual begins by detailing the Name and Functions of Buttons on the remote controller. This section serves as a quick reference to understand the purpose of each button, ensuring users can navigate the device effectively. Key buttons include:
- ON/OFF button: Used to turn the air conditioner ON or OFF.
- MODE selector button: Allows selection between AUTO, COOL, HEAT, DRY, and FAN modes.
- FAN setting button: Adjusts the airflow rate.
- TEMPERATURE adjustment button (▲ TEMP / ▼ TEMP): Used for temperature adjustment and other settings.
- 7 DAY TIME CLOCK button: Accesses the setting display for Simple and Multi 7-Day Timers.
- ON/OFF TIMER button: Sets ON and OFF timers.
- SHIFT button: Changes the display during settings.
- ENTER button: Confirms and accepts settings.
- CLEAR button: Cancels settings.
- TEST/EXIT button: Exits programs.
- DAY/TIME button: Navigates to the clock and day setting.
- SELECT SENSOR button: For sensor selection.
- FIXING SENSOR button: Enters the selected sensor.
- ZONE button: For making zone settings.
- DISPLAY: The LCD screen that shows current settings.
The manual also explains that two remote controllers can be connected to the system, functioning as master and sub units. The sub remote controller mirrors the master's functions, except for time and day settings, which are exclusively set on the master.
The Preparation before Operation section guides users through initial setup, starting with Turning the breaker ON. It emphasizes that if nothing is displayed on the LCD, the breaker should be turned ON.
A crucial part of the preparation is Time and Day Settings. This step is vital for the proper functioning of timer operations. The process involves:
- Identifying if "Mo", "00:00", and "SET" are blinking, indicating no time/day settings have been made.
- Pressing the "DAY/TIME button" to access the setting screen.
- Using the "SHIFT button" to enter adjustment mode, where "Adjust." and "Mo" blink.
- Selecting the day (Mo → Tu → We → Th → Fr → Sa → Su) using the "▲ TEMP / ▼ TEMP buttons".
- Pressing "SHIFT button" again to move to time setting, where "0000" blinks.
- Adjusting the present time using the "▲ TEMP / ▼ TEMP buttons".
- Pressing the "ENTER button" to confirm and save the settings.
Instructions are also provided for Cancelling Time and Day Settings, by pressing the "CLEAR button" for at least 4 seconds, which resets the settings and makes "Mo" and "SET" blink again.
Notes on energy saving are included, advising users to maintain moderate temperature settings and use blinds/curtains to block sunlight, thereby improving cooling efficiency. It also reminds users that the air conditioner consumes a small amount of electricity even when off and recommends turning the breaker OFF for long periods of non-use, switching it back on 6 hours before operation.
Operation
The FAN · DRY · AUTO · COOL · HEAT Operation section details how to use the air conditioner in various modes.
To start operation:
- Press the "MODE button" to select the desired operation mode (FAN → DRY → AUTO → COOL → HEAT).
- Press the "ON/OFF button" to start the air conditioner in the selected mode.
To stop operation, simply press the "ON/OFF button" again.
To change the temperature setting:
- Press the "▲ TEMP / ▼ TEMP buttons".
- In DRY or FAN mode, temperature setting is unavailable.
- In AUTO, COOL, or HEAT mode, adjust the temperature between 16°C and 32°C using the "▲ TEMP / ▼ TEMP buttons".
To change the airflow setting:
- Press the "FAN button" to select the airflow rate.
- Airflow volume is selectable from two levels in normal or AUTO fan mode.
Notes on specific operation modes provide important context:
- HEAT operation: Explains that heating capacity drops in lower outdoor temperatures due to heat absorption from outdoor air. It also mentions defrosting operations, during which warm air will not flow from the indoor unit.
- COOL operation: Clarifies that cooling performance drops if the outside temperature is high, as heat is released outdoors.
- DRY operation: States that the computer chip automatically controls temperature and fan strength to remove humidity, making manual adjustment unavailable.
- AUTO COOL/HEAT operation: Describes how the system selects COOL or HEAT based on room temperature and automatically reselects settings to maintain the user-set level.
- Airflow rate setting: Explains that the fan may stop for 6 minutes continuously and then operate for 30 seconds when AUTO fan speed is selected and the room temperature is within the selected range. It also notes that AUTO fan function operates differently if "Indoor Sens" is not selected.
The TIMER Operation section covers how to use ON and OFF timers to automatically switch the air conditioner.
- Ensure time and day are set.
- Press the "ON/OFF TIMER button" to select ON TIMER or OFF TIMER. "Timer", "ON", and "01" will be displayed.
- Press the "SHIFT button" to enter adjustment mode, where "Adjust." and "01" blink.
- Select the desired time (1 to 12 hours) using the "▲ TEMP / ▼ TEMP buttons".
- Press the "ENTER button" to complete the timer setting.
To cancel ON TIMER and OFF TIMER operation:
- Press the "ON/OFF TIMER button" to display the timer setting.
- Press the "CLEAR button" for at least 4 seconds to clear the setting.
The manual also explains how to combine ON TIMER and OFF TIMER, providing an example of setting ON after 1 hour and OFF after 3 hours. It clarifies that timer settings can be made in both master and sub remote controllers, with the air conditioner operating according to the sequence of settings.
SIMPLE 7 DAY TIMER Operation
This section details how to program the air conditioner to start and stop twice a day, 7 days a week, with individual modes and temperatures.
- Ensure time and day are set.
- Press the "7 DAY TIME CLOCK button" to display "S. 7DayTimer" and "0000", which blink. Each press shifts the day and program number. Holding the button for 4 seconds accesses MULTI 7 DAY TIMER settings.
- Press the "SHIFT button" to enter time setting, where "Adjust." and "0000" blink.
- Set the ON TIMER time (00:00 to 23:50 in 10-minute increments) using the "▲ TEMP / ▼ TEMP buttons".
- Press the "SHIFT button" to select the OFF TIMER setting section.
- Set the OFF TIMER time using the "▲ TEMP / ▼ TEMP buttons".
- Press the "SHIFT button" to select the MODE setting section, where "FAN" blinks.
- Select the operation mode (FAN → DRY → AUTO → COOL → HEAT) using the "▲ TEMP / ▼ TEMP buttons".
- Press the "SHIFT button" to select the temperature setting section, where the current temperature blinks. If FAN-DRY mode is selected, this step is skipped.
- Set the temperature using the "▲ TEMP / ▼ TEMP buttons".
- Press the "ENTER button" to complete the timer setting. "PROG" will be displayed.
To cancel SIMPLE 7 DAY TIMER operation:
- To cancel all settings, press the "7 DAY TIME CLOCK button", then press the "CLEAR button" for at least 4 seconds.
- To cancel an individual setting, select the setting, then press the "SHIFT button" to enter adjustment mode, and press the "CLEAR button" for at least 4 seconds.
Setting SIMPLE & MULTI 7 DAY TIMER using copy mode
This feature allows users to copy timer settings from one day to another.
- Press the "7 DAY TIME CLOCK button" and select the program number of the desired day to copy.
- Press the "SHIFT button" to display "Adjust."
- Press the "ENTER button" for at least 4 seconds to copy the setting to the next day. Repeat for other days.
- Press the "ENTER button" to confirm the copy.
- Press the "TEST/EXIT button" to return to normal operation.
Notes for timer settings include:
- All S. 7 DAY TIMER settings apply to M. 7 DAY TIMER.
- Up to two items per day and 14 items per week can be set.
- Both ON and OFF timers must be set for correct operation.
- Incomplete settings will be entered if "ENTER" is pressed prematurely.
- Power outages or turning off the breaker can affect the internal clock, requiring a reset.
- The "SHIFT button" can be used to scroll through setting items if an error occurs or a step is skipped.
MULTI 7 DAY TIMER Operation
This section describes how to set SIMPLE 7 DAY TIMER, zone control, and thermistor switching.
- Press the "7 DAY TIME CLOCK button" for at least 4 seconds to access "M. 7DayTimer" settings. "0000" will blink.
- The procedure for setting ON TIMER, OFF TIMER, mode selection, and temperature is the same as for SIMPLE 7 DAY TIMER (refer to steps 2 to 9 of SIMPLE 7 DAY TIMER on page 10).
- Press the "SHIFT button" to display "Adjust. Zone?", where "Zone?" blinks.
- Press the "ZONE1 button" to select desired zones. LEDs of selected zones will light up green.
- Press the "SHIFT button" to display "Adjust. Indoor", where "Indoor" blinks.
- Press the "SEL SENSOR button" to switch the thermistor sensor. Options include Indoor, Sens1, Sens2, Master, and Sub.
- Press the "FIX SENSOR button" to fix the thermistor sensor position.
- Press the "ENTER button" to enter program 2 (if required).
- Press the "TEST/EXIT button" to complete the timer setting.
Explanation of the 7 DAY TIMER operation
This section provides illustrative examples of how the 7 DAY TIMER functions.
Case 1: SIMPLE 7 DAY TIMER
This allows programming the unit to start and stop twice a day, 7 days a week, with individual modes and temperatures for each time frame.
- Example: ON at 6:00, OFF at 8:30 (Auto, 23°C); ON at 15:00, OFF at 21:00 (Cool, 22°C).
Case 2: MULTI 7 DAY TIMER
This allows programming the unit to start and stop twice a day, 7 days a week, with individual modes, temperatures, zones, and sensor positions for each time frame.
- Example: ON at 17:00, OFF at 21:30 (Auto, 23°C, Living, Dining, Children's room, Living room sensor); ON at 21:40, OFF at 23:30 (Cool, 22°C, Main bedroom, Children's room, Main bedroom sensor).
ZONE Control
This feature allows users to select specific rooms for heating or cooling.
To select ZONE:
- Press the "ZONE1 button" to select the desired zone. "Zone1" will be displayed.
- Press the "ZONE1 button" again to fix the selection. The LED on the remote controller will light up green, and air will be blown to the selected zone.
To cancel ZONE selection:
- Press the "ZONE1 button" to select the zone to switch off. "Zone1" will be displayed.
- Press the "ZONE1 button" again to cancel the selection. The green LED will turn off.
Notes on ZONE control:
- Not all buttons may be available depending on the number of zones installed.
- Zones not required must be set up during commissioning.
- Names can be registered for each zone.
TEMPERATURE SENSOR Switching (Option)
This function allows users to add up to two optional temperature sensors (e.g., in living room, bedroom) and control the temperature based on the selected room's temperature.
To switch the temperature sensor:
- Press the "SEL SENSOR button". Each press shifts the sensor detection position (Indoor Sens → Sens1 → Sens2 → Master → Sub).
- Press the "FIX SENSOR button" to fix the selected sensor position.
Notes on sensor switching:
- This function is only available if an optional sensor or sub controller is mounted, except for "Indoor Sens" and "Master RC" sensors.
- The initial setting is "Indoor Sens".
- The temperature sensor setting can be checked by pressing the "SEL SENSOR button".
- Names can be registered for each sensor.
Name registration
This feature allows users to register names for each zone and temperature sensor, which will be displayed when switching between them.
To register the name:
- Press the "SHIFT button" for at least 4 seconds. "_Zone1" will be displayed, and "" will blink. Each press of the "ENTER button" shifts the display to the next zone.
- Use the "▲ TEMP / ▼ TEMP buttons" to enter a character (A to Z, a to z, 0 to 9, blank).
- Press the "SHIFT button" to move the cursor to the next digit. Repeat steps 2 and 3 to set the name.
- Press the "ENTER button" to fix the setting and shift to the next zone.
- Press the "TEST/EXIT button" to complete the name change.
To initialize registered names:
- Press the "SHIFT button" for at least 4 seconds to shift the display to name setting.
- Press the "CLEAR button" for at least 4 seconds to return the display to the initial state.
Cleaning
This section describes the Filter Cleaning Notice Reset procedure.
- When the filter becomes dirty or after a predetermined operating period, the remote controller will display "Filter", indicating that cleaning is required.
- After checking and cleaning the filter, press the "CLEAR button" for at least 4 seconds to reset the notice. The normal display will reappear.