6
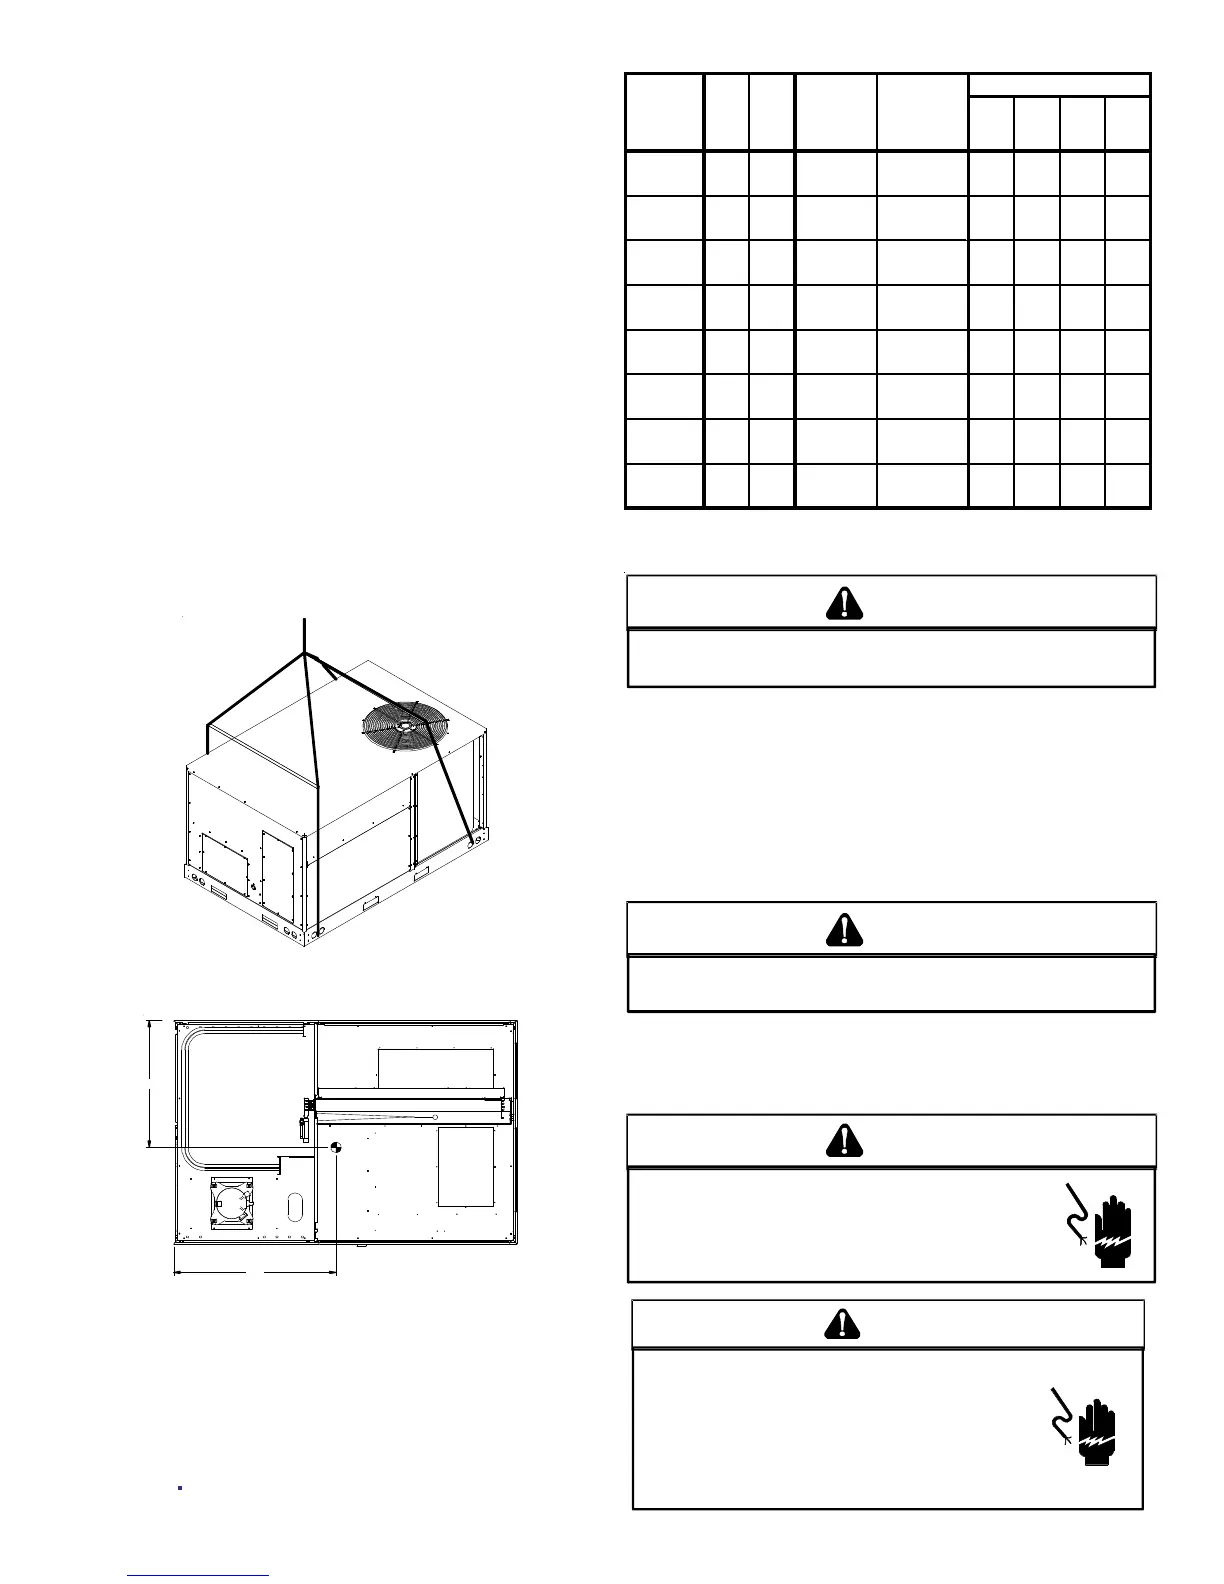
• The distance between the crane hook and the top of the
unit must not be less than 60”.
• Two spreader bars must span over the unit to prevent
damage to the cabinet by the lift cables. Spreader bars
must be of sufficient length so that cables do not come in
contact with the unit during transport. Remove wood
struts mounted beneath unit base frame before setting
unit on roof curb. These struts are intended to protect
unit base frame from fork lift damage. Removal is
accomplished by extracting the sheet metal retainers and
pulling the struts through the base of the unit. Refer to
rigging label on the unit.
Important: If using bottom discharge with roof curb, ductwork
should be attached to the curb prior to installing the unit. Ductwork
dimensions are shown in Roof Curb Installation Instructions.
Refer to the Roof Curb Installation Instructions for proper curb
installation. Curbing must be installed in compliance with the Na-
tional Roofing Contractors Association Manual.
Lower unit carefully onto roof mounting curb. While rigging unit,
center of gravity will cause condenser end to be lower than supply
air end.
To assist in determining rigging requirements, unit weights are
shown as follows:
A
B
C
D
CG
SUPPLY
RETURN
EVAPORATOR COIL
CONDENSER
COIL
COMPRESSOR
Y
X
CORNER & CENTER OF GRAVITY LOCATIONS
ABCD
DCC036* 35 27 525 500 115 150 105 130
DCC048* 35 27 560 535 125 160 110 140
DCC060* 35 27 595 570 133 167 118 152
DCC072* 35 27 650 625 147 185 127 166
DCH036* 34 28 605 580 130 180 110 155
DCH048* 34 28 610 585 135 185 115 155
DCH060* 34 28 605 580 133 182 113 157
DCH072* 34 28 660 635 142 200 122 171
* Weights shown are belt drive with no accessories.
Operating
Weight
(lbs)
Corner Weights ( lbs )
A*
Model
X
(in)
Y
(in)
Shipping
Weight
(lbs)
T
O
PREVENT
SEVERE
DAMAGE
TO
THE
BOTTOM
OF
THE
UNIT
,
DO
NOT
FORK
LIFT
UNIT
AFTER
WOOD
STRUTS
HAVE
BEEN
REMOVED
.
CAUTION
Bring condenser end of unit into alignment with the curb. With
condenser end of the unit resting on curb member and using curb
as a fulcrum, lower opposite end of the unit until entire unit is
seated on the curb. When a rectangular cantilever curb is used,
care should be taken to center the unit. Check for proper align-
ment and orientation of supply and return openings with duct.
RIGGING REMOVAL
T
O
PREVENT
DAMAGE
TO
THE
UNIT
,
DO
NOT
ALLOW
CRANE
HOOKS
AND
SPREADER
BARS
TO
REST
ON
THE
ROOF
OF
THE
UNIT
.
CAUTION
Remove spreader bars, lifting cables and other rigging equipment.
ELECTRICAL WIRING
HIGH VOLTAGE!
D
ISCONNECT
ALL
POWER
BEFORE
SERVICING
OR
INSTALLING
THIS
UNIT
. M
ULTIPLE
POWER
SOURCES
MAY
BE
PRESENT
. F
AILURE
TO
DO
SO
MAY
CAUSE
PROPERTY
DAMAGE
,
PERSONAL
INJURY
OR
DEATH
.
WARNING
HIGH VOLTAGE!
T
O
AVOID
PERSONAL
INJURY
OR
DEATH
DUE
TO
ELECTRICAL
SHOCK
,
DO
NOT
TAMPER
WITH
FACTORY
WIRING
. T
HE
INTERNAL
POWER
AND
CONTROL
WIRING
OF
THESE
UNITS
ARE
FACTORY
-
INSTALLED
AND
HAVE
BEEN
THOROUGHLY
TESTED
PRIOR
TO
SHIPMENT
.
C
ONTACT
YOUR
LOCAL
REPRESENTATIVE
IF
ASSISTANCE
IS
REQUIRED
.
WARNING
 Loading...