8 MAN# 650666:A
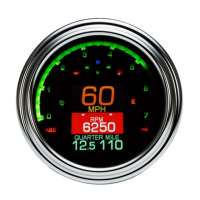
TACH Tachometer warning setup
• When “>TACH” is displayed, then press and hold the switch until “RELEASE” is displayed, and release.
• The selectable options are “INPUT”, “HIGH WARNING”, and “BACK”.
• Press and release the switch to change the selection; press and hold the switch to select it.
INPUT Signal input setup
• This may be required to be changed for some low voltage ECM tach signals.
• When “>INPUT” is displayed, press and hold the switch until “RELEASE” is displayed, release the switch.
• The selections are “CYLINDER”, “TYPE”, and “BACK”.
• Press and release the switch to change the selection: press and hold the switch to select it.
CYLINDER Cylinder count setup
▪ When “>CYLINDER” is displayed, press and hold the switch until “RELEASE” is displayed, and release.
▪ The cylinder options range from 1 to 16.
▪ Press and release the switch to change the cylinder count.
▪ Press and hold the switch until “RELEASE” is displayed, and release.
▪ Exit setup.
TYPE Signal type setup
• When “>TYPE” is displayed, press and hold the switch until “RELEASE” is displayed, and release.
• The options are “>*12V HIGH”, “5V LOW” and “BACK”.
• Press and release the switch to change the voltage input range.
• Press and hold the switch until “RELEASE” is displayed, and release.
• Exit setup.
High warning (shift light) setup
• When “>HIGH WARNING” is displayed, press and hold the switch until “RELEASE” is displayed, and release.
• The display will show the current high RPM warning with a *.
• The default is 5,500 RPMs but is selectable from 2,200 to 8,200 RPMs.
• Press and release the switch to change the RPM warning point.
• Press and hold the switch until “RELEASE” is displayed, and release.
• Exit setup.
TEMP temperature unit setup menu
• For use with MBM-17 module and optional ambient temp sender.
• When “>TEMP” is displayed, press and hold the switch until “RELEASE” is displayed, and release.
• The options are “F”, “C” or “BACK”.
• Press and release the switch to change the selection between “F” or “C”.
• Press and hold the switch until “RELEASE” is displayed, and release.
VOLT Low voltage warning setup
• When “>VOLT” is displayed, press and hold the switch until “RELEASE” is displayed, and release.
• The low voltage warning points will range from 9.0 to 12.1 volts.
• Press and release the switch to change the low voltage warning point.
• Press and hold the switch until “RELEASE” is displayed, and release.
• Exit setup.