Do you have a question about the Danfoss RAS-C2 Combi and is the answer not in the manual?
Details the bi-directional valve's installation options and the process for selecting flow direction to prevent water hammer.
Provides guidance on resolving water hammer by adjusting the valve's setting ring.
Step-by-step instructions for correctly attaching the thermostat sensor to the radiator valve.
Procedure for safely detaching the thermostat sensor from the valve using the locking mechanism.
Explains how to set the desired room temperature by turning the thermostat head.
Advises on not covering the thermostat and details the positive shut-off feature for maintenance.
Provides details about the lockshield valve (type RLV-D) and its associated product codes.
Explains the function of TRVs in regulating room temperature and how they interact with heating systems.
The Danfoss Radiator Thermostat RAS-C2 Combi is a device designed to regulate the temperature of a room by controlling the flow of water through a radiator. It features a bi-directional valve with a flow-selectable feature, allowing for flexible installation and optimization of heating performance.
The primary function of the RAS-C2 Combi is to sense the air temperature around it and regulate the flow of water through the radiator to which it is fitted. This allows for individual room temperature control, contributing to energy saving and comfort. The valve is bi-directional, meaning it can be installed in either the flow or return pipe of a heating system, horizontally or vertically. A key feature is its ability to select the flow direction, which helps to eliminate the risk of water hammer – a common issue in heating systems that can cause noise and potential damage.
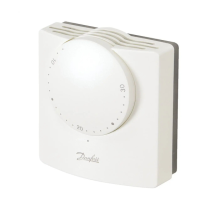
The thermostat head, which is fitted to the valve, allows users to set their desired room temperature. The settings range from frost protection (*) to various temperature levels (II, III, 8, 12, 16, 20, 24 °C), with specific markings for common room types like bedroom, living room, and bathroom. The device also includes a "Positive SHUT-OFF" feature, allowing the water flow to be completely shut off by turning the head past the frost protection setting to "0". This is useful for maintenance, such as draining and removing the radiator.
Installation of the Valve: The valve itself is designed for flexible installation. It can be installed horizontally or vertically in either the flow or return pipe. To prevent water hammer, the built-in flow direction selection feature can be utilized. If water hammer is encountered after installation, the setting ring on the valve can be turned to the other setting to adjust the flow direction without needing to remove the valve. For initial system commissioning, the flow direction through each valve can be established by following a simple procedure:
Fitting the Sensor (Thermostat Head):
Setting Room Temperature: The desired room temperature is set by turning the thermostat head. The markings on the head correspond to approximate temperatures, ranging from frost protection to 24°C. Turning the TRV to a higher setting will not make the room heat up faster; the speed depends on the boiler and radiator size. Similarly, a lower setting will result in a lower controlled temperature and save energy.
Important Considerations for Usage:
Troubleshooting Water Hammer: If water hammer is encountered after installation, the setting ring on the valve can be turned to the other setting to adjust the flow direction. This can be done without removing the valve, making troubleshooting straightforward.
Removing the Sensor: To remove the sensor, turn it to its maximum position. Then, turn the union nut anti-clockwise to release the locking mechanism. The sensor can then be separated from the valve. This allows for easy replacement or temporary removal if needed.
Draining the Radiator: The "Positive SHUT-OFF" feature allows the water flow to be completely shut off by turning the thermostat head to the "0" setting. If the lockshield valve is also shut off, the radiator can be drained and removed for maintenance or decoration purposes, simplifying tasks that require the radiator to be isolated from the heating system.
The Danfoss Radiator Thermostat RAS-C2 Combi is designed for user-friendly installation, operation, and maintenance, providing effective and efficient room temperature control while addressing common heating system issues like water hammer.
| Type | Radiator Thermostat |
|---|---|
| Connection Size | 1/2 inch |
| Frost Protection | Yes |
| Color | White |
| Hysteresis | 0.5°C |
| Approvals | EN215 |
| Temperature Range | 8 - 28 °C |
| Sensor Type | Liquid |