20
Installer menu / installer mode, continued
If Pre-/aftercooling coils are installed they are controlled by the same setpoints and
control strategy as the built
-in BYPASS-COOLING function. I.e. Pre-/aftercooling and
bypass are always switched on at the same time.
If Aftercooling is installed it will be used together with “cooling recovery mode” if the
outdoor temper
ature (T1) is higher than the extract air temperature (T3).
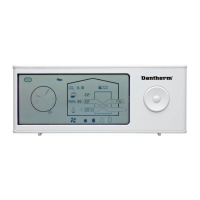
The setpoint for AUTOMATIC BYPASS-COOLING can be adjusted as follows:
Press RIGHT for 10 sec., until the installer menu is active (the ventilation
unit icon is flashing)
Press RIGHT until the BYPASS-COOLING icon (parallel air channels on the
display) flashes slowly.
NB. The display shows the actual temperatures in all fields.
Press CENTER and the actual setpoints for BYPASS-COOLING are shown on
the T1 and T3 places.
Press CENTER and the setpoint for T1/SET bypass Tmin will flash quickly,
together with the icons for pre-/aftercoolers if any is installed.
Press UP/DOWN to change the setpoint for T1/ SET bypass Tmin, and con-
firm by pressing CENTER.
The setpoint for T3/Bypass Tmax will now flash quickly together with the
icons for pre-/aftercoolers if any is installed. If going lower than 18°C the
Press UP/DOWN to change the setpoint for T3/ SET bypass Tmax and con-
firm by pressing CENTER. If set point is set to “OF” the BYPASS-COOLING
permanent switched off.
Press RIGHT for 10 sec. until the installer menu closes (the ventilation unit
icon stops flashing)
Setpoints and factory settings are as follows:
AUTO Demand-control (RH%)
Bypass Tmin
(Outdoor temperature (T1))
Bypass Tmax
Extract air temperature (T3)
Afterheater (Electrical or water based)
Supply air temperature (T2)
Extract air temperature (T3)
Back to factory set-
tings
When the INSTALLER MENU is active the unit can be set “BACK TO FACTORY SETTING” by
pressing UP and CENTER simultaneously for 10 sec. , until all icons are flashing

 Loading...