EasyManua.ls Logo

Dee Zee DZ 43200 User Manual

Dee Zee DZ 43200
2 pages
To Next Page IconTo Next Page
Page #1 background imageLoading...
Page #1 background image
PARTS LIST:
ITEM
QTY
THREAD LOCK TUBE 1
SHOCK 1
BALL MOUNT PLATE 1
NUTSERT TOOL 1
BALL MOUNT 1
NUTSERT 1
TORX WRENCH 1
TOOLS REQUIRED:
T-50 TORX
M5 ALLEN WRENCH
TAPE MEASURE
10MM WRENCH
13MM WRENCH
DZ 43200
FORD F-150 2004-2011
13MM WRENCH
STEP 1)
STEP 2)
STEP 3)
Adjust the nutsert tool so
Using a M5 Allen wrench and
Mark one side of the nut and
Apply thread lock to the threads
there is 3/4" from the washer
a 10mm wrench, install the
count the number of revolutions
of the ball mount.
to the head of the bolt.
nutsert in the opening by the
to insure the correct number
Install the ball mount into the
tailgate pivot point.
of full turns.
nutsert using a 13mm
Overtightening the nutsert
wrench/socket.
can strip the threads and cause
the nutsert to be unusable.
Remove the nutsert tool
when installation is complete.
The nutsert should NOT be
tightened any more than 9
360 degree turns.
Question and Answer IconNeed help?

Do you have a question about the Dee Zee DZ 43200 and is the answer not in the manual?

Dee Zee DZ 43200 Specifications

General IconGeneral
MaterialAluminum
Model NumberDZ 43200
ColorSilver
AdjustableNo
CompatibilityUniversal
InstallationBolt-on
Weight Capacity500 lbs

Summary

Installation Steps

Step 1: Prepare Nutsert Tool

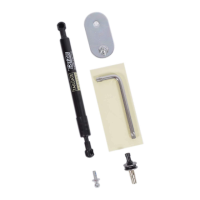
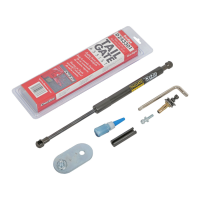
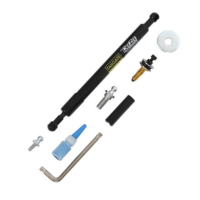
Adjust the nutsert tool to set 3/4" from washer to bolt head for proper nutsert installation.

Step 2: Install Nutsert

Use M5 Allen wrench and 10mm wrench to install nutsert into tailgate pivot point opening.

Step 3: Attach Ball Mount

Apply thread lock to ball mount threads and install into nutsert using 13mm wrench/socket.

Step 4: Remove Cable Bolt

Use T50 torx socket to remove tailgate cable bolt and detach tailgate cable.

Step 5: Reinstall Bolt

Install the removed bolt through the ball mount plate hole back into the vehicle.

Step 6: Attach Shock to Bolt

Install cable back onto bolt, and larger shock part onto ball mount.

Step 7: Attach Shock to Ball Mount

Install the narrow end of the shock onto the previously installed ball mount.

Related product manuals