Need Help? Visit DefenderCameras.com/support
8
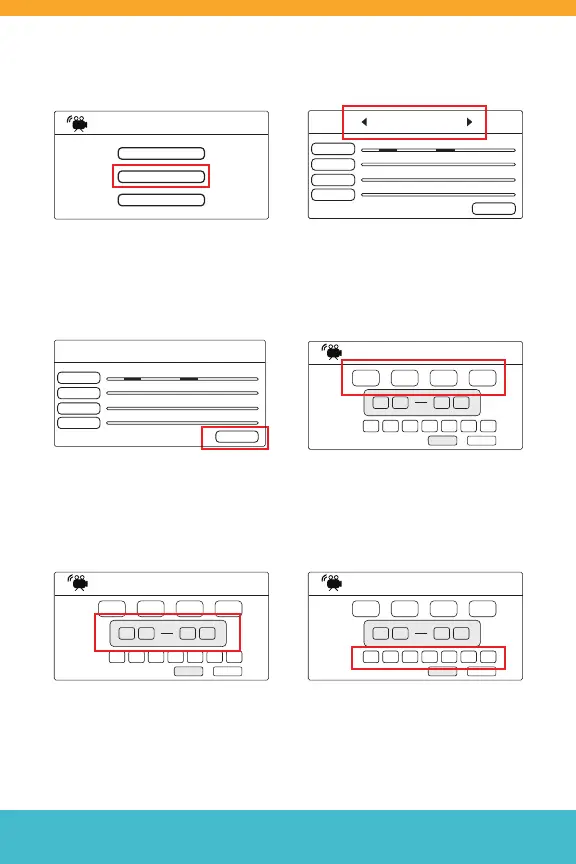
Setting up a Recording Schedule
Step 1: Press the Menu Button,
then select “Record.” Navigate
to “Schedule Recording” to
begin schedule setup.
Step 3: To modify schedule for
a particular day, navigate to
“Modify”
Step 5: Then, use the keypad to
set the recording window for
scheduled recordings.
Step 2: Use the Left and Right
Buttons on the keypad to shue
through days of the week to view
a camera-based daily schedule.
Step 4: Use the Left and Right
Buttons to cycle through cameras.
Select the camera(s) you would like
to apply a recording period to.
Step 6: Finally, use the Left and
Right Buttons to cycle and select
days of the week you would like
to apply the recording window to.
Recording
Duration
Schedule Recording
File Overwrite
Camera 1
Camera 2
Camera 3
Camera 4
Modify
Monday
0 2 4 6 8 10 12 14 16 18 20 22 2 4
Camera 1
Camera 2
Camera 3
Camera 4
Modify
Monday
0 2 4 6 8 10 12 14 16 18 20 22 2 4
Cam 1C am 2C am 3C am 4
Schedule Recording
Delete
SATFRITHUWEDTUE
0 00 0 0 0 0 0
MONSUN
Save
Cam 1C am 2C am 3C am 4
Schedule Recording
Delete
SATFRITHUWEDTUE
0 00 0 0 0 0 0
MONSUN
Save
Cam 1C am 2C am 3C am 4
Schedule Recording
Delete
SATFRITHUWEDTUE
0 00 0 0 0 0 0
MONSUN
Save