Adding and Replacing Parts 111
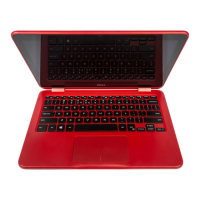
9 Insert the four securing tabs on the keyboard into their respective slots
in the palm rest, and lower the keyboard into the bottom case.
Ensure that all four securing tabs are engaged before trying to
completely seat the keyboard.
10 Replace the four keyboard screws.
11 Replace the hinge cover.
interface connector
keyboard connector
screws
securing tabs (4)
 Loading...