Page 6
Hotshot Gas Fireplace Insert
P/N XG0511
Installation
Step 2. Install the Lower Louvre Assembly
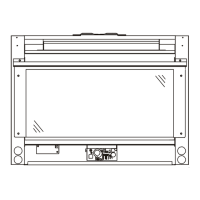
Position the Lower Louvre Assembly as shown in Figure 7.
Line up the screw holes on the hinge with the pilot holes on the
front of the fireplace and attach using three screws. The lower
louvres should rotate freely, allowing easy access to the
Hotshot's control compartment.
Step 4. Install the Upper Louvre Assembly
Position the Upper Louvre Assembly as shown in Figure 9.
Line up the screw holes on the louvres with the pilot holes on
the fireplace and attach using two screws.
NOTE: Remove the protective plastic coating from the louvres and
trim before lighting the appliance. Failure to do so will result
in permanent damage to the metal's surface.
Step 3. Install the Face Plate Trim
n 3a. Assembly
To assemble the face plate trim, slide the top end of the 2 side
rails into the slots on the underside of the top rail. Crimp 'tab A'
over the side rail until tight. See figure 8a. This will hold the
side rails and top rail in place while installing into the fireplace.
NOTE: When crimping point A over with pliers, cover brass with a
soft cloth to ensure brass does not become scratched.
Figure 8a. Assembling the face plate trim.
Tab A
Top rail
Side rail
n 3b. Installation
Slide the face plate trim onto the fireplace. The trim should
slide in easily between the face plate and the lower louvres and
the hood. Refer to figure 8b. Ensure that the pilot holes in the
trim line up with the pilot holes in the face plate.
Install two screws into the pilot holes in the top rail, and one
screw into each of the side rails, as shown in figure 8b.
To remove face plate or face plate trims simply reverse above
procedures.
Figure 8b. Installng the trim.
Figure 7. Installing the lower louvres.
Figure 9. Installing the upper louvres.