3
72677 Rev. B
1
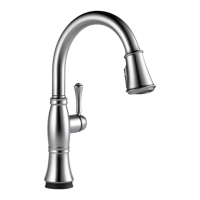
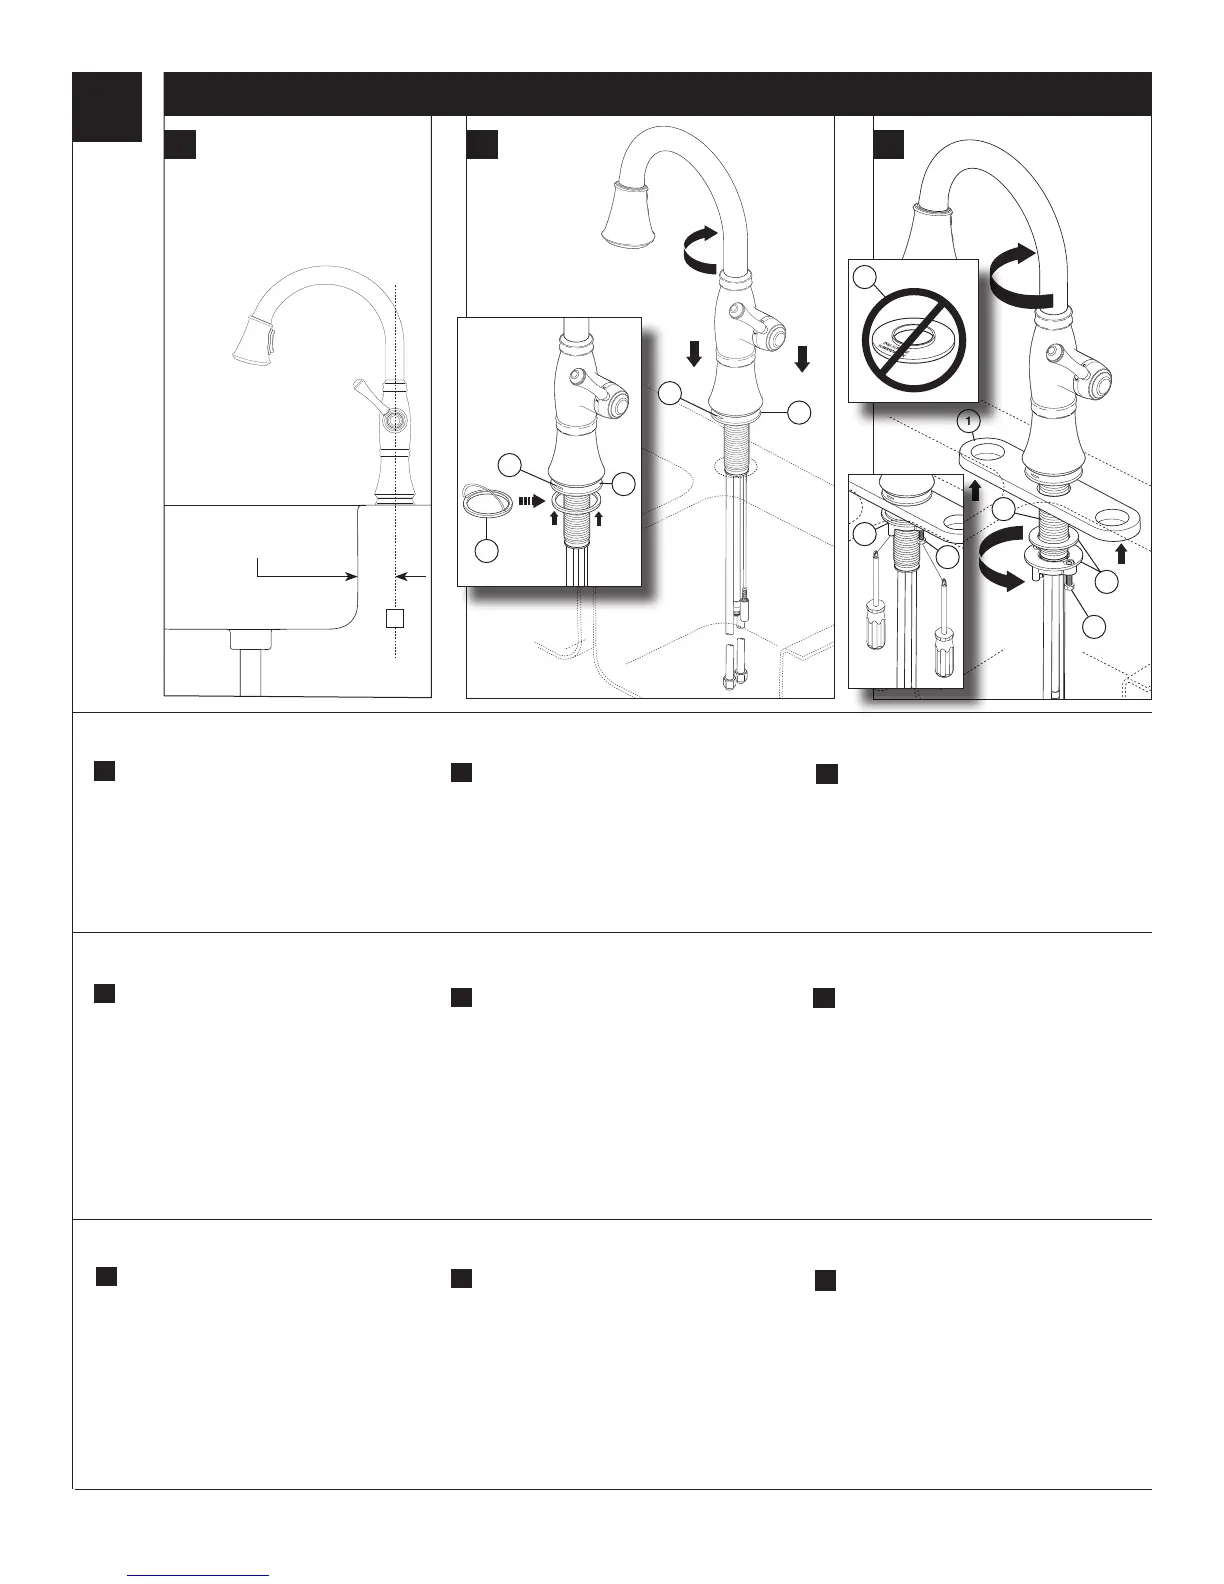
Faucet Installation For Top Mount Sinks
A.
Yourfaucetisdesignedforaholediameterof
13/8"+/-1/8"(35mm+/-3mm)andadeck
thicknessofupto23/4"(69.8mm).Theminimum
distancefromthecenterline(A)tothesink
bowlis11/4". Note: With 10 1/2" escutcheon,
maximum deck thickness is reduced to 2 1/4"
(57.1 mm).
A.
Monter le robinet sur la plage
Instale la Llave de Agua / Grifo en el Borde del Fregadero
A
A.
Su llave de agua está diseñada para un agujero
de13/8"+/-1/8"(35mm+/-3mm)ygrosor
de la superficie de instalación o encimera hasta
23/4"(69,8mm).Ladistanciamínimadesde
lalíneacentral(A)alfregaderoolapalangana
deéstees11/4".Nota: Con una chapa de
cubierta o chapetón de 10 1/2", el grosor
máximo de la encimera se reduce a 2 1/4"
(57,1 mm).
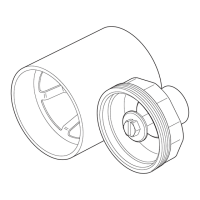
C.
Instalelaplacadeaislamiento(1)enlaespiga
demontaje(2).Fijelallavedeaguaconla
arandelaytuercademontaje(3).Aprietela
tuercaconlamano.Conundestornillador
Phillips,aprietelostornillos(4).Esimportante
asegurarsequelaespigadelsurtidor(2)nohaga
contacto con el fregadero de metal. El separador
aisladorblanco(5)seutilizaconmonturainterior
solamente.
B.
CIERRE LOS SUMINISTROS DE AGUA. Quite
elpapelprotectordelempaque(1)ypresione
ensulugarenlabase(2).Asegurándosequeel
indicadorluminoso(3)seencuentraenelfrente,
inserte los tubos a través del orificio de montaje
en el fregadero y centralice la llave de agua en
su sitio, sobre el agujero. SUGERENCIA: Gire
el tubo del surtidor hacia el lado opuesto de la
manija para balancear el ensamble cuando hace
la instalación.
A.
Votrerobinetestconçupouruntroud’un
diamètrede13/8po+/-1/8po(35mm+/-3
mm)etunesurfaced’uneépaisseurd’auplus2
3/4po(69,8mm).Ladistanceminimaleentrela
lignecentrale(A)etlacuvettedel’évierestde
11/4po.Note : Si vous utilisez la plaque de
finition de 10 1/2 po, l’épaisseur de la surface
ne doit pas dépasser 2 1/4 po (57,1 mm).
C.
Placezlaplaqueisolante(1)surlemanchonde
montage(2).Fixezlerobinetaveclarondelleet
l’écroudemontage(3).Serrezl’écrouàlamain
solidement.Àl’aided’untournevisPhillips,serrez
lesvisdeblocage(4).Sil’évierestenmétal,le
manchondubec(2)nedoitabsolumentpasy
toucher.Laplaqueisolante(5)doitêtreutilisée
uniquement si l’évier s’appuie sous la surface.
B.
FERMEZ LES ROBINETS D'ARRÊT. Enlevez la
pellicule qui recouvre la surface adhésive du joint
(1)etcollezlejointsurlabase(2)enexerçant
unepression.Assurez-vousquelevoyant(3)est
situéenavant.Introduisezlestubesdansletrou
de montage de l’évier et centrez le robinet sur
le trou. CONSEIL : Tournez le tube du bec pour
l'amener du côté opposé à celui de la manette afin
d'équilibrer le robinet pour le montage.
11/4"Min.FromCenterLine
ToSinkBowl.
11/4"Mínimo.Delalíneade
centro para hundir el tazón de
fuente.
11/4";Minimal.Delaligne
centrale pour descendre la
cuvette.
B. C.
1
2
3
4
C.
Installtheisolationplate(1)ontomountingshank
(2).Securefaucetwithwasherandmounting
nut(3).Tightennutsecurelybyhand.Usinga
Phillipsscrewdriver,tightenlockingscrews(4).It is
importanttoensurethespoutshank(2)doesnot
contactthemetalsink.Thewhiteisolationspacer
(5)isused with undermount only.
B.
SHUT OFF WATER SUPPLIES. Remove adhesive
backingfromgasket(1)andpressintoplaceonto
base(2).Makingsuretheindicatorlight(3)is
located in front, insert tubes through mounting hole
insinkandcenterfaucetinpositionoverhole.HINT:
Turn the spout tube opposite the handle to balance
the assembly when mounting.
Top Mount Sinks / Instalación por Encima / Bâti supérieur
4
4
5
2
3
1
3
2
 Loading...