Making Adjustments / Installation et Directives
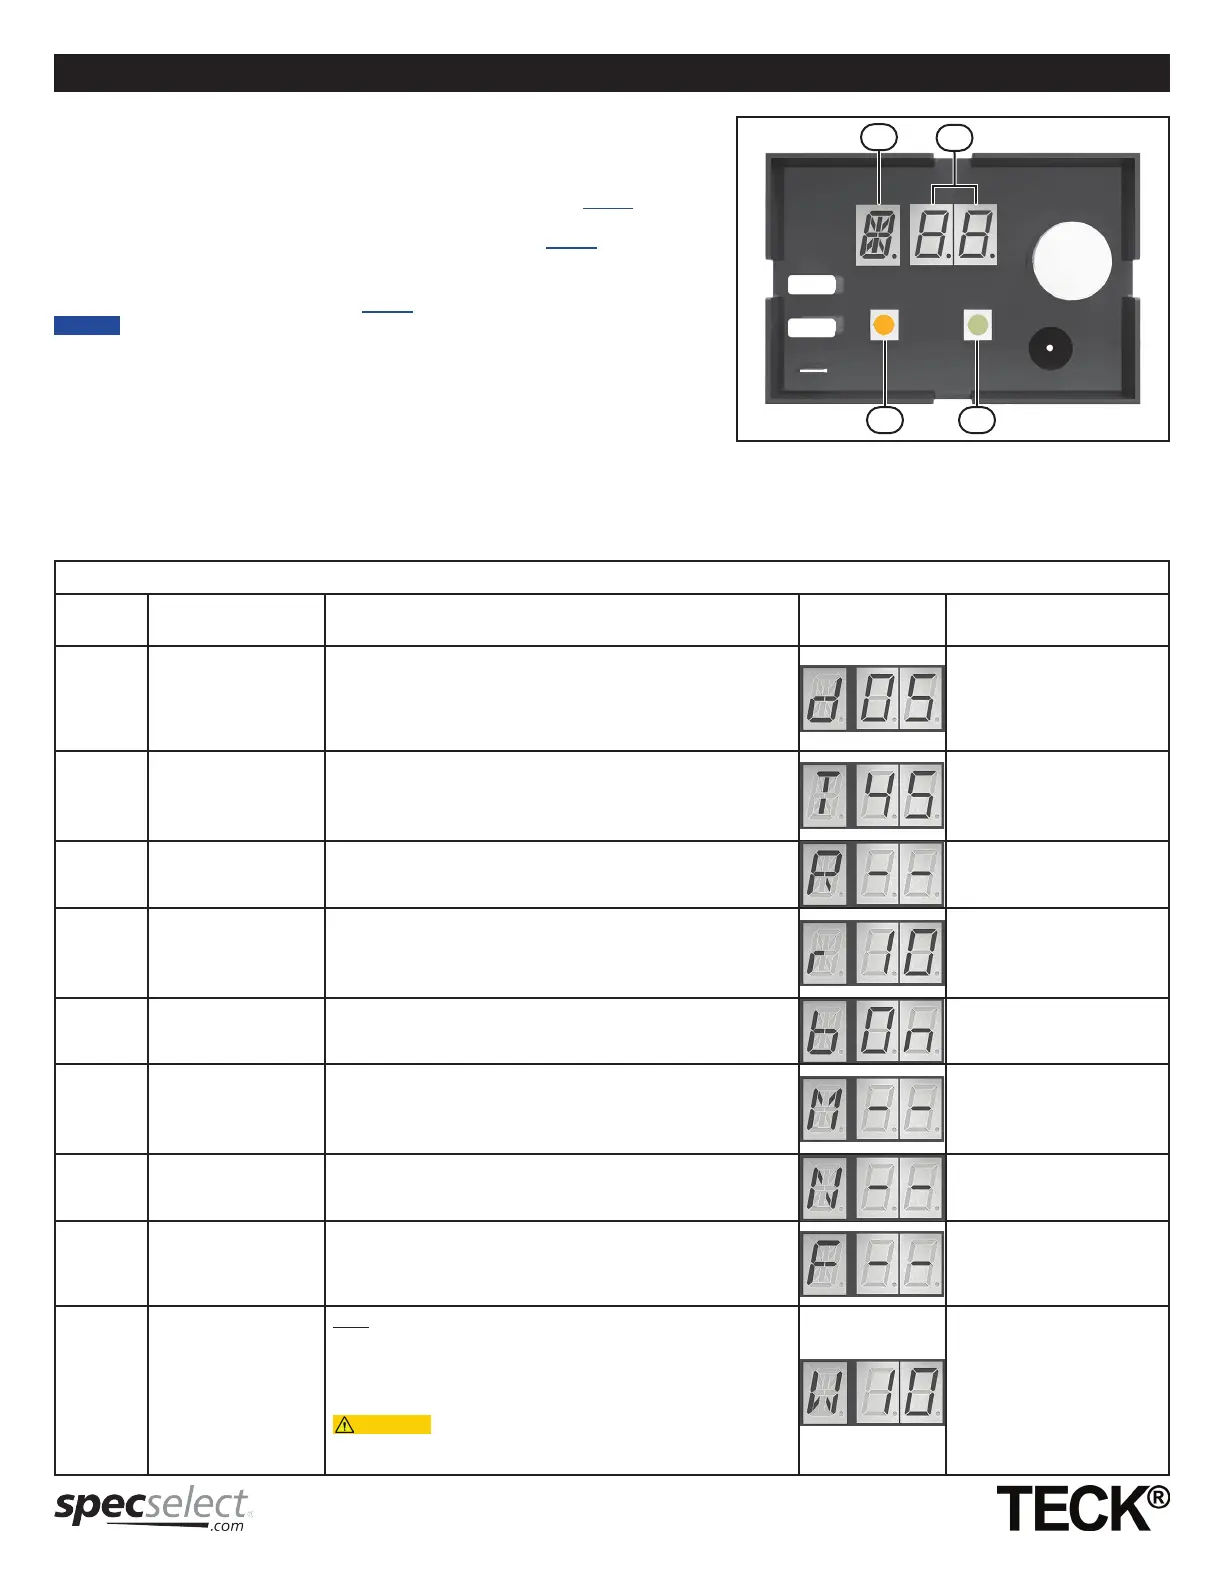
ADJUSTING SETTINGS (see Figure 6)
1. Press and hold the Mode button (MB) until the function symbol (FS)appears.
2. Once in the adjustment mode, keep pressing Mode button (MB) until desired function
setting (FC) is reached (see “Driver Board Quick Reference Chart” on page 8).
3. To change function code, press and release Toggle button (TB) until desired function
setting is reached (see “Driver Board Quick Reference Chart” on page 8).
4. After changes are complete allow the driver board display to turn off.
5. Disconnect the power from the driver board for 10 seconds and then reconnect to restart
the faucet, (see G1 and F, Figure 4 on page 6).
Driver board will leave Adjustment Mode after 10 seconds of inactivity and reset to
previous settings.
FACTORY RESET
1. Press and hold the Mode button (MB) until the function symbol appears (refer to ‘Driver
Board Quick Reference Chart’ below).
2. Once in the adjustment mode, press and release the Mode button (MB) until “F--” symbol
is reached
3. To reset factory default settings, press and hold Toggle button (TB) until the “dEF” is displayed (approximiately 5 seconds). Release the Toggle button (TB).
4. After approximately 2-second display of “dEF”, software reset will be conducted, and the faucet will restart.
5. The functions d, T, R, b and W will be reset to the factory default settings as stated in the ‘Driver Board Quick Reference Chart’ below.
Driver Board Quick Reference Chart
Function
Symbol
Function Description Factory Default
Setting
Function Code
d
Sensor
Sensitivity
Higher numbers represent a more sensitive configuration.
Higher sensitivity will increase the distance at which the user is
detected. The sensitivity settings are on a 10 point scale (1 - 10).
Please note that these setting values are relative values and do
not correspond to a particular distance.
1 to 10
T
Auto Timer
(faucet shut-off)
Auto Timer is a safety mode in the event the sensor continually
senses a target. In this case, the faucet will stop after the
predetermined time period expires.
5, 7, 10, 12, 15, 30, 45, 60,
75, 90 seconds
2.0, 3.0, 4.0, 5.0, 6.0, 7.0,
8.0, 9.0, 9.9 minutes
R Rinse Cycle
This feature is meant to purge stagnant water from supply lines.
The faucet will turn on after the set amount of hours of inactivity
and run the set Rinse Time (r) (see below).
-- (OFF), 6, 12, 18, 24, 30,
36, 42, 48 hours
r
Rinse Time
This feature is only
active if Rinse Cycle
(R) time is chosen.
The setting determines how long the faucet will turn on during
the Rinse Cycle (R).
10, 20, 30, 40, 50, 60, 90
seconds
2.0, 2.5, 3.0 minutes
b Buzzer
For Proximity, the buzzer setting does not silence the controller
and sensor status sounds. Buzzer options are ON and - (OFF),
the default setting is ON.
ON, - (OFF)
M Metering Mode
This feature changes the product into a metering faucet; it will
run the full set amount of time after the user’s hands are first
detected.
Auto Timer (T) is disabled when the feature is turned on.
-- (OFF), 7, 8, 9, 10, 11, 12,
13, 14, 15, 18, 24, 30, 40, 50,
60, 90 seconds
2.0, 2.5, 3.0, 3.5, 4.0 minutes
N
Signal diagnosis value
(only for sensor 20 or
above)
This feature is used for Delta technical service NA
F Factory default setting
This feature resets specific functions to factory default setting.
The specific reset functions are listed as d, T, R, b and W. Each
setting value refers to default setting in the column of Factory
Default Setting in this table
NA
W Water Run-on
Only adjust this setting if you are experiencing run on times of
greater than 2 seconds.
To reduce run on time, increment the setting from 10 to 20
and retest for a run on condition. Repeat from 20 to 30 etc. if
necessary.
Over adjustment of this setting can lead to a faucet
that is too sensitive and shuts off unexpectantly during hand
washing.
10, 20, 30, 40, 50, 60, 70,
80, 90, 1.0 (100)
FC
FS
MB TB
Figure 6
Page - 8 of 19
214188 Rev. A