5
WARNING: If the vena cava diameter is greater than 28mm, do not deploy the DENALI
®
Filter.
WARNING: If large thrombus is present at the initial delivery site, do not attempt to deliver the filter.
Migration of the clot and/or filter may occur. Select an alternate site to deliver the filter. A small thrombus
could be bypassed by the guidewire and introducer sheath.
13. Disconnect the dilator from the sheath, and remove the dilator, leaving the 8.4 French introducer sheath with its
tip in the inferior vena cava.
14. Aspirate from the introducer side port to remove any potential air.
15. Flush the introducer sheath intermittently by hand to maintain introducer sheath patency. Maintaining patency
helps prevent clot from interfering with filter deployment.
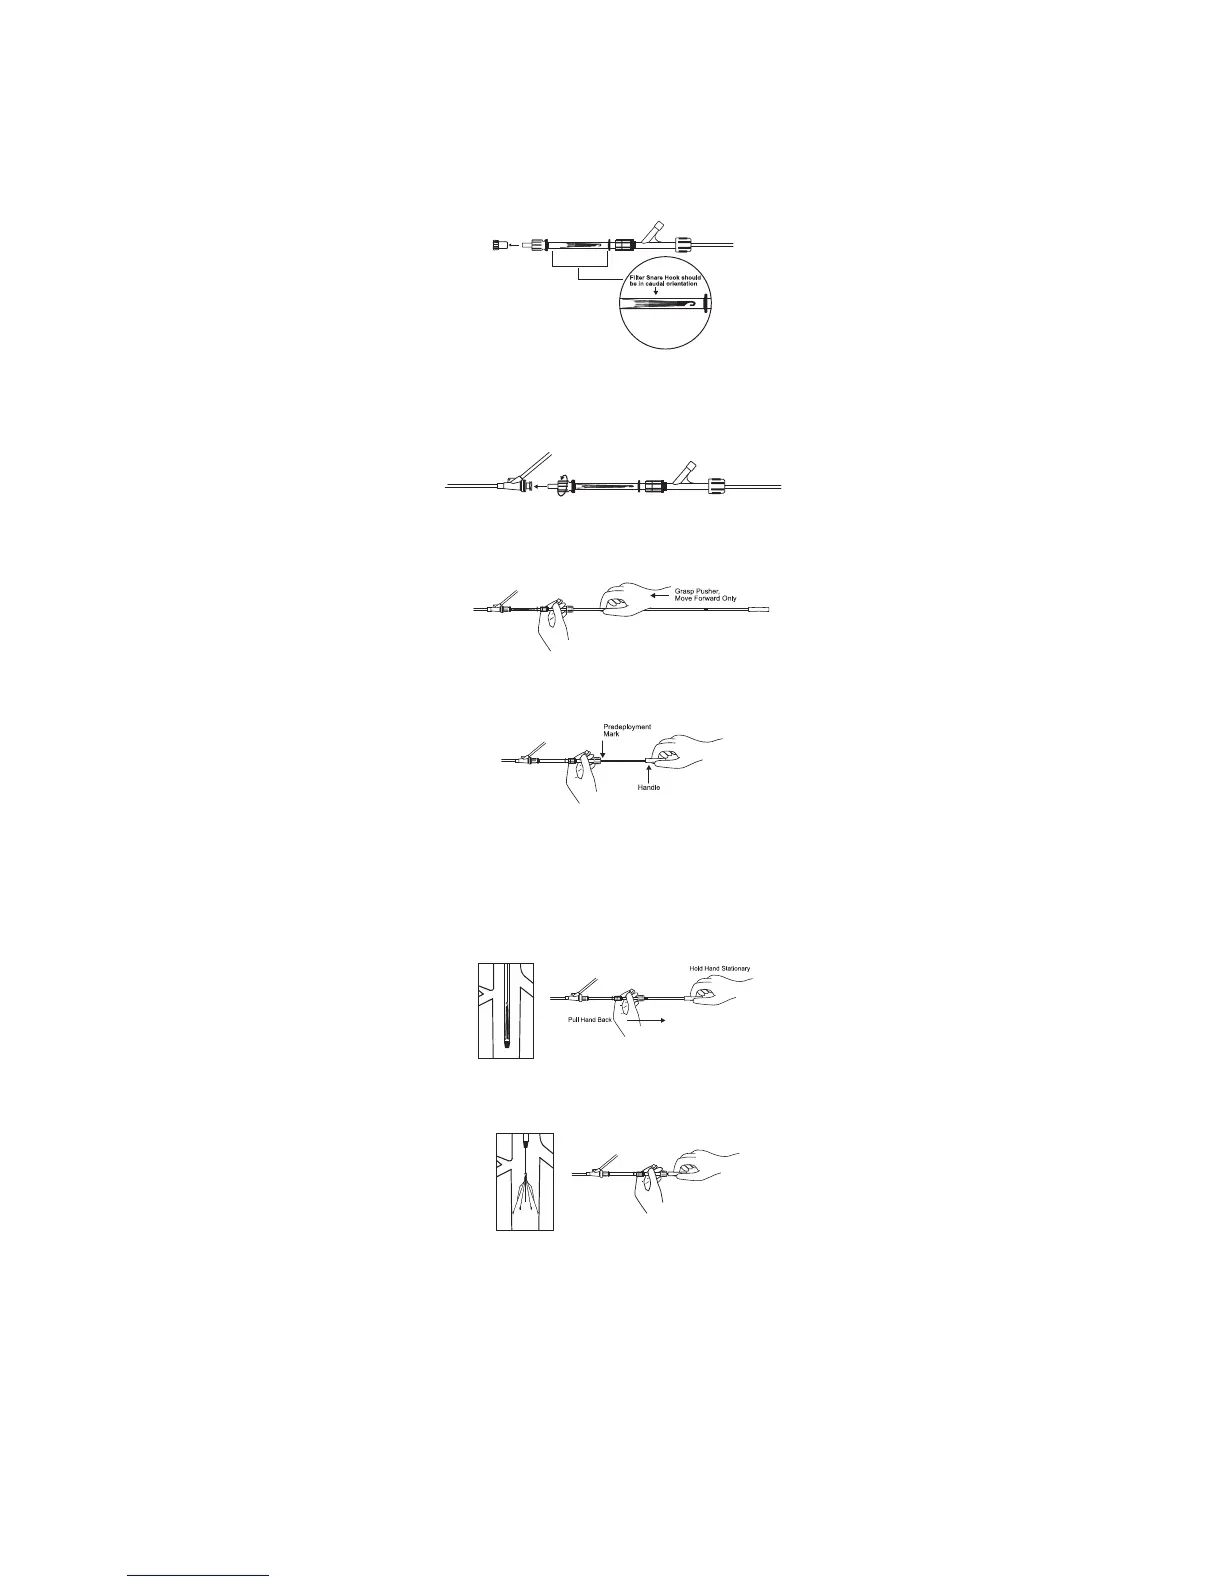
16. Remove the delivery system containing the device from the package and remove the red safety cap (Reference
Figure 4).
Note: Not all pusher assembly components are shown in Figures 4-9.
Figure 4: Safety Cap Removal
17. Flush the delivery device with saline through the Touhy-Borst adapter.
PRECAUTION: It is very important to maintain introducer patency with a saline flush to prevent occlusion
of the introducer which may interfere with delivery device advancement.
18. Attach the free end of the filter storage tube directly to the introducer sheath already in the vein. The introducer
sheath and filter delivery system should be held in a straight line to minimize friction.
Figure 5: Attachment to Introducer Sheath
PRECAUTION: Care should be taken to ensure the connection between the introducer hub and the filter
storage tube is tight; however, the use of excessive force which can cause slippage of the threads and/or
breakage of the hub should be avoided.
19. Loosen the proximal end of the Touhy-Borst adapter and advance the filter by moving the pusher forward
through the introducer sheath. Do not twist or retract the pusher at anytime during the procedure.
Figure 6: Advancement of Filter
20. Advance until the black predeployment mark on the pusher is flush with the proximal end of the Touhy-Borst
adapter. The black predeployment mark on the pusher provides a visual cue indicating that the filter is near the
end of the sheath.
Figure 7: Advancement to Proximal End of Adapter
21. Prior to deployment, verify the location of the filter within the sheath using fluoroscopy and confirm that the filter
snare hook is 1cm below the lowest renal or is in the intended location in the inferior vena cava.
22. Deliver and release filter as described in Step 22. A-C:
A. Firmly grasp the pusher handle. Keep this hand stationary throughout the entire filter release/deployment
process. The filter should be positioned at the distal end of the introducer sheath.
B. Under fluorscopic guidance, hold the pusher handle stationary (it is recommended to stabilize the hand on a
stationary object such as a table), and with the other hand draw the Touhy-Borst adapter, storage tube, and
introducer sheath assembly back all the way to the handle, unsheathing and releasing the filter. Ensure that
there is no slack or bend in the system during the filter release/deployment process.
Note: The assembly should be retracted in one smooth, continuous motion.
Figure 8: Unsheathing of Filter
PRECAUTION: Do not deliver the filter by pushing it beyond the end of the introducer sheath. To achieve
proper placement, unsheath the stationary filter. Do not twist the pusher handle at anytime during this
procedure.
Figure 9: Releasing of Filter
C. Ensure that the filter is fully deployed.
23. Under fluoroscopic guidance, carefully withdraw the distal tip of the pusher back into the storage tube by firmly
holding the Touhy-Borst Adapter, storage tube, and introducer sheath assembly and pulling back on the pusher.
Then disconnect the storage tube from the introducer sheath.
24. Resume the intermittent saline flush to maintain introducer sheath patency.
25. A venacavogram may be performed to confirm satisfactory deployment before terminating the procedure
(typically 30mL of contrast medium at 15mL/s).
PRECAUTION: Care should be taken when advancing a guidewire or imaging catheter through a filter to
prevent entanglement.
26. Remove the introducer sheath and apply routine compression over the puncture site to achieve hemostasis.
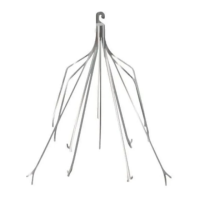
J. Optional Procedure for Filter Removal
Removal of D
ENALI
®
Filter Using an Intravascular Snare
Collect and Prepare the Following Equipment for Use:
• One intravascular snare
• Dual retrieval sheaths, 9F I.D. and 11F I.D.
• 0.035" Straight Guidewire, 110cm long or longer
• 18 gauge entry needle
• Saline
• Contrast medium
• Syringe for saline infusion
• All basic materials for venipuncture: scalpel, #11 blade, local anesthesia, drapes, etc.
• Imaging Catheter
 Loading...